
Getting Started
Thank you for choosing DayCost 2 and welcome!
Are you having trouble with:
- You don not know where to spend your own money.
- Inability to quickly understand your assets and liabilities.
- Unknowingly overspending.
- ...
DayCost 2 is a wise choice for you. in addition to solving your worries, she also allows you to collaborate with your family or friends and partners to bookkeeping, etc. more features are waiting for you to discover.
Our goal is: to first enable you to save money with DayCost 2, to grow your assets, and eventually to achieve financial freedom.
Your data is only stored on your own iPhone/iPad and iCloud servers (if "iCloud Sync" is enabled), and we don not collect any of your data.
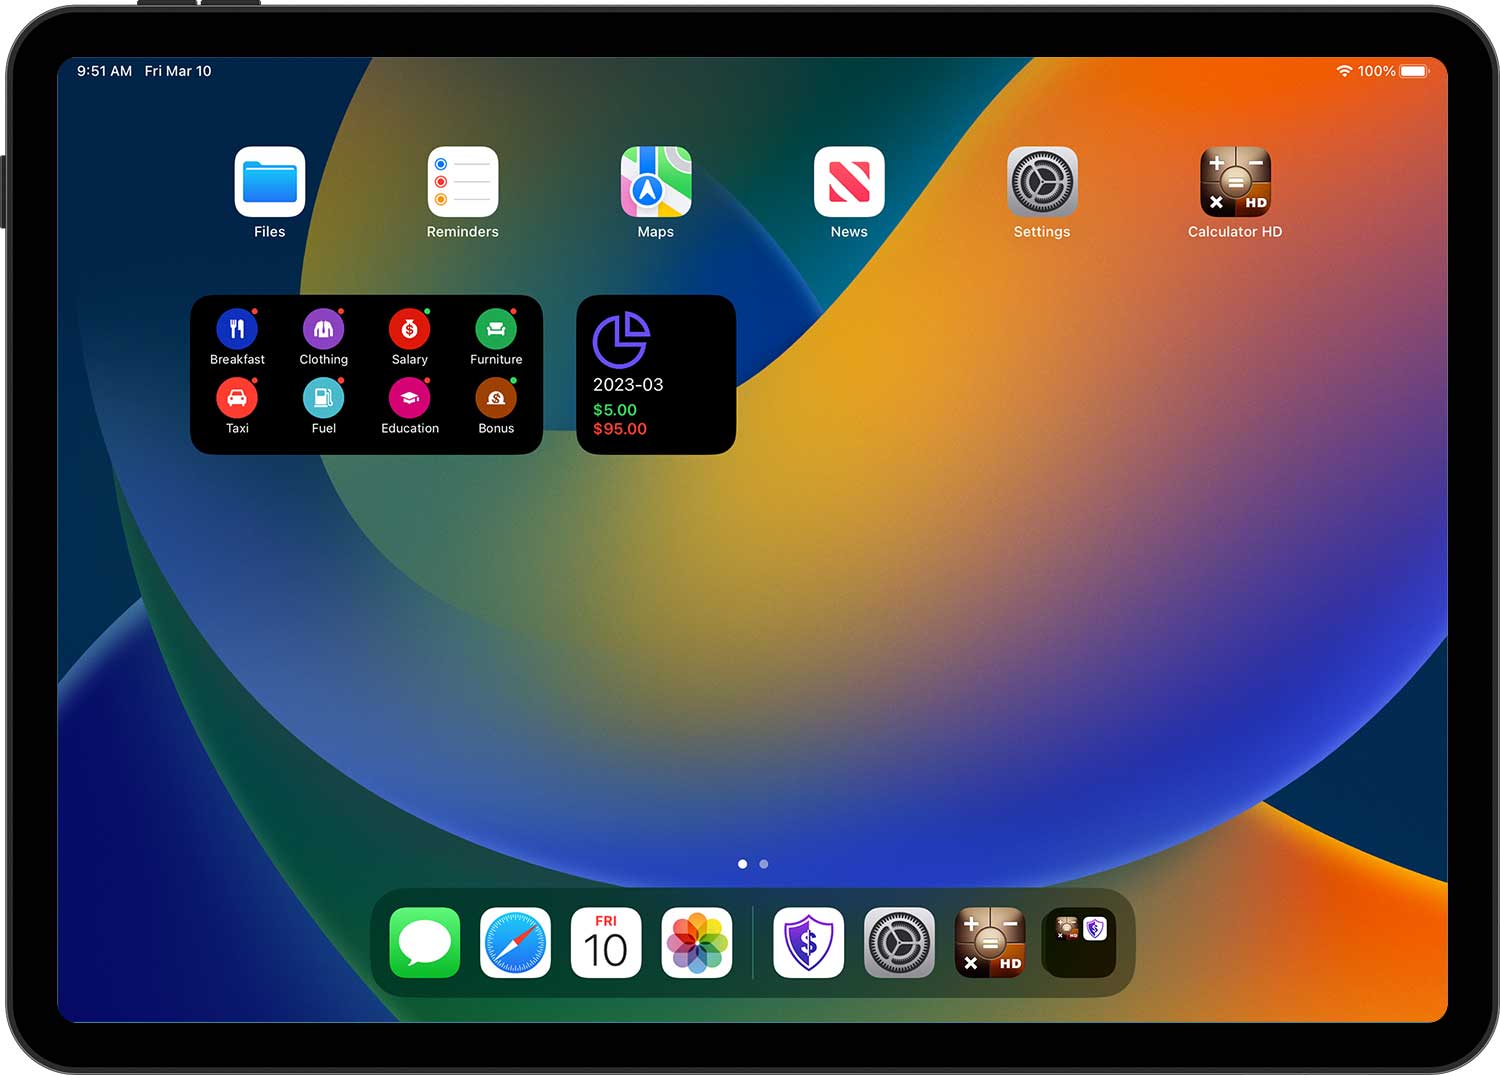
In this user manual, you will learn how to manage your personal finances with DayCost 2 in your iPhone and iPad. This manual is divided into 6 sections: Home, Accounts, Budget, Reports, Search, and Settings (Family Bookkeeping, Sync). Each of these 6 sections has a corresponding entry in the home page.
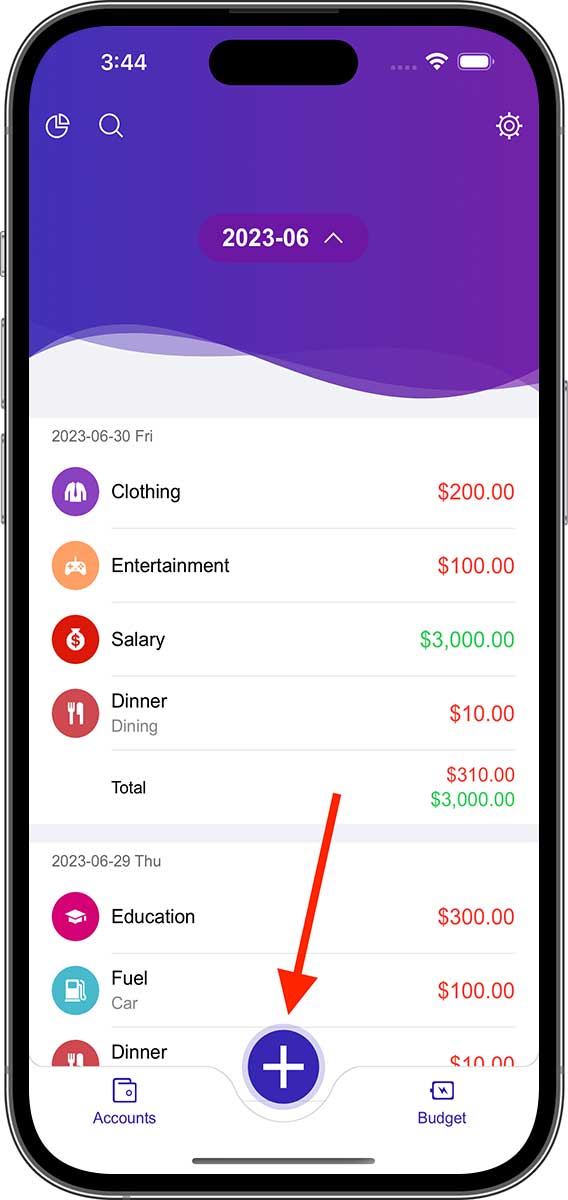
Home
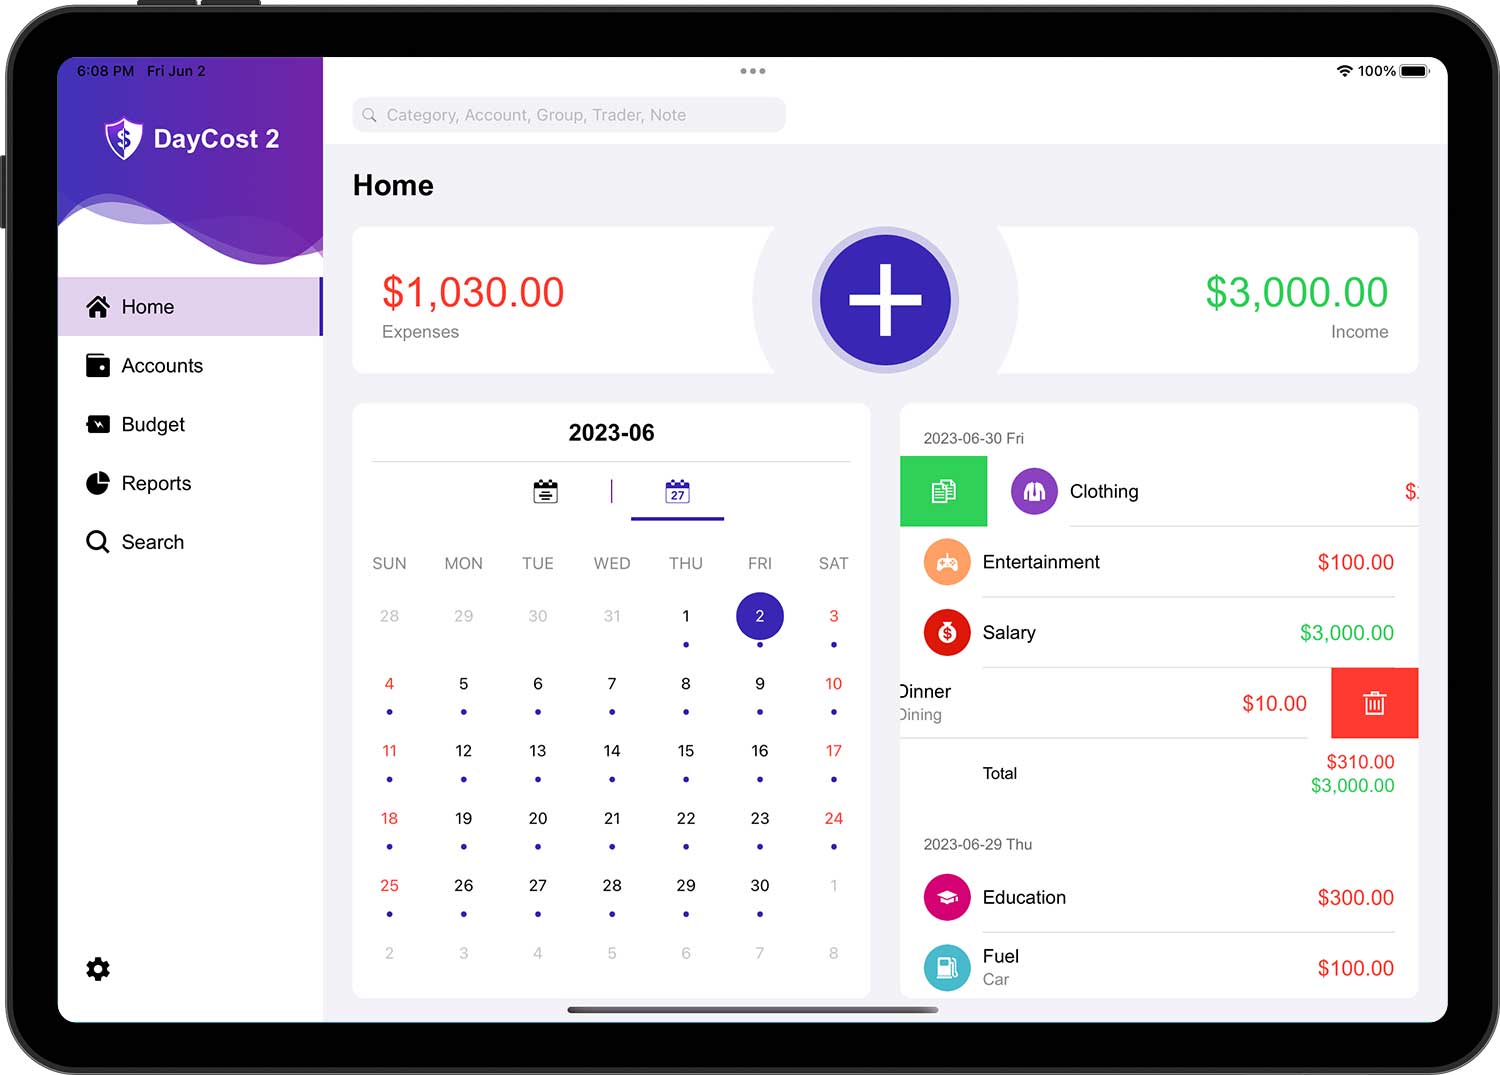
This section will let you understand how to add/modify/delete transaction data and quickly filter the transaction data by calendar for a particular month/day.
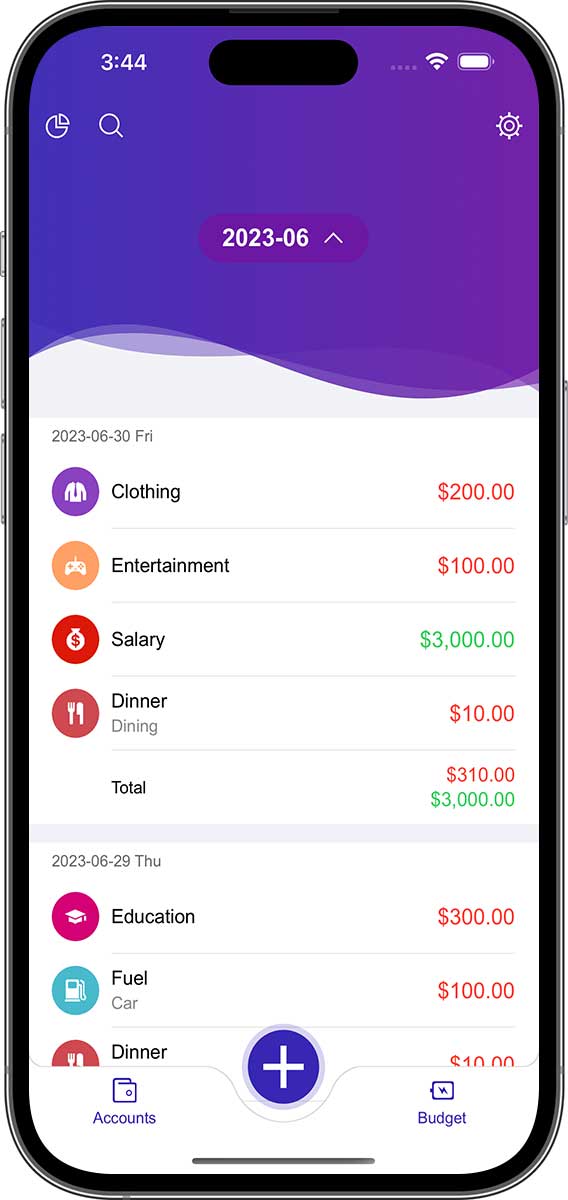
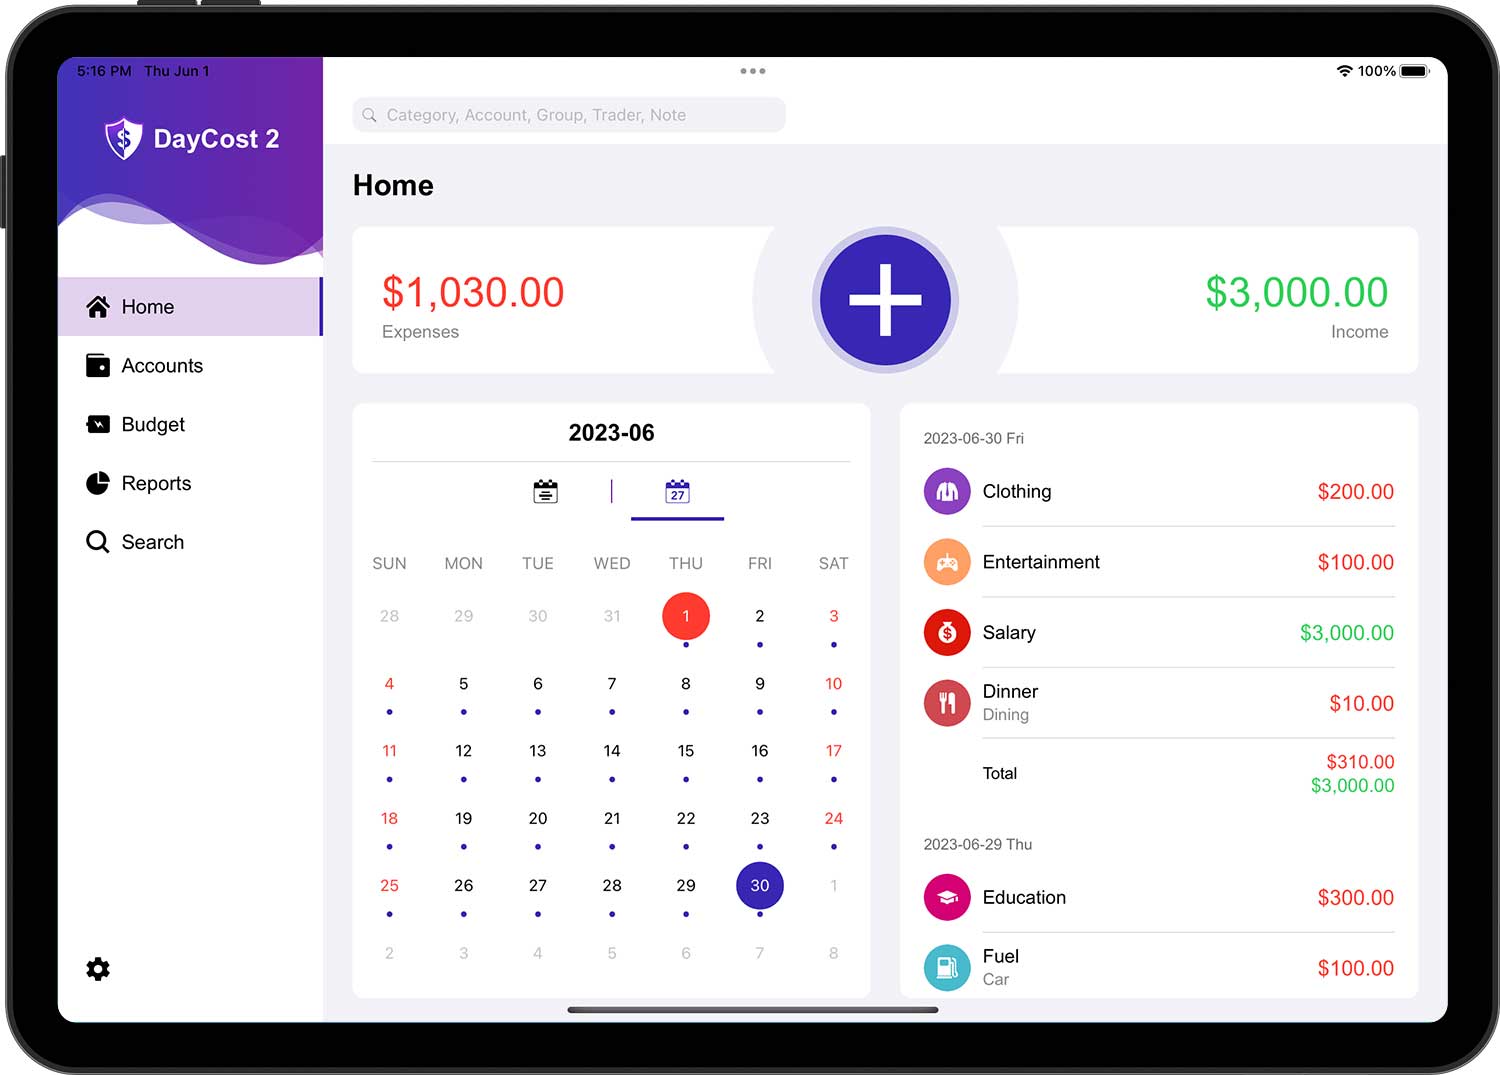
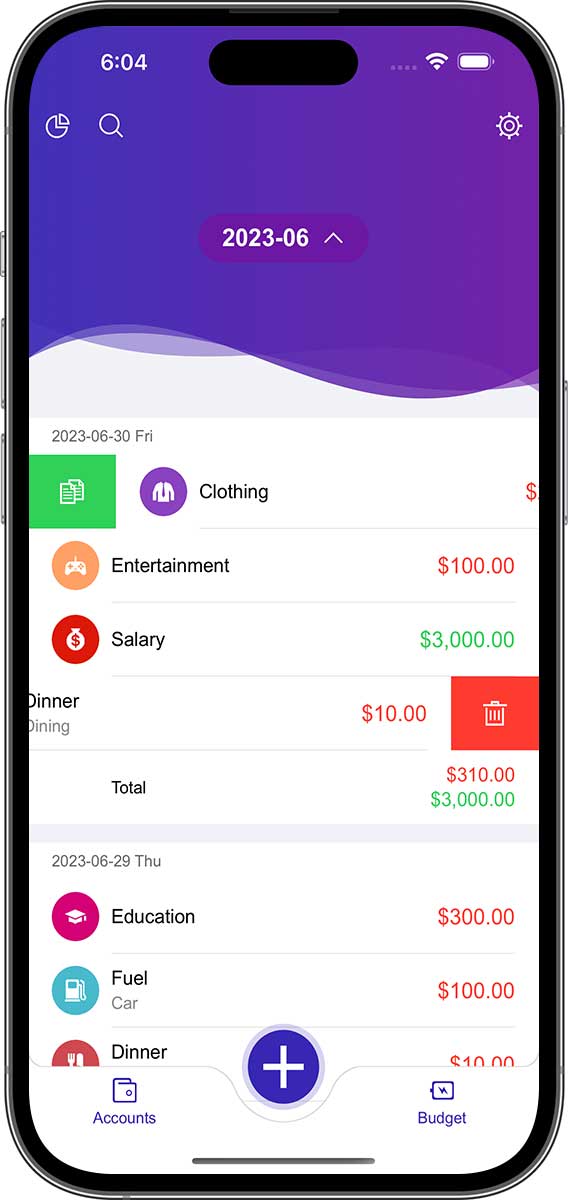
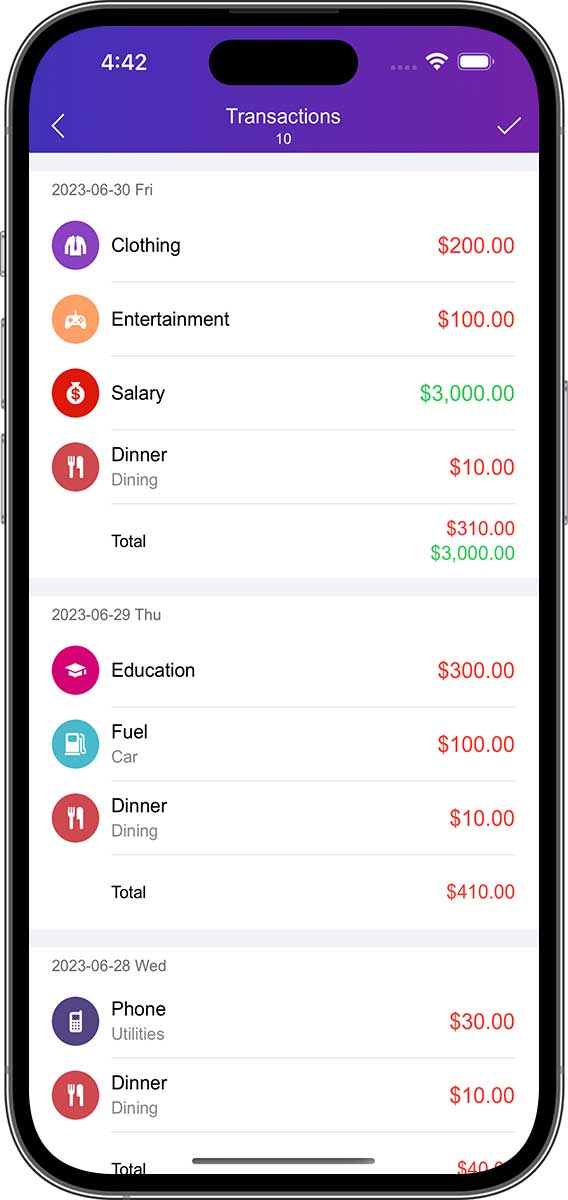
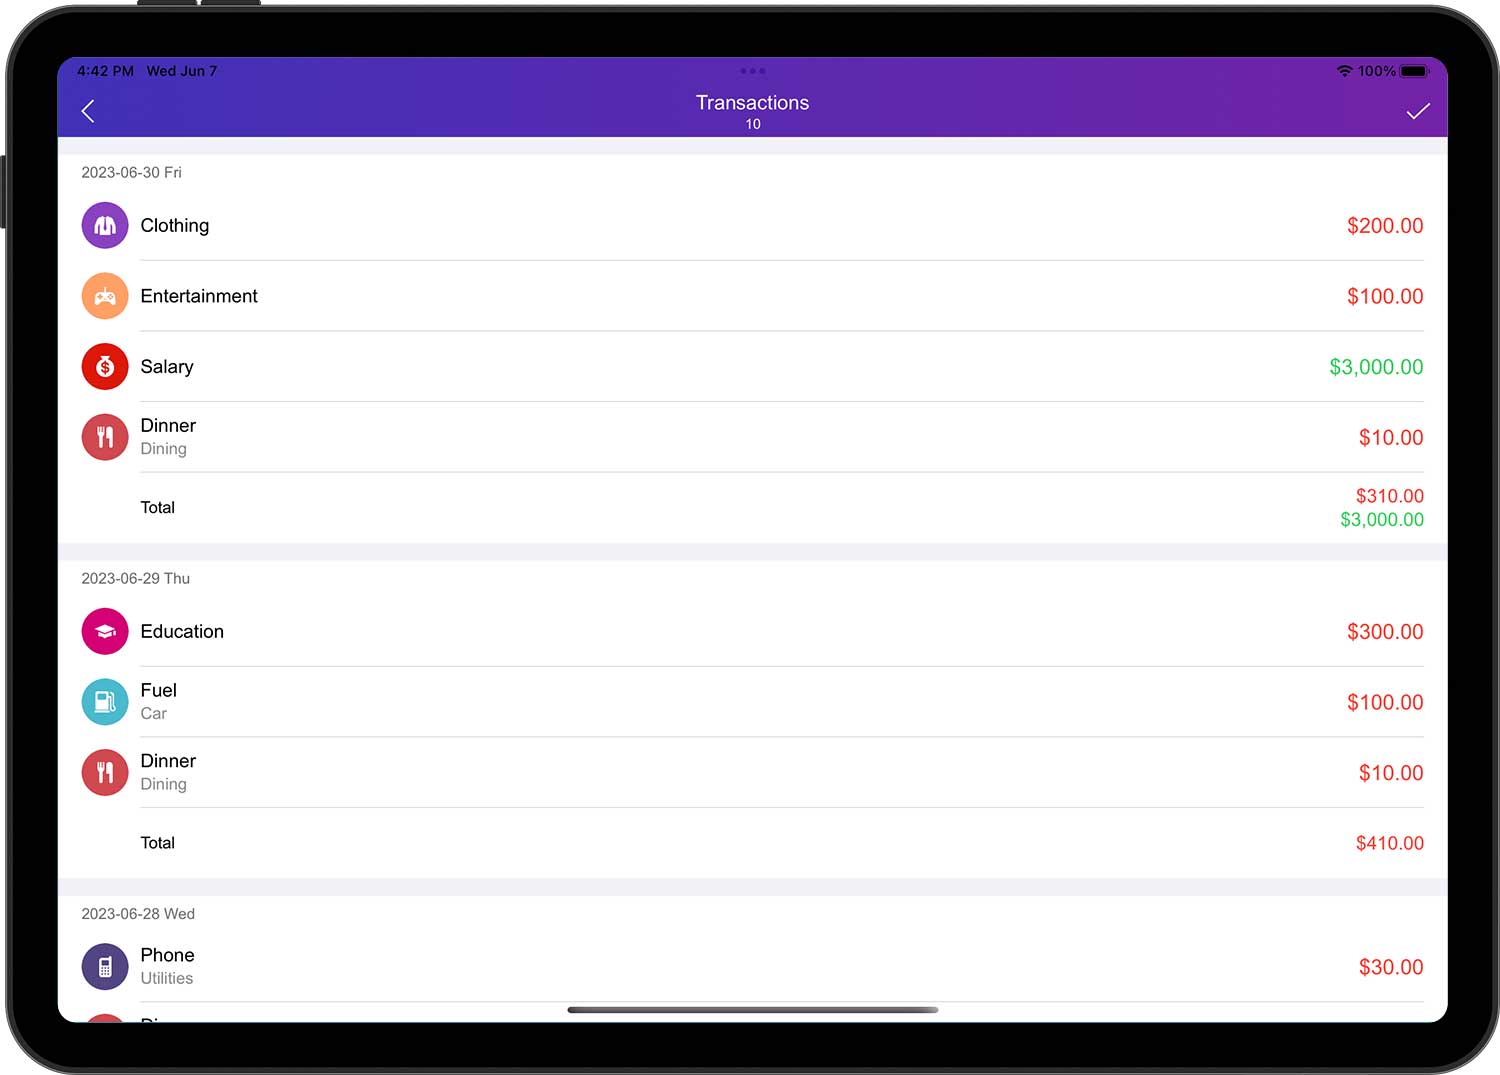
- The list of transactions for the current month is displayed by default.
- The amount color of expense transactions is red; income transactions are green; other transactions are black.
Tap the date button at the top of the iPhone screen to bring up a calendar (displayed directly in the iPad). The calendar is divided into two parts, on the left you can change the year and month by swiping up and down, and on the right you can change the month by swiping up and down.
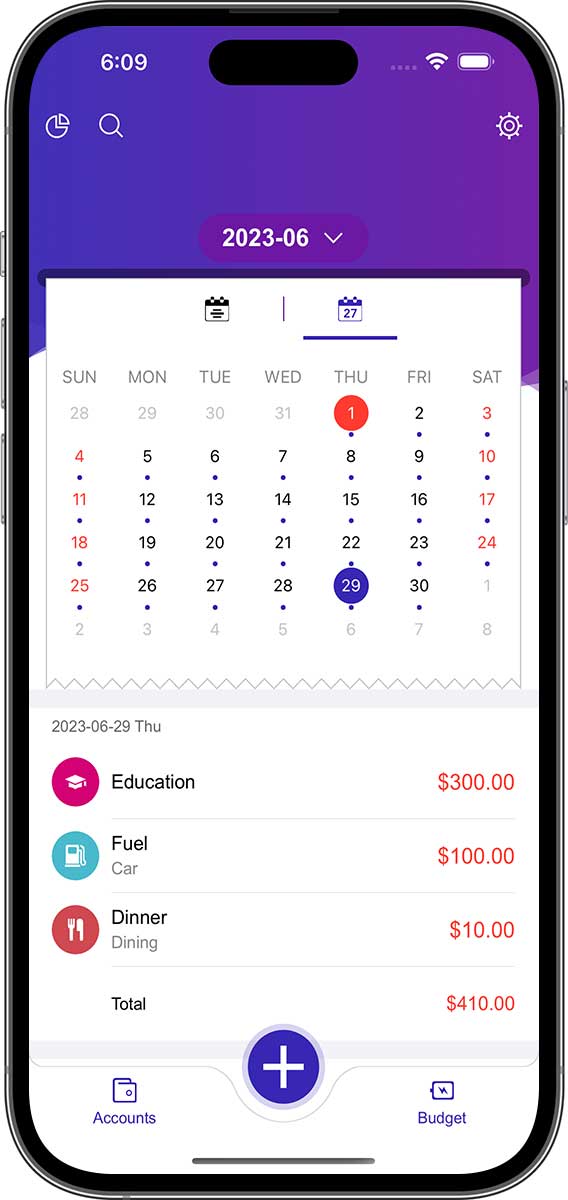
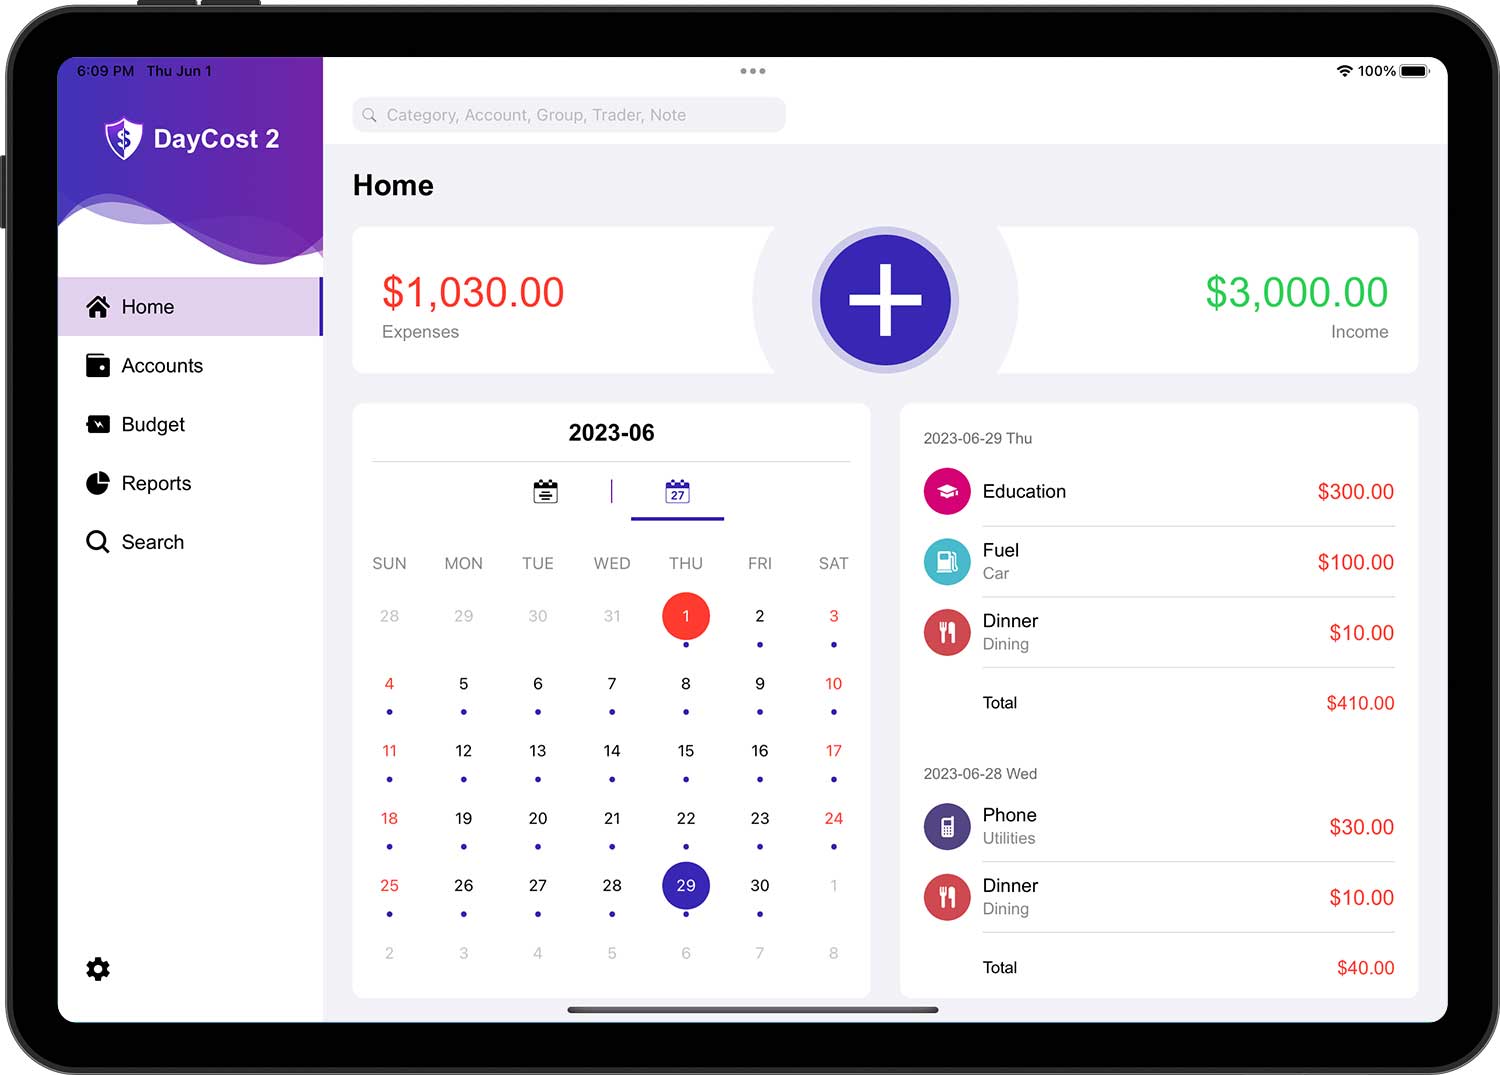
In the calendar, the dates on which there are transactions occurring are marked with dots. The list below the calendar is a list of transactions for the currently selected month. If you tap a day in the calendar, the list of transactions for the corresponding date will be on top.
Transaction Type
Transactions are financial actions that you have made and include the following three basic types:
- Income: when you receive wealth (salary, profit sharing, dividend income, grants, etc.) from others.
- Expense: When you make payments to others in exchange for goods or services.
- Money Transfer: A situation where your assets are transferred from one account to another in DayCost 2. For example, you transfer a portion of your funds from a checking account to a cash account.
In addition, when you tap on "More", you can find several other transaction types:
- Asset Purchase: When you buy a new asset.
- Asset Sale: A situation when you sell an asset.
- Liability Acquisition: When you take out a loan from a bank.
- Discharge of Liability: When you pay off a loan or cancel a credit card.
- Lend Money: when you lend wealth to other people.
- Recover Money: When you recover wealth lent by other people.
Create Transaction
Tap the "+" button in the "Home" page.

The default transaction type is "Expense". Please change the transaction type as needed. If you choose a different transaction type, the rest of the form will be different.
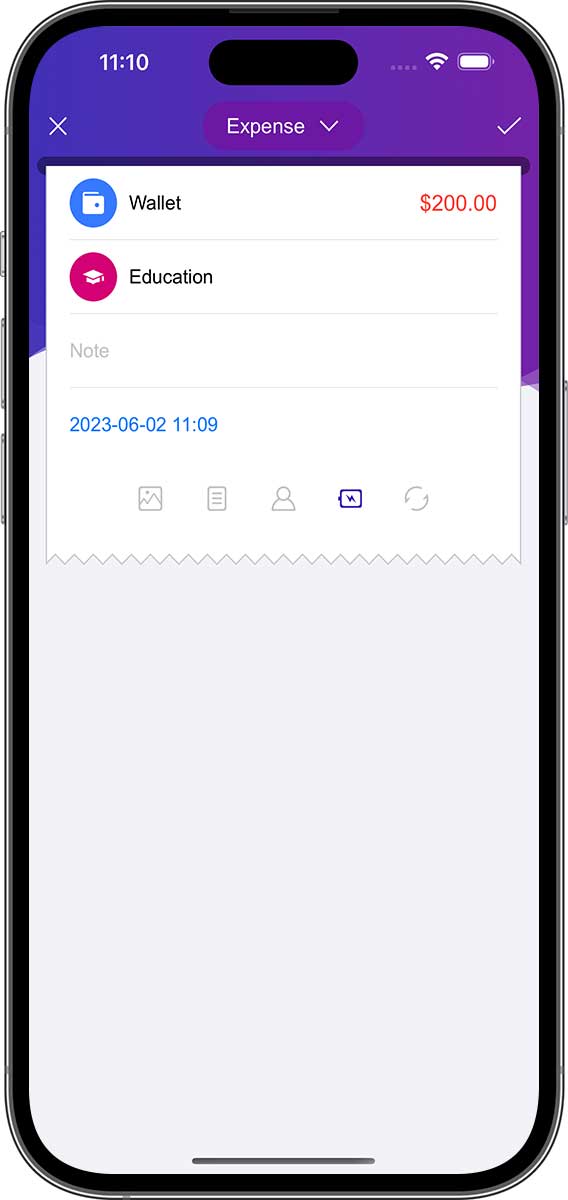
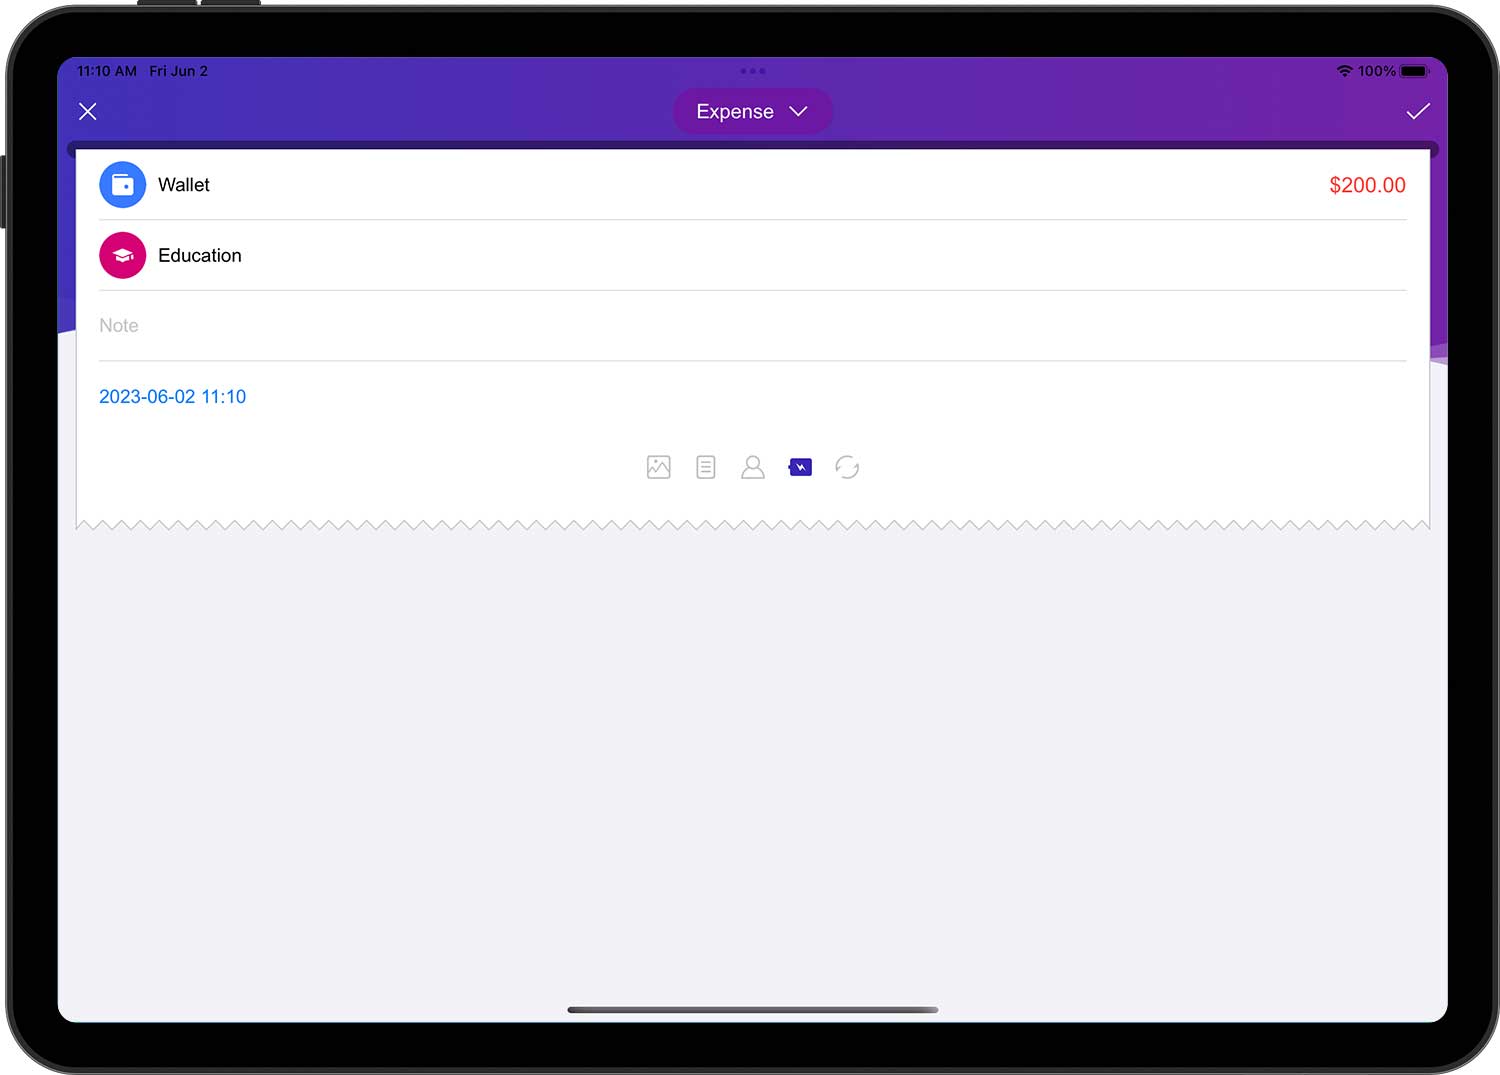
Expense:
- Account: the account that paid for this transaction.
- Amount: a specific amount (in the same currency unit as the selected account).
- Category: the category for this transaction.
- Note (optional): a description of this transaction.
- Date: The date and time when this transaction occurred.
- Additional information (optional): photo attachment, group (travel, party, business), trader (payee), whether budget was used, repeat cycle.
- How to add accounts, categories, groups, traders, see below for more information.
- Use budgets or not: If this option is checked (i.e. icon highlighted), the transaction will be counted in the budget aggregate (default is "Yes").
- Repeat Cycle: After setting the repeat period for this transaction, DayCost 2 will automatically generate transactions based on the frequency (see below for more information).
Income:
- Account: the account that received this revenue.
- Amount: a specific amount (in the same currency unit as the selected account).
- Category: the category for this transaction.
- Note (optional): a description of this transaction.
- Date: The date and time when this transaction occurred.
- Additional information (optional): photo attachment, group (travel, party, business), trader (payee), whether budget was used, repeat cycle.
Money Transfer:
- Account: the account from which the funds will be transferred.
- Amount: the amount to be transferred from the account (in the same currency unit as the selected account).
- (To) Account: The account that will receive the funds.
- Amount received: the amount received by the receiving account. Even if the transferring account and the incoming account use different currency units (see "Currency converter"), the corresponding amount will be filled in automatically here. However, if the received amount is different from the transferred amount, you can change it manually.
- Note (optional): a description of this transaction.
- Date: The date and time when this transaction occurred.
- Additional information (optional): photo attachment, group (travel, party, business), trader (payee), whether budget was used, repeat cycle.
Asset Purchase, Asset Sale, Liability Acquisition, Discharge of Liability, Lend Money, Recover Money:
In terms of operations, Asset Purchase, Asset Sale, Liability Acquisition, Discharge of Liability, Lend Money, Recover Money are equivalent to a transfer transaction, all of which are the same as a transfer transaction, except with additional categories. The category is optional and empty by default. If the category is selected, the following changes will occur:
- Asset Purchase, Discharge of Liability, Lend Money: in addition to being a transfer transaction, it is also an expense transaction.
- Asset Sale, Liability Acquisition, Recover Money: In addition to being a transfer transaction, it is also an income transaction.
And, when the category is selected, the transaction will be included in the generation of the "Income/Expense" report.
In addition, when a transaction involves an asset or a liability, both the "Assets/Liabilities" and "Net Worth" reports will include the transaction even if no category is selected.
- To handle credit card payments, you can either use a "Money Transfer" transaction or create it as a "Discharge of Liability" transaction.
- ”Liability Acquisition” and ”Lend Money” have an additional "Repayment Date" (optional) in the supplementary information. If you fill in the repayment date, DayCost 2 will automatically send a reminder when the repayment date is reached. You can get more information in the "Settings" ➔ "Reminders" page.
Categories (Accounts, Groups, Traders operate similarly)
Tap on the "Category" line in the transaction edit form will bring up the "Categories" page.
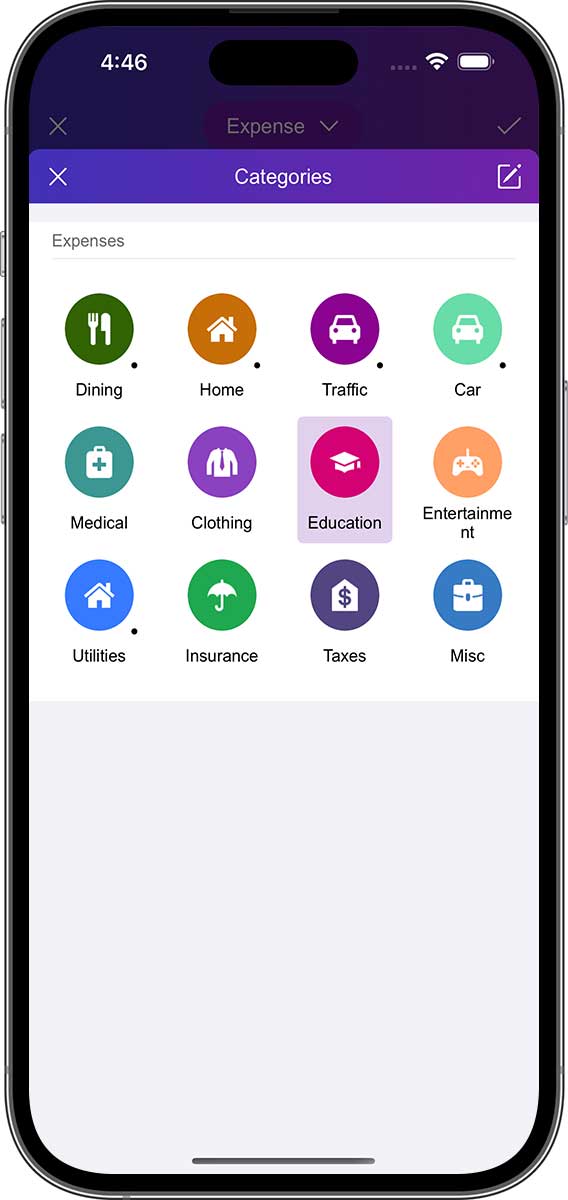
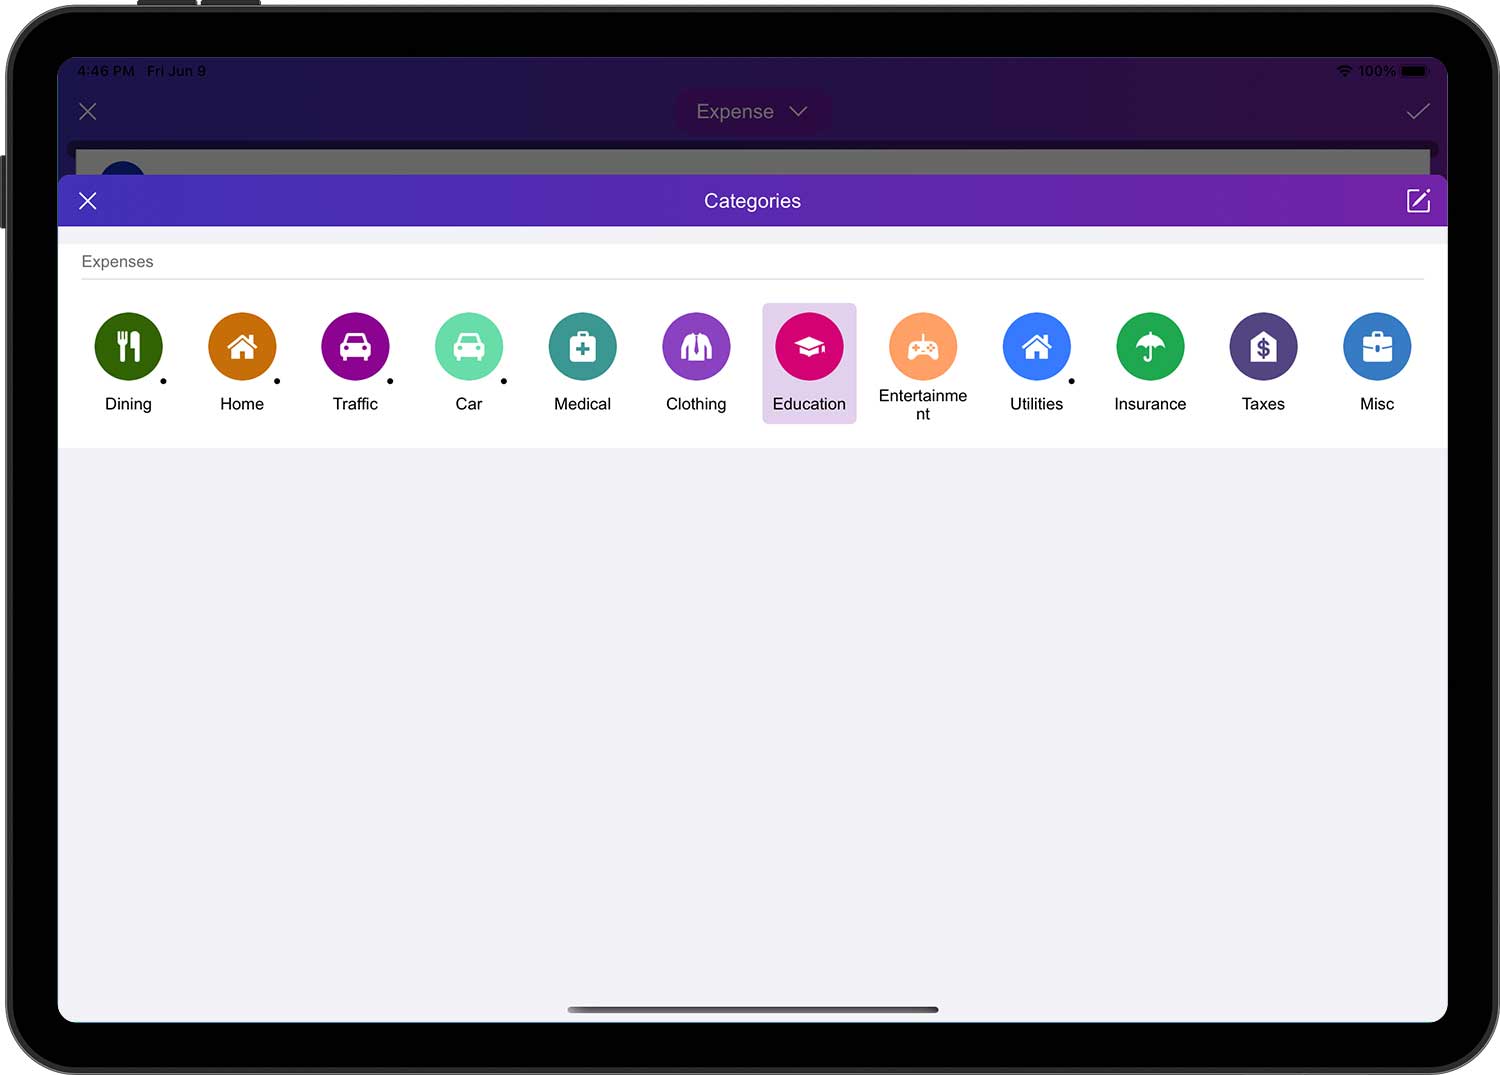
You can tap on a category to select it (some categories have a dot in the lower right corner, indicating that it has subcategories). If you want to edit a category, you can tap the Edit button in the upper right corner to go to the edit page. On this page you can add, edit, sort, hide and delete categories.
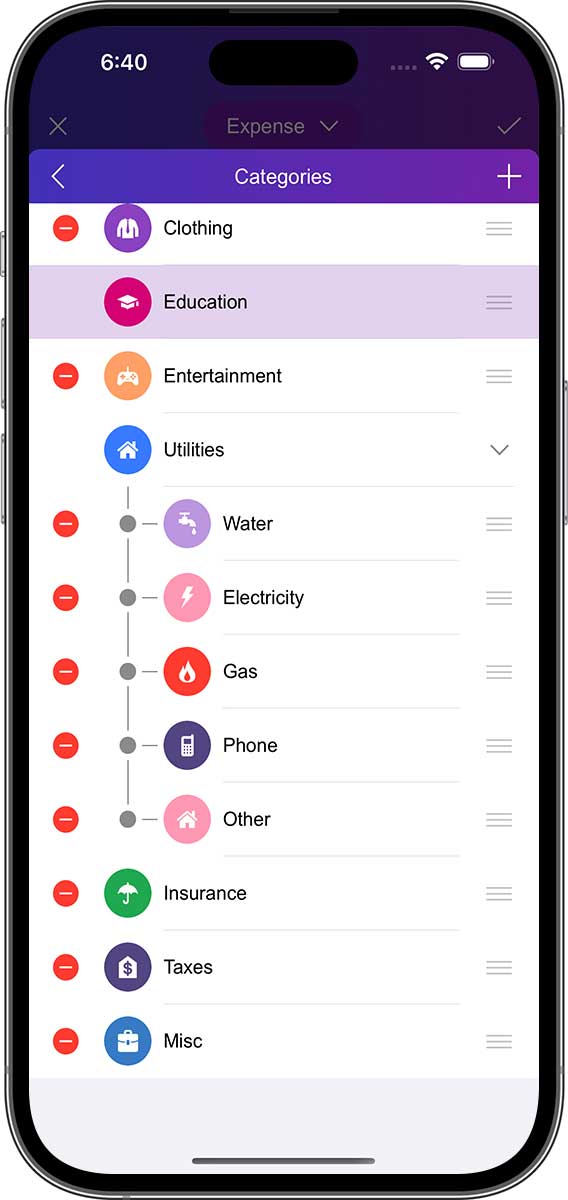
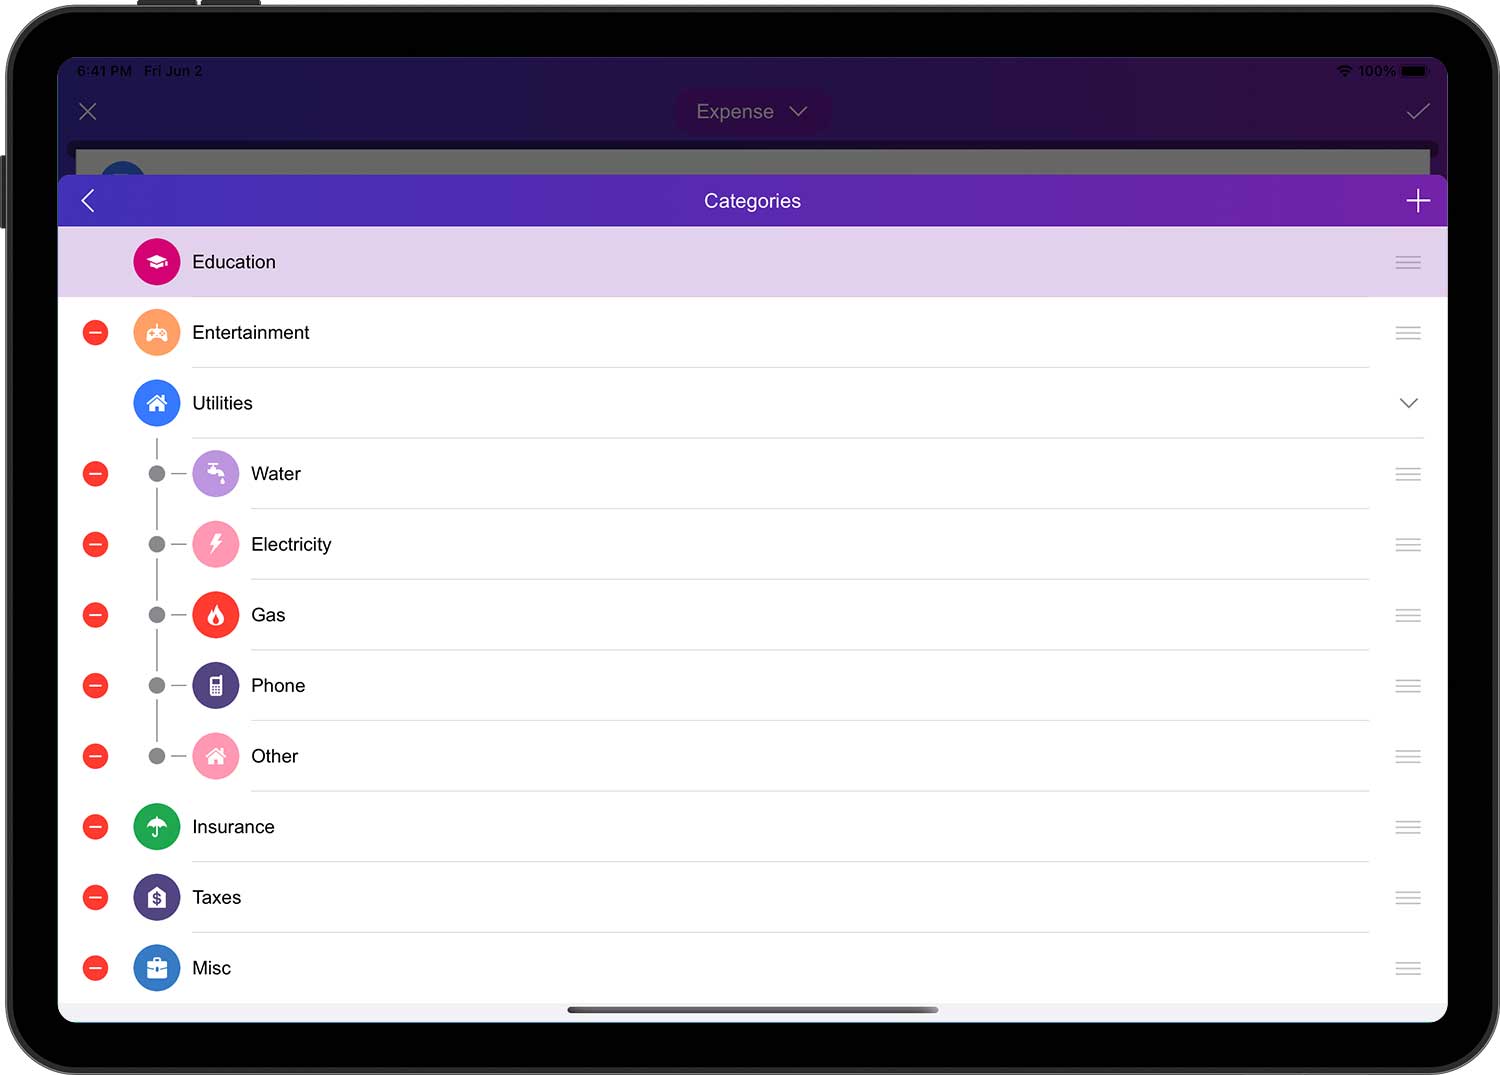
- Each category has an icon with three horizontal lines on the right side, called the category move icon.
- For a category that needs to be moved, drag and drop the horizontal line icon on the right side of the category to the corresponding position in the list.
- Just repeat the above operation for other categories. Please note that you can only adjust the order of different categories within the same first level category.
Tap the "+" button in the upper right corner will add a new category.
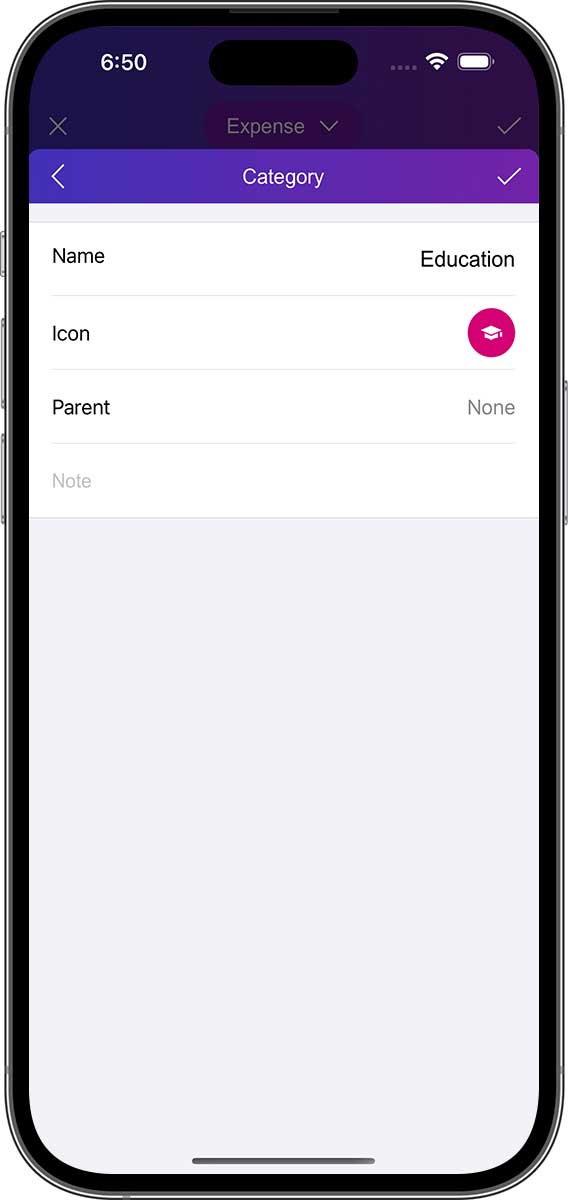
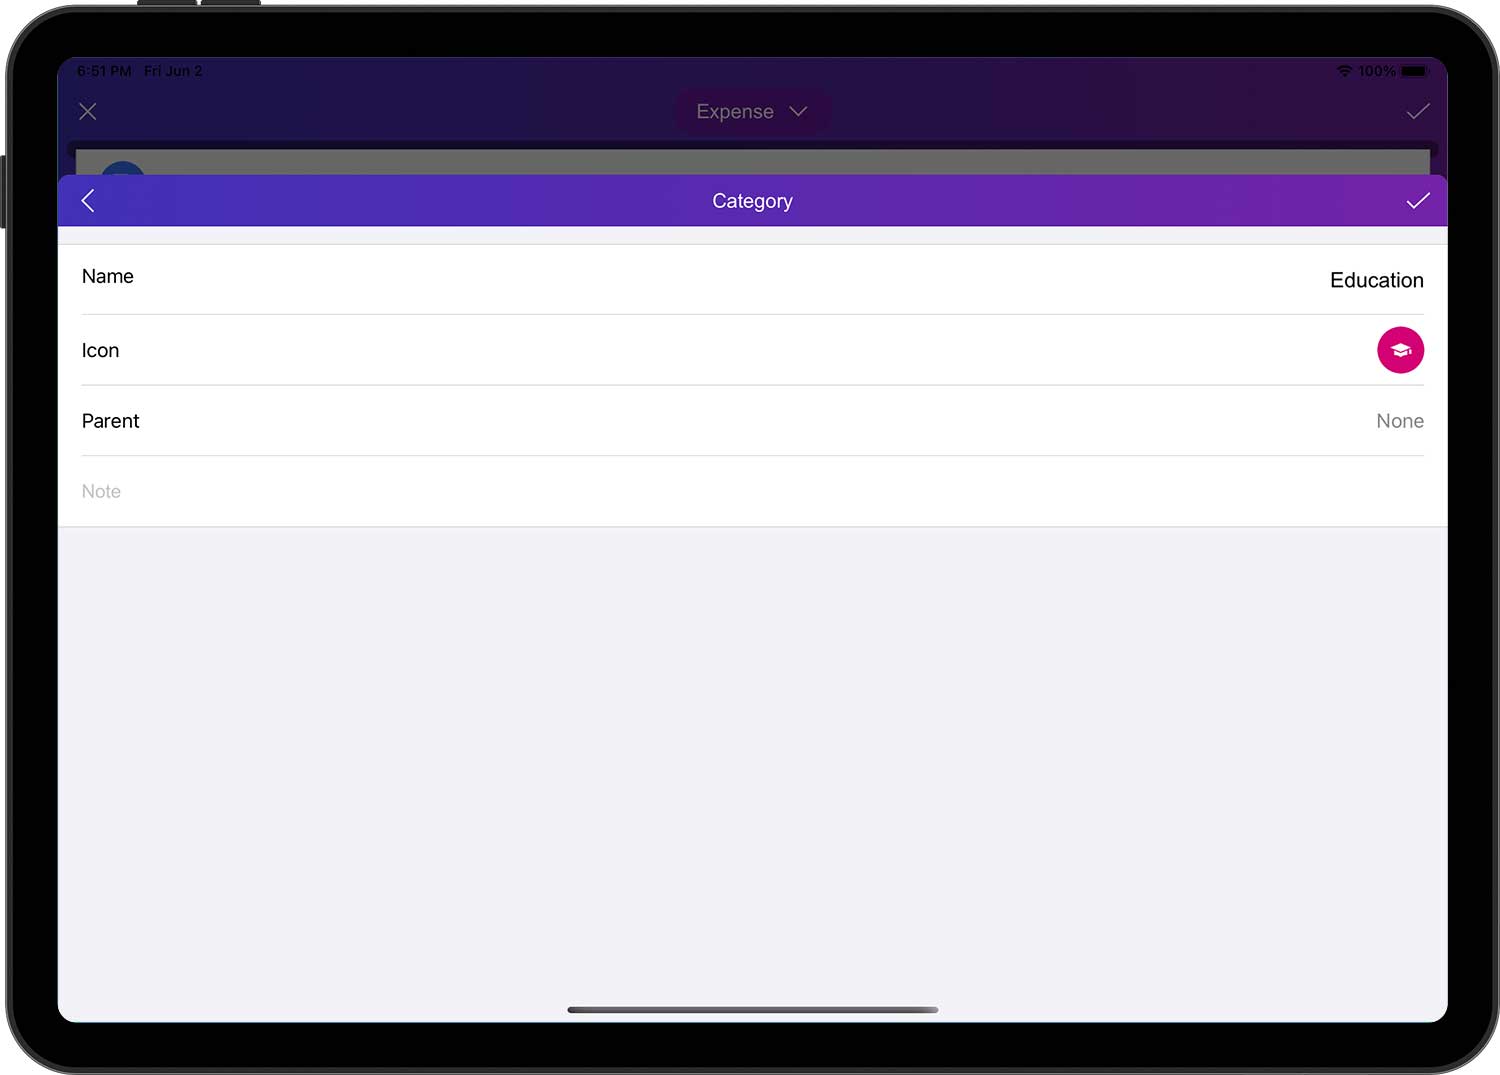
Enter information about the new category:
- Name: name the short name so that the category can be easily found in the list.
- Icon: Select an icon from the built-in icon manager or choose your own image as an icon via the camera/photo library.
- Parent: Specify the parent category of the new category. If "None", it means a first-level category.
- Note (optional): Description of the category.
When finished, tap the "✓" button in the upper right corner to complete the operation.
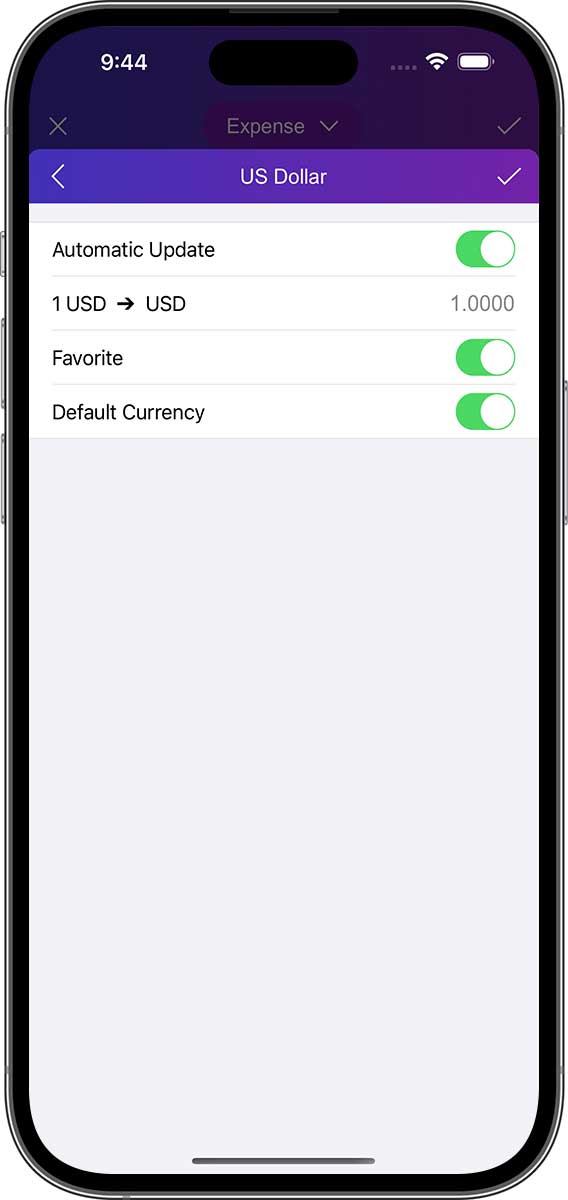
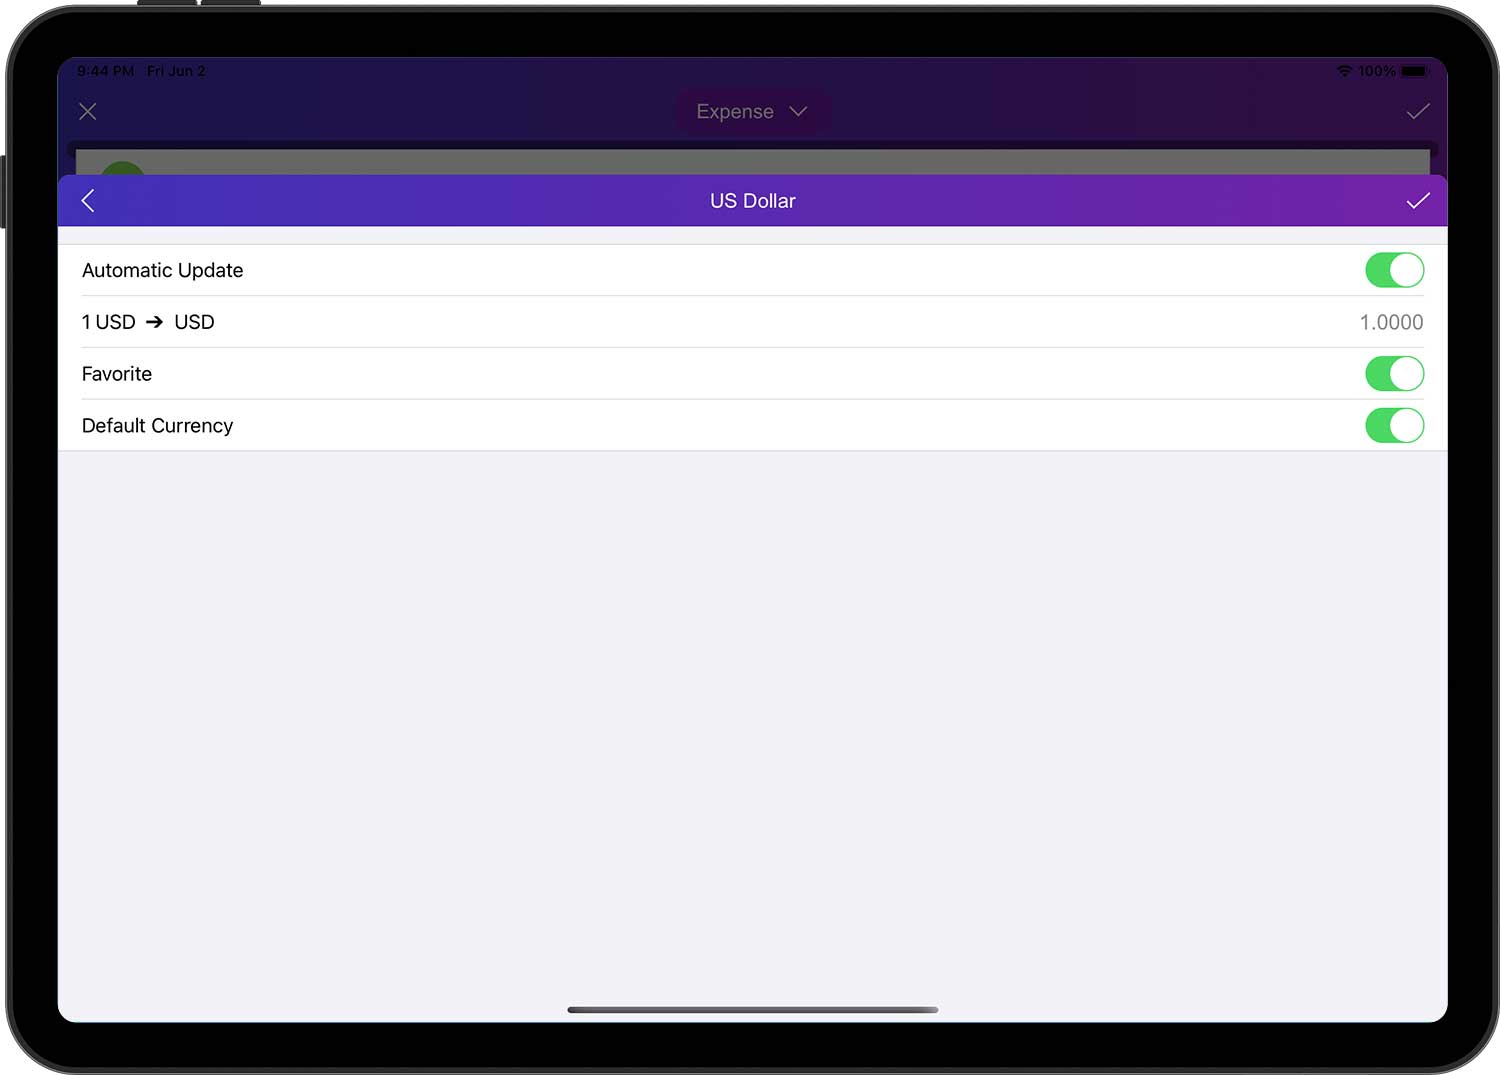
Currency Converter
When you create a transaction and need to enter an amount, you can use the currency converter that comes with DayCost 2. The converter will help you deal with different currencies. Tap the Currency button, select the currency unit you need to convert, then enter the corresponding currency value, and the converter will automatically convert it to the currency of the account belonging to that transaction.
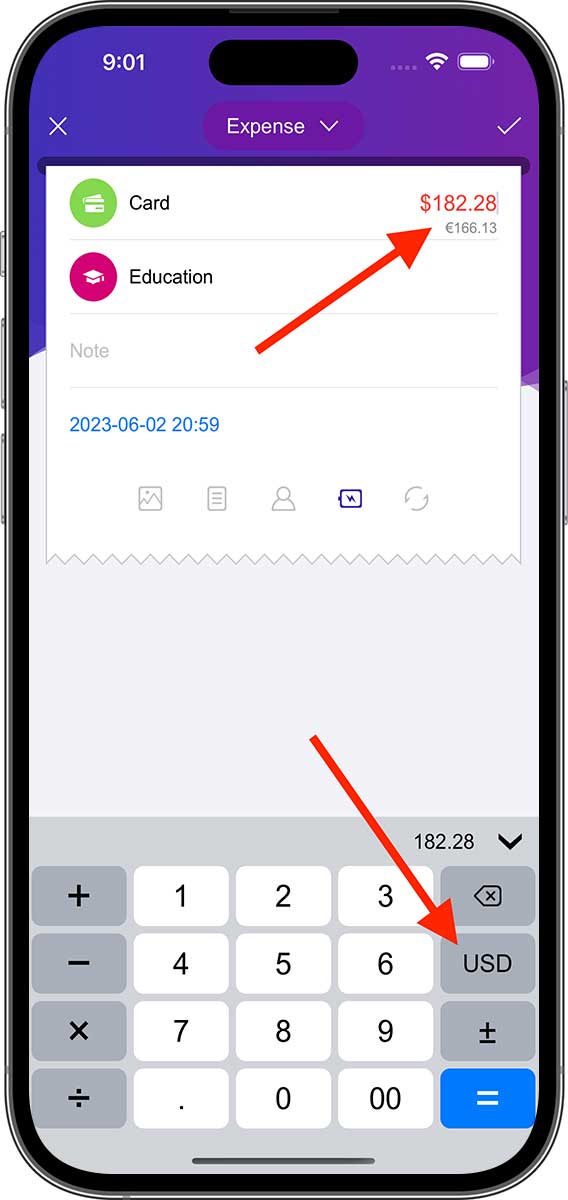
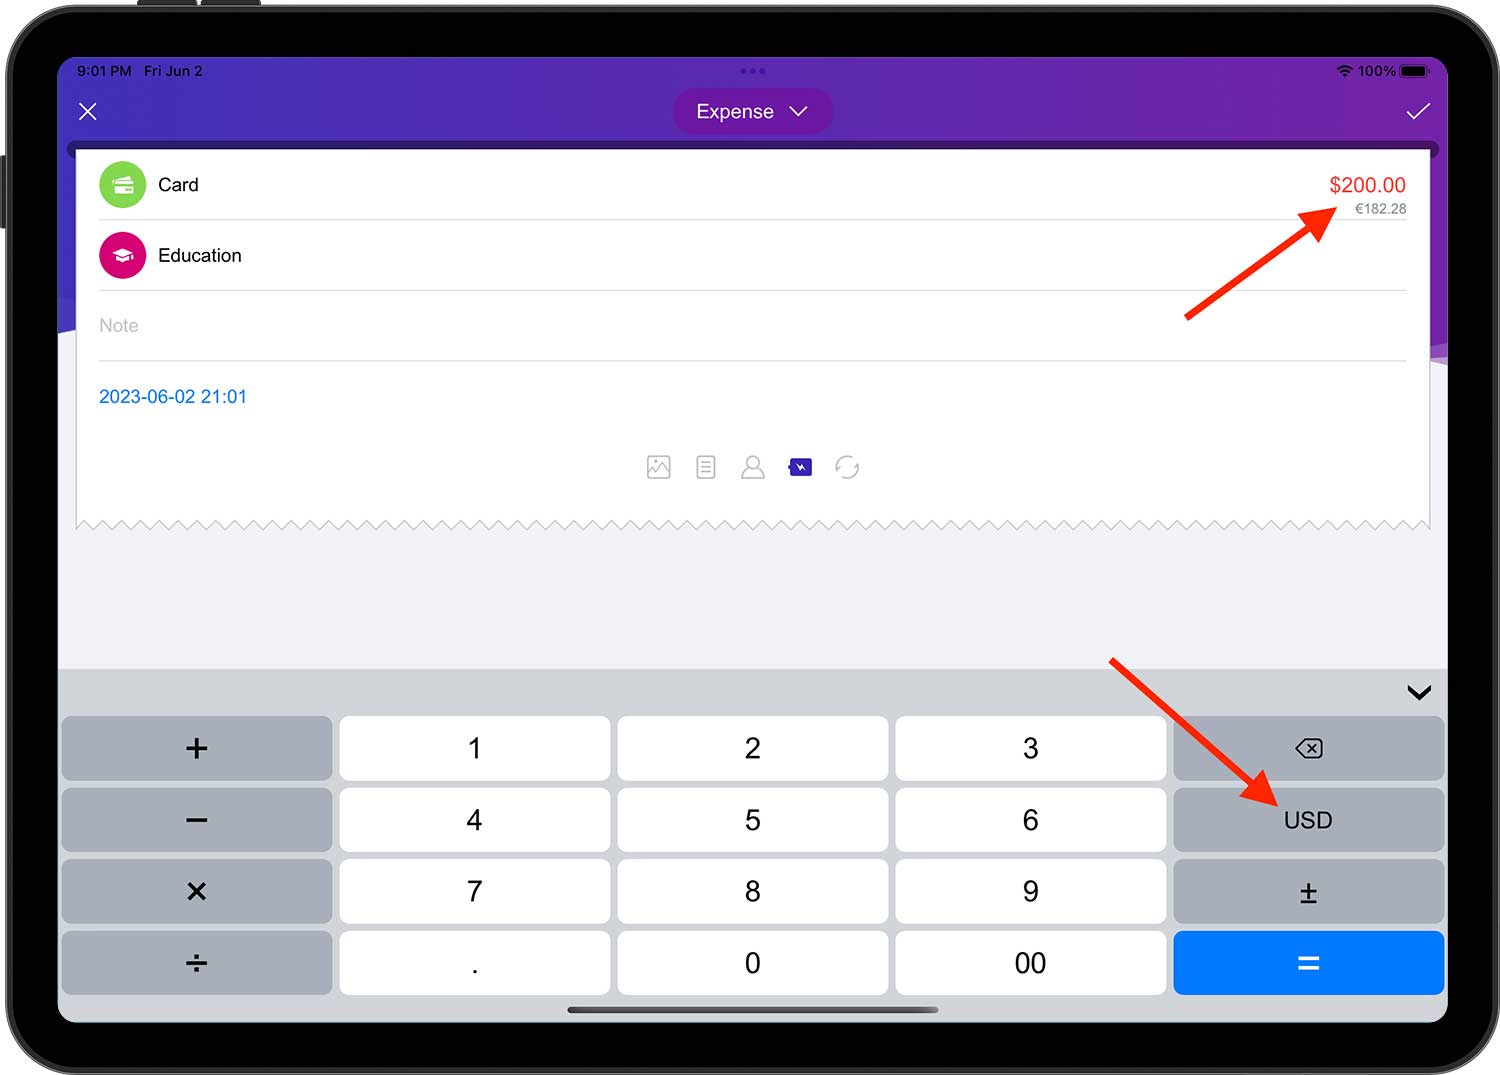
If you want to transfer funds from one account to another, and the currency units of both accounts are not the same, then you just need to enter the amount of the original account in the "Amount" field. In the "Amount received" field (corresponding to the target account), the currency value of the corresponding unit will be calculated automatically.
The budget and all reports are displayed in the default currency unit. To change the default currency unit, open the "Settings" ➔ "Currency" page and select the desired currency.
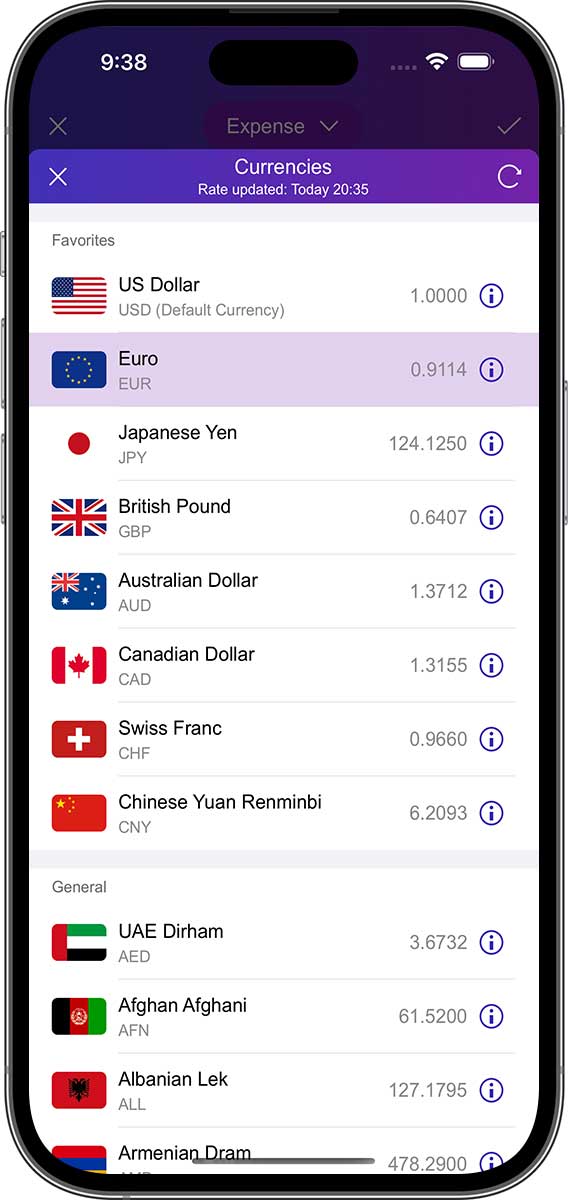
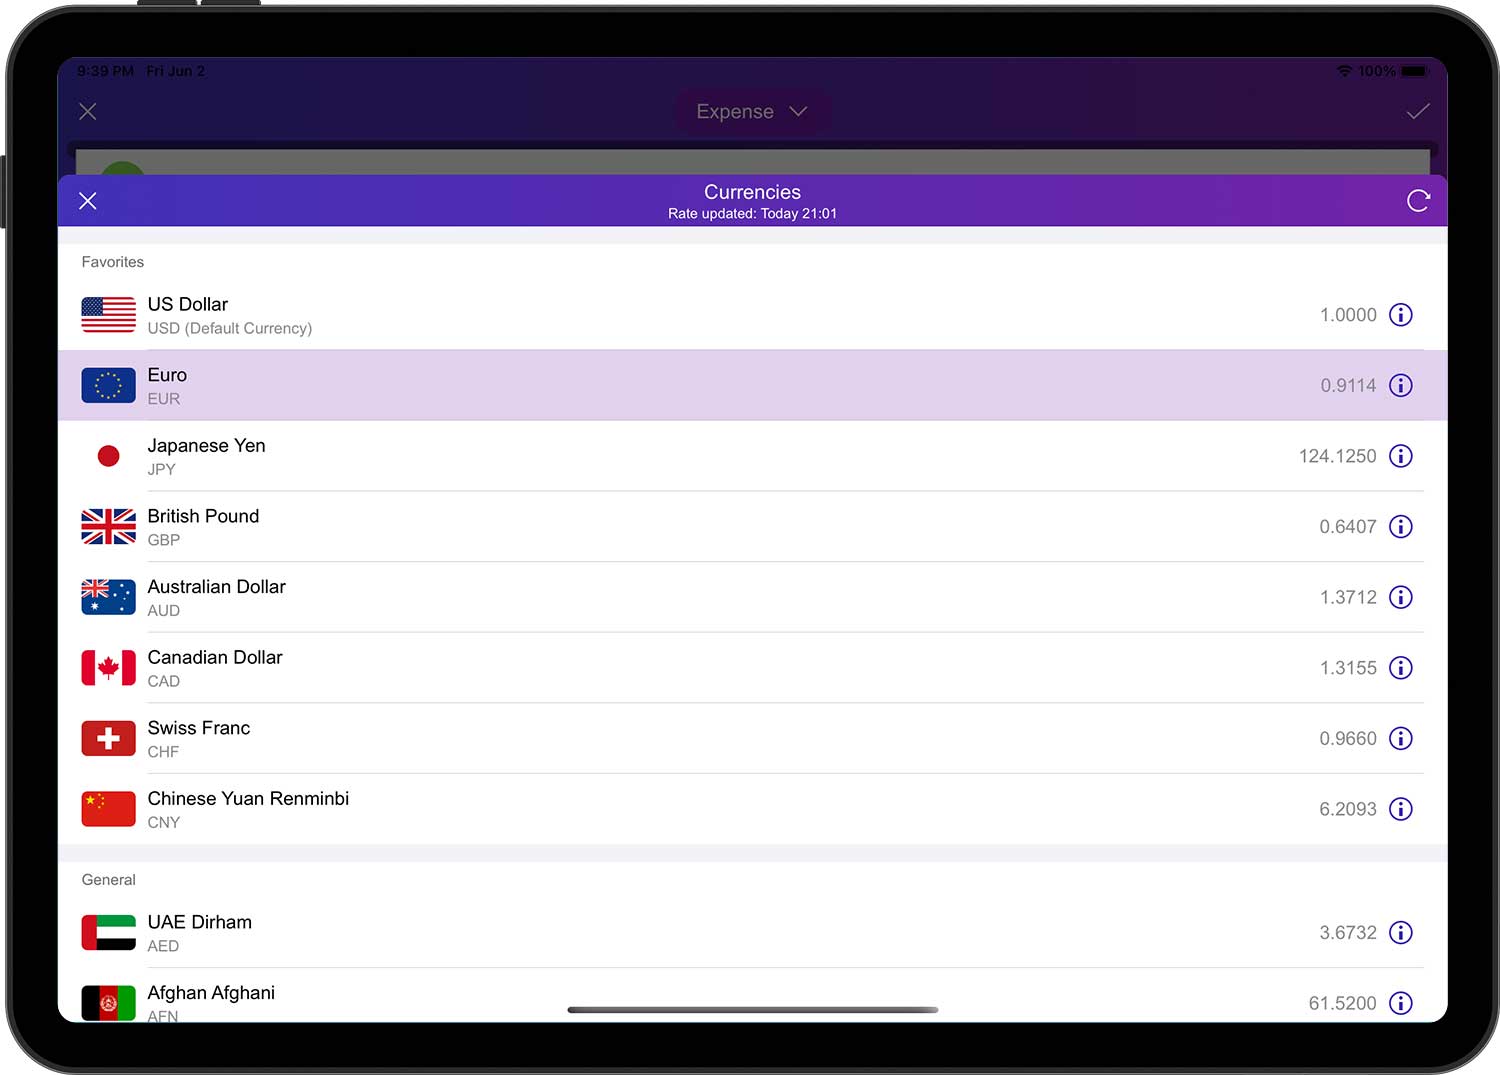
In addition, you can tap on the "i" button to change the exchange rate and add it to the "Favorites" list.
Repeat Cycle
In the trade editing form, tap on the "Repeat Cycle" button in the supplementary information will open the "Repeat" page. On this page you can set the repetition frequency of the transaction, as well as the expiration date. After setting the repetition frequency, DayCost 2 will automatically generate trades based on the frequency before the deadline.
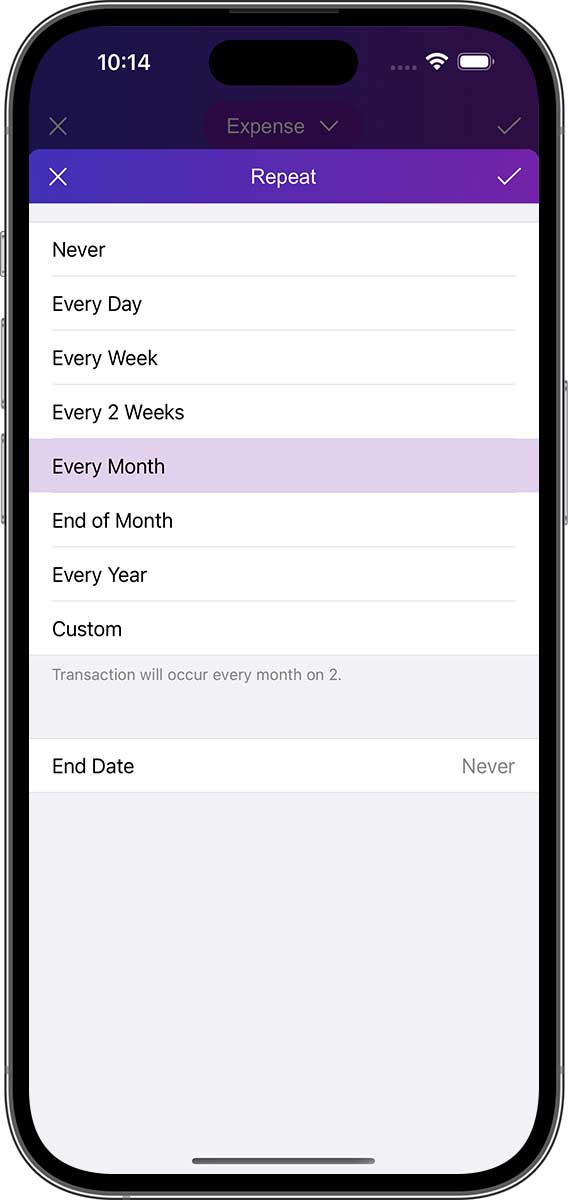
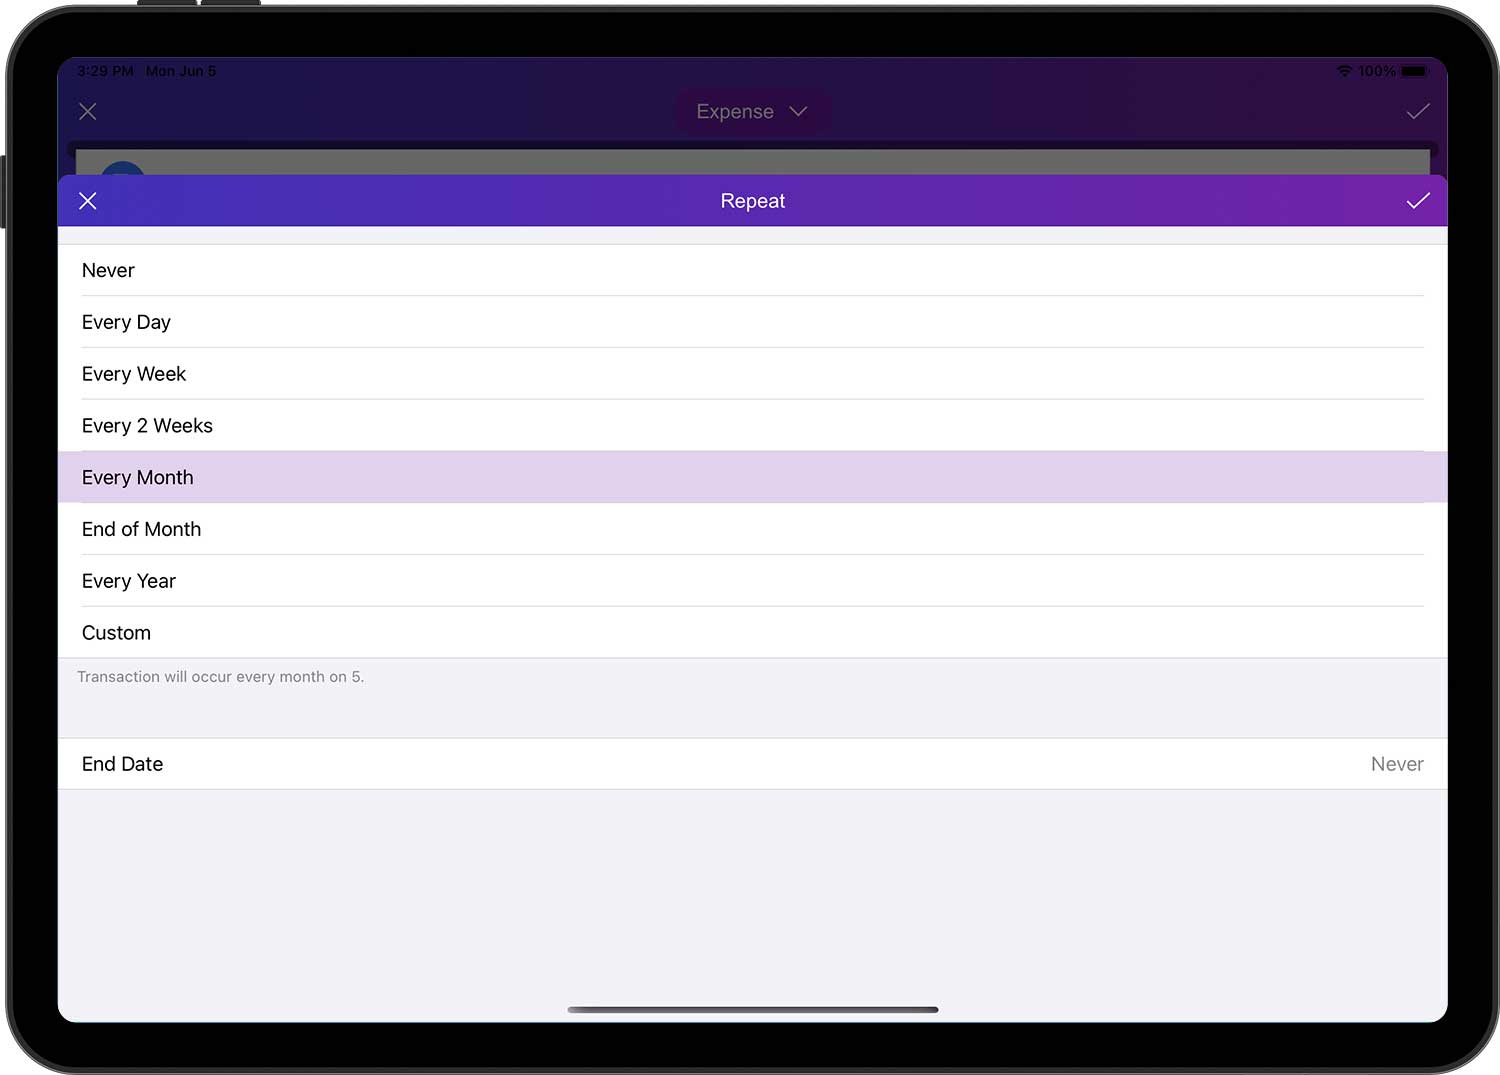
- You can only adjust the "Repeat Cycle" in the edit form for new transactions, and this option is not enabled by default.
- After enabling this option and saving the transaction, a data entry will be added to the "Settings" ➔ "Repeating Transactions" page. You can also add data for repeat transactions directly on this page.
Transaction Templates
Tap on "Transaction Template" in the list of transaction types, which will open the "Transaction Template" page. You can add some common transaction data to this page, then tap on any of the data and DayCost 2 will automatically fill in all the information of the transaction template into the new transaction, saving you time.
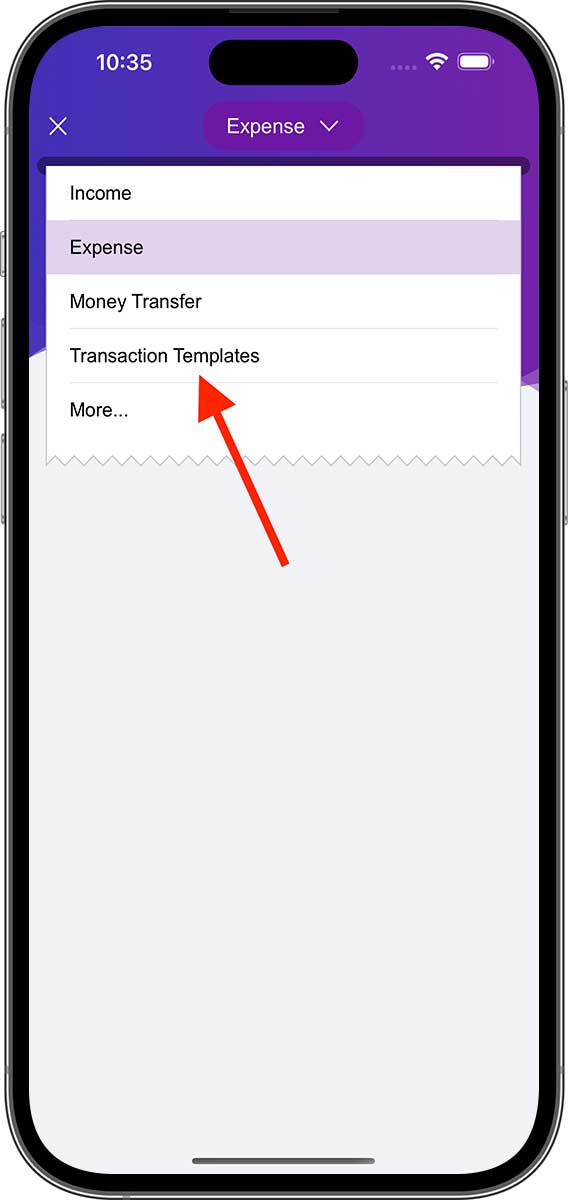
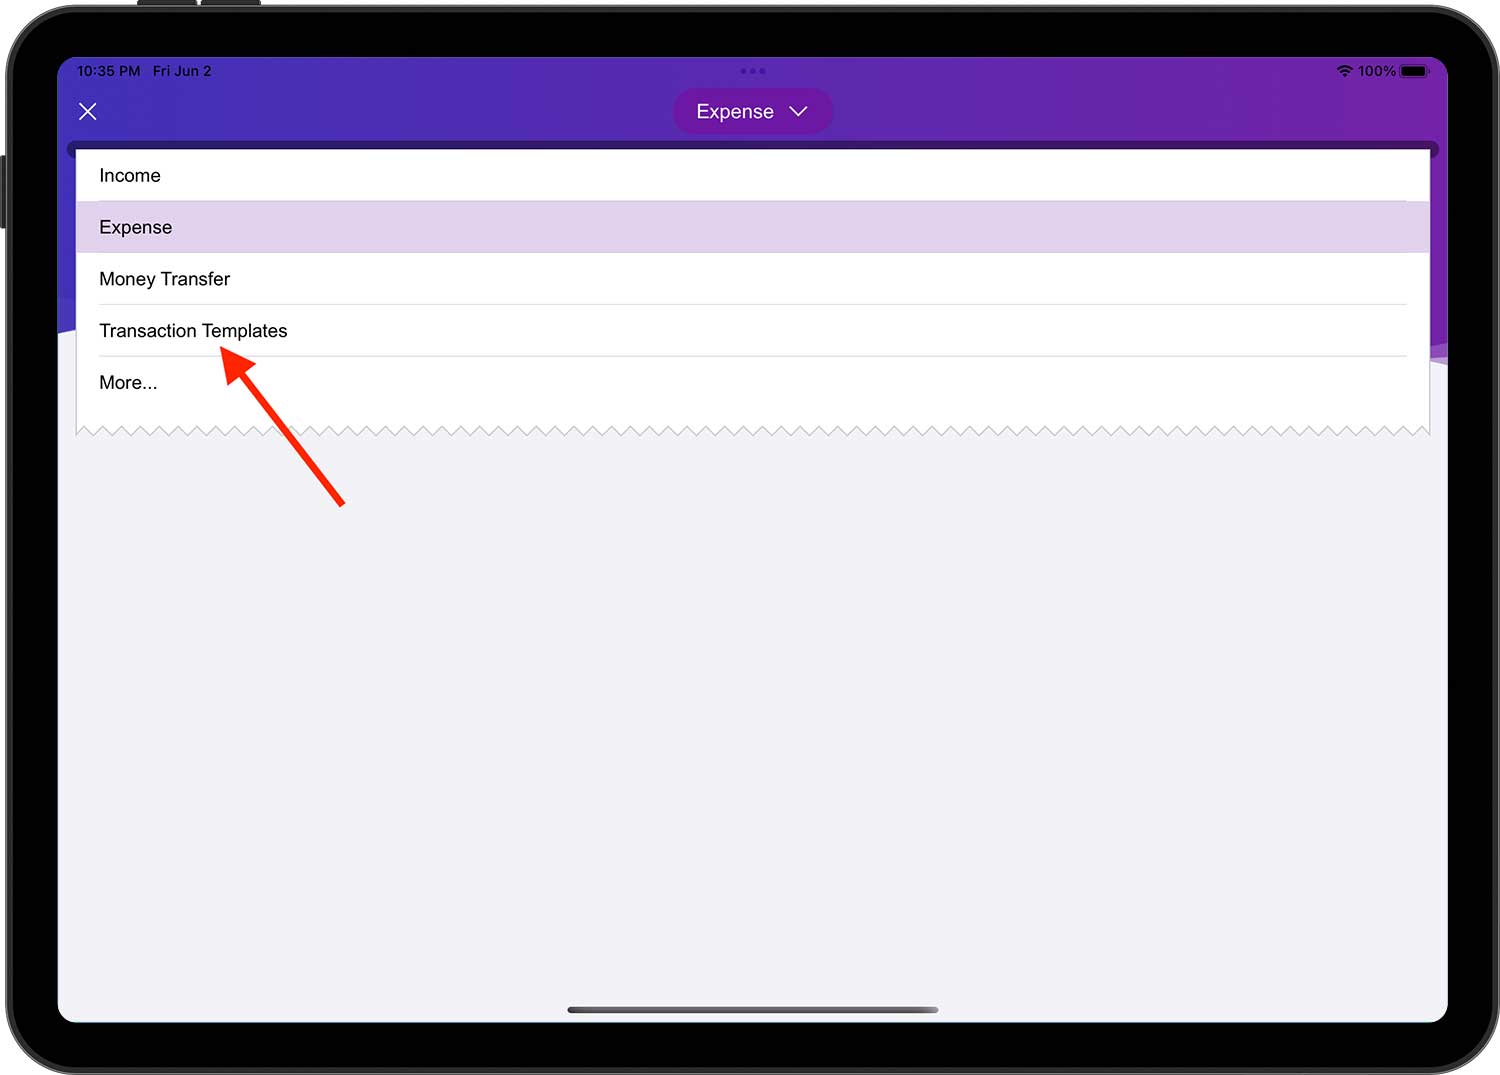
- You can also open the list of transaction templates via "Settings" ➔ "Transaction Templates".
- The list of transaction templates is automatically sorted in descending order by the number of times each template has been used.
After adding transaction templates, you can also select templates in the widget (only the name of the category in the transaction template is displayed). When you tap on any template data, DayCost 2 will create a new transaction data and automatically fill in all the information of the transaction template into the new transaction, normally you only need to enter the amount and tap on the "✓" button in the upper right corner to create a new transaction.
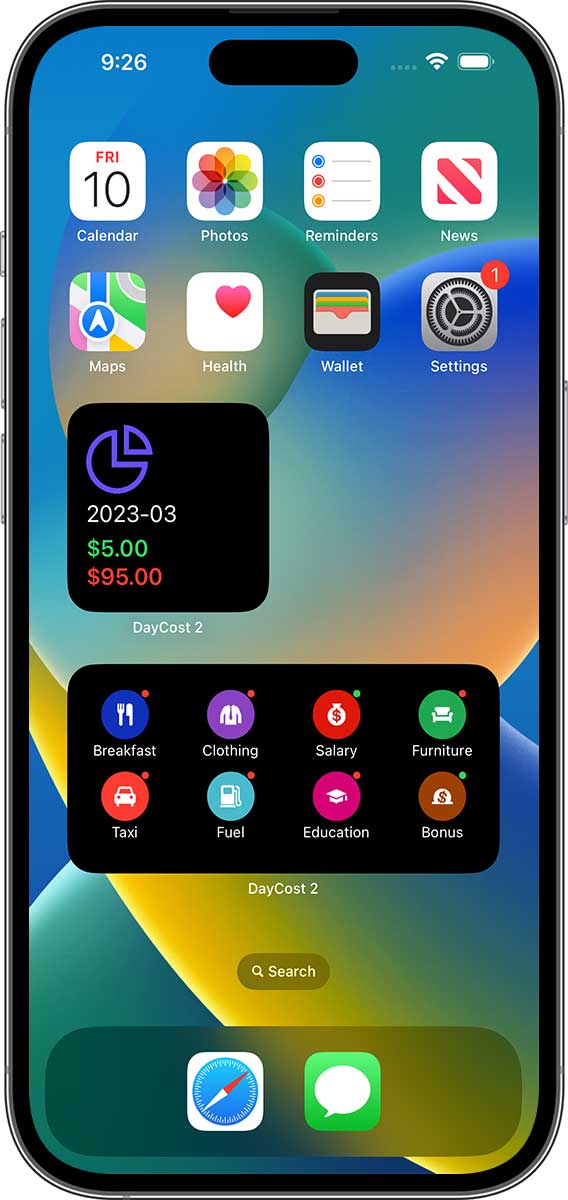
- The transaction templates in the widget can be customized and sorted via the "Edit widget".
- Explanation of the dots in the upper right corner: green dot - income; red dot - expenses.
Copy/Delete Transactions
On any transaction list page (e.g. home page, account transaction list, budget transaction list, etc.), you can copy a transaction by tapping and swiping to the right, or delete a transaction by tapping and swiping to the left.
For deleting transactions, you can also tap on any transaction and then tap on the "Delete" button at the bottom of the opened edit form.
Accounts
This section will let you understand how to add/modify/delete accounts. Also, on the account list page, you can quickly see your net worth status, and the balance of each account (green: assets; red: liabilities).

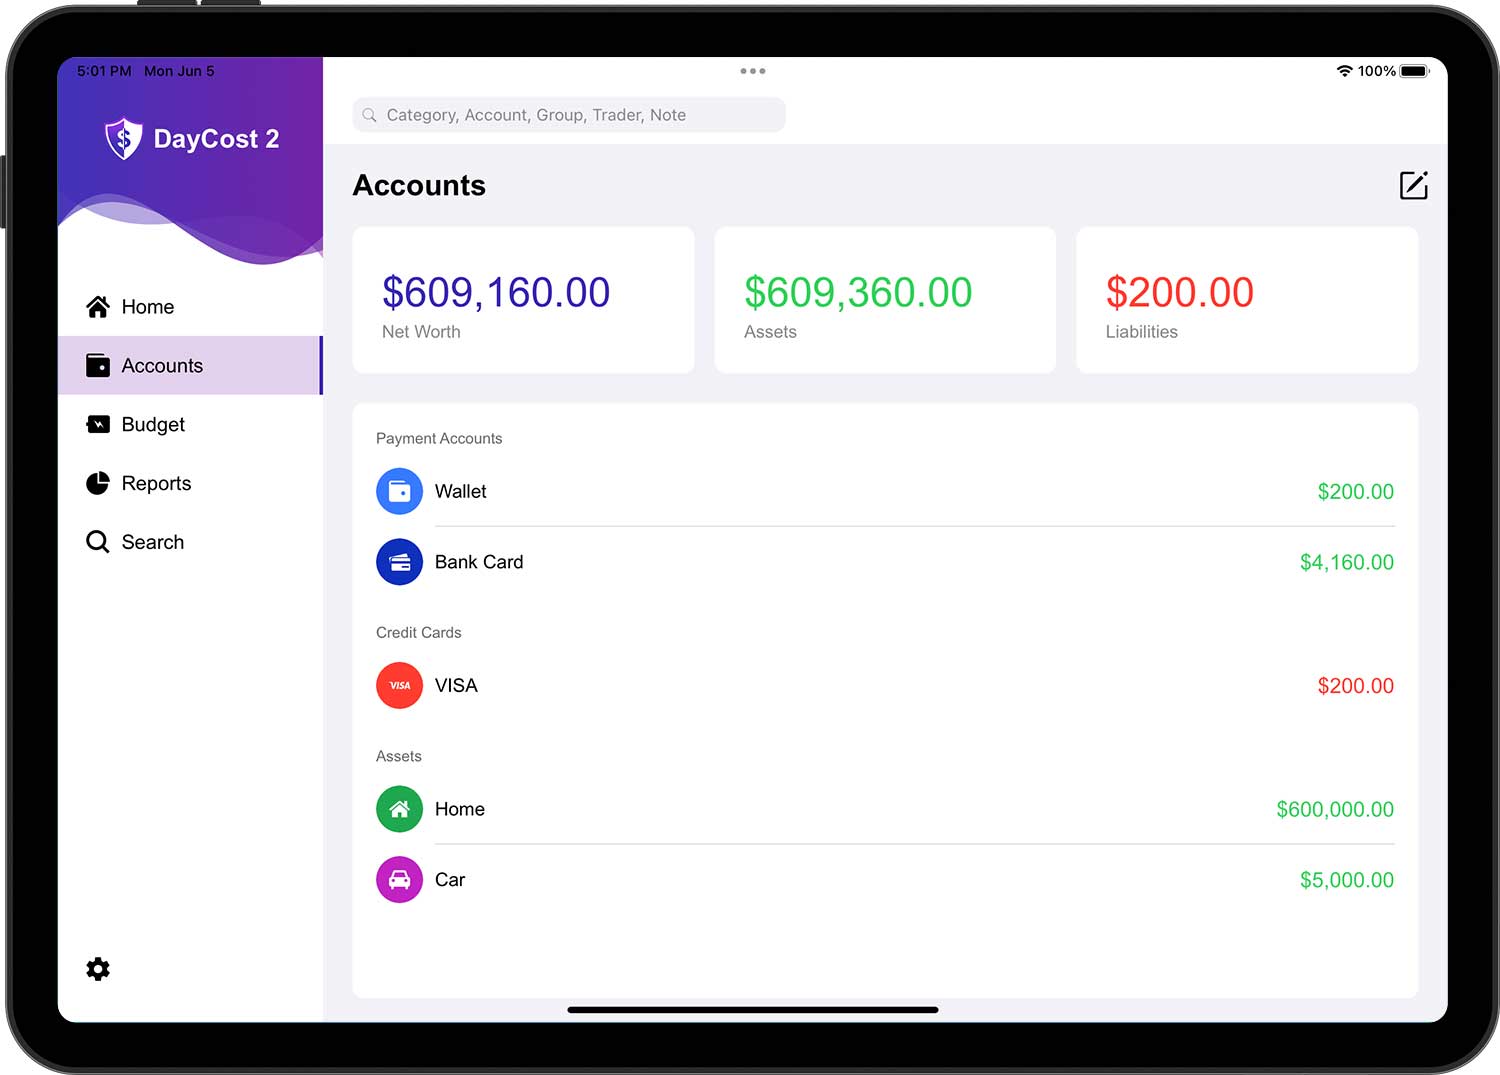
Assets and Liabilities
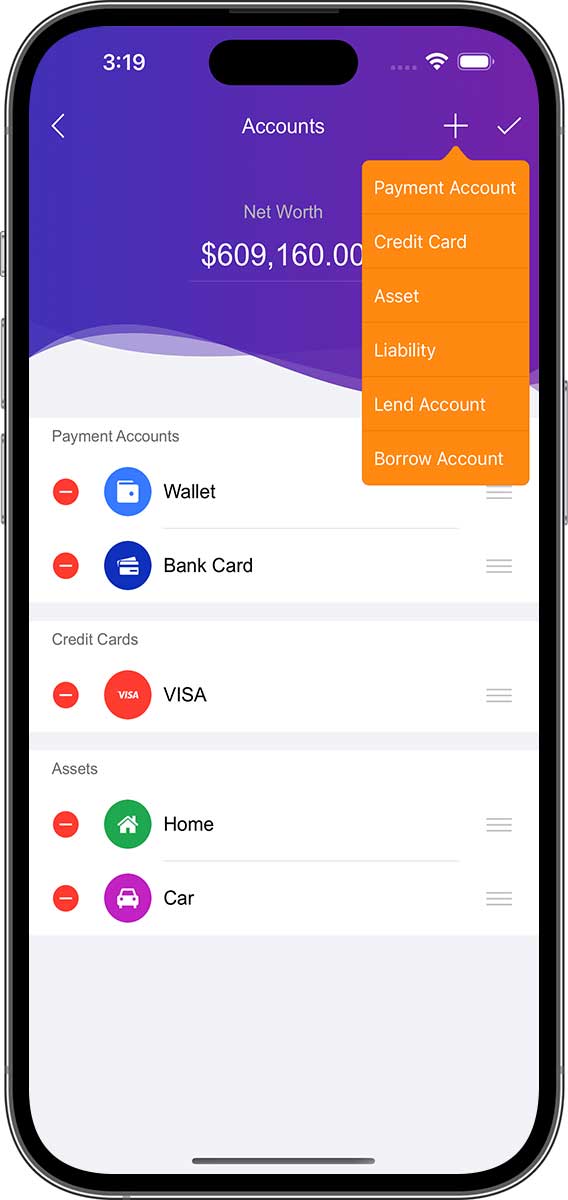
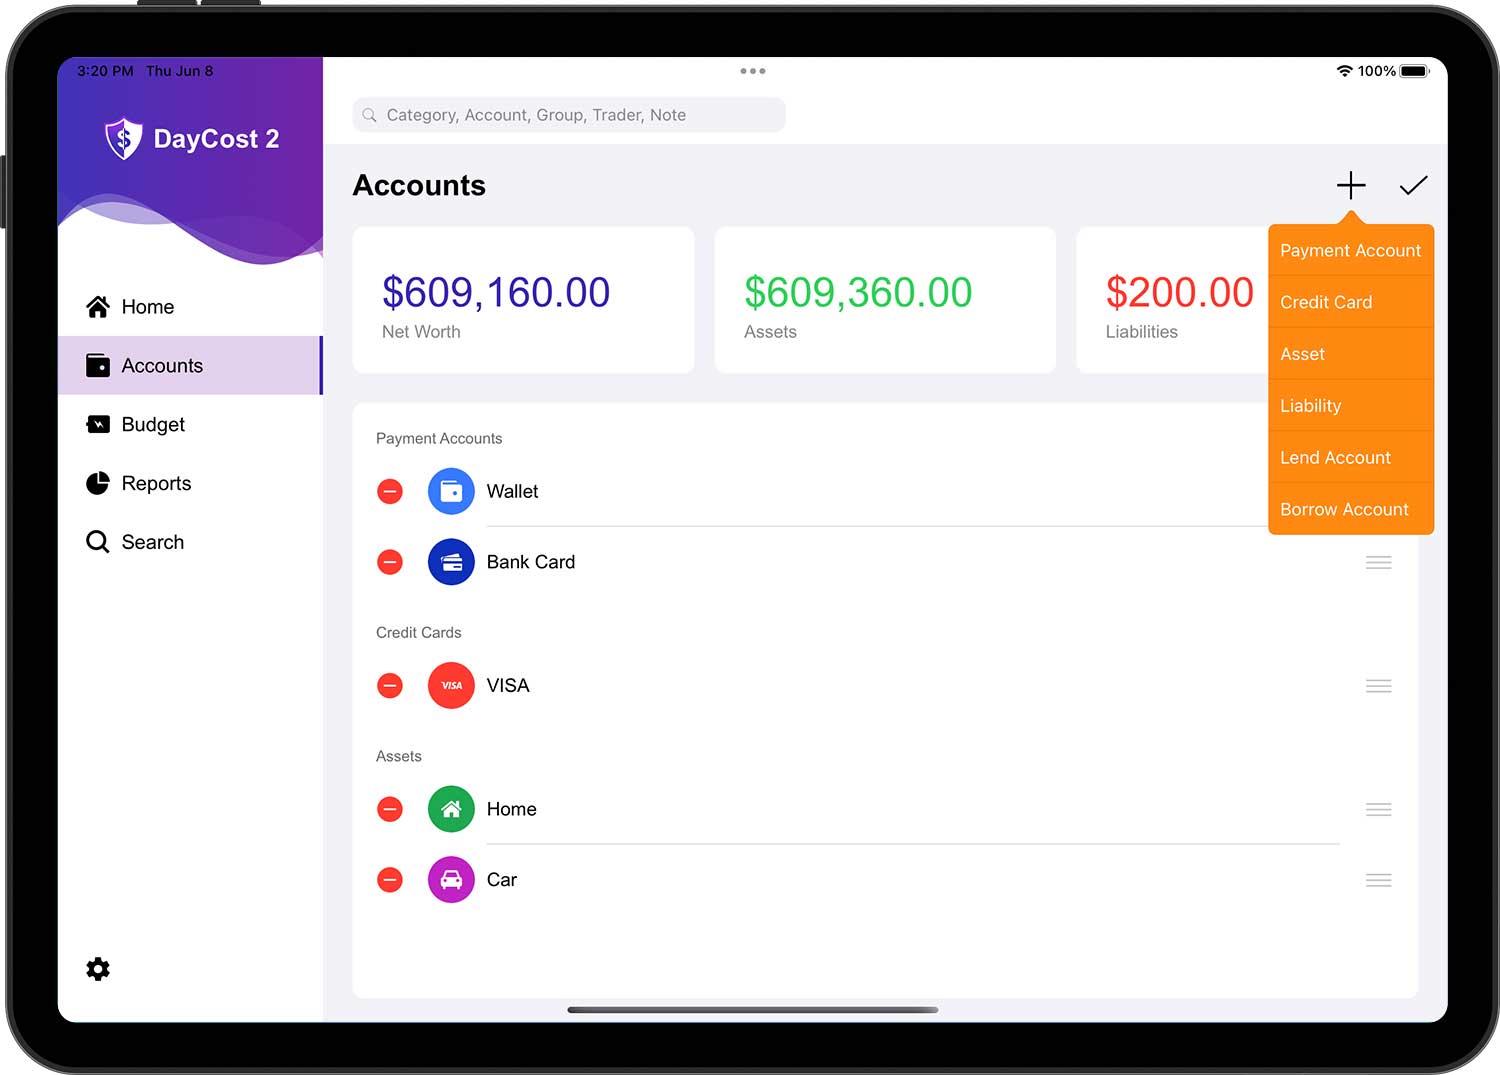
Perhaps you can find a better way to classify your assets, however, DayCost 2 suggests dividing them into the following three categories:
- Payment accounts: accounts used for payments, such as cash accounts, bank accounts, debit card accounts, internet accounts, etc.
- Assets: all other assets of higher value - homes, cars, stocks, etc.
- Lend Accounts: accounts where you lend your wealth to other people (the name of the account is usually the borrower).
Liabilities are also divided into three categories:
- Credit cards: Only your credit cards.
- Liabilities: bank loans, arrears, mortgages, etc.
- Borrow Accounts: an account that borrows wealth from other people (the account name is usually the borrower).
The credit card account shows the amount of debt you currently have with the bank. Designating the credit card account as the account for income transactions will reduce the amount of debt.
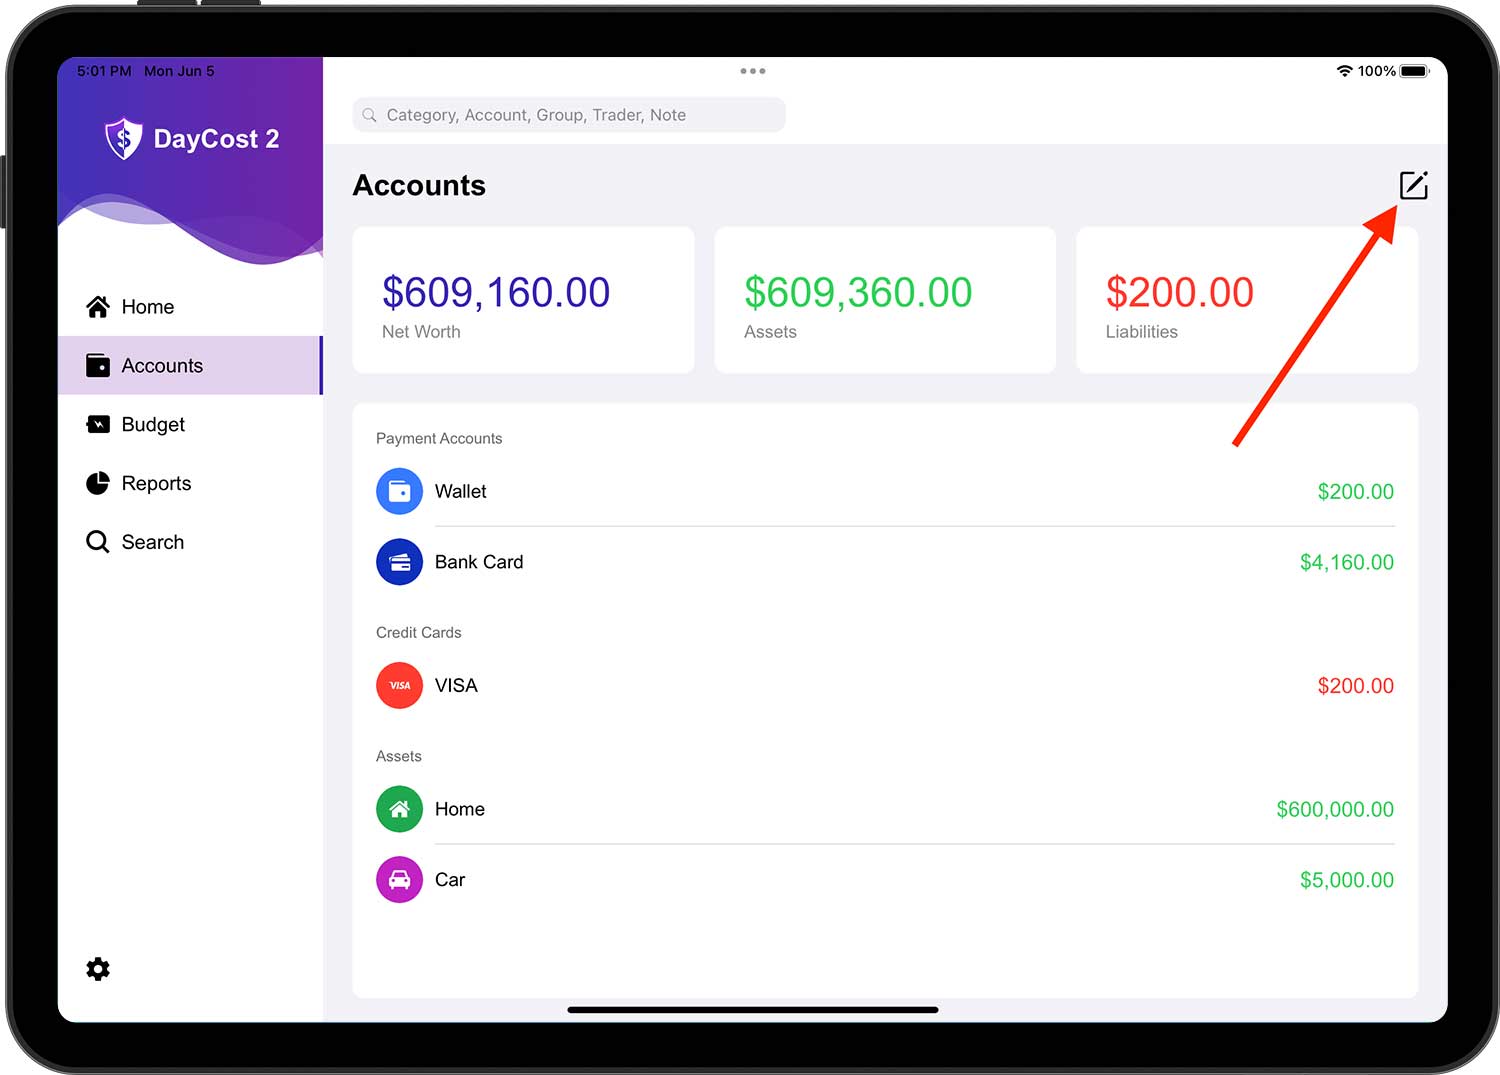
New Account
If you want to add a new account, tap the Edit button in the upper right corner, then tap the newly appearing "+" button, then select the account category.

Enter information about the new account:
- Name: Name a short name so that the account can be easily found in the list.
- Icon: Select an icon from the built-in icon manager or choose your own image as an icon via the camera/photo library.
- Currency: the currency unit of this account. All transactions within this account are in the same currency unit as this account.
- Balance: The current value of your assets/liabilities.
- Note: A description of the account.
When you are done, tap the "✓" button in the upper right corner to complete the operation.
- Each account can be set in its own currency unit. Please select the appropriate currency unit for each account separately.
- Tap on any account to see a list of all transactions for that account.
Edit Account
Tap the Edit button in the upper right corner of the account list page to enter the editing state, then tap the corresponding account to open the account information page, and tap the "✓" button in the upper right corner to complete the operation after the changes are made.
When the account list page is in edit state, you can sort the accounts:
- To the right of each account there is an icon consisting of three horizontal lines called the account movement icon.
- For accounts that need to be moved, just drag and drop the horizontal line icon to the right of the account to the corresponding position in the list.
- Repeat the above for other accounts. Please note that you can only adjust the order of different accounts in the same category (e.g. payment accounts, credit cards, etc.)
Hide/Delete Accounts
If you want to hide or delete an account, tap the Edit button in the upper right corner of the account list page to enter the editing status, tap the Delete button of the corresponding account, and the "Hide" and "Delete" menus will pop up. select the corresponding menu according to your needs.
- Hide: Set the account to "Inactive" status, it will not be displayed anywhere except in the account list page and in edit status. To revert to normal, you can simply do something similar to Set Hidden and select the "Display" menu in the pop-up menu.
- Delete: removes the account and associated transactions from DayCost 2 and cannot be restored.
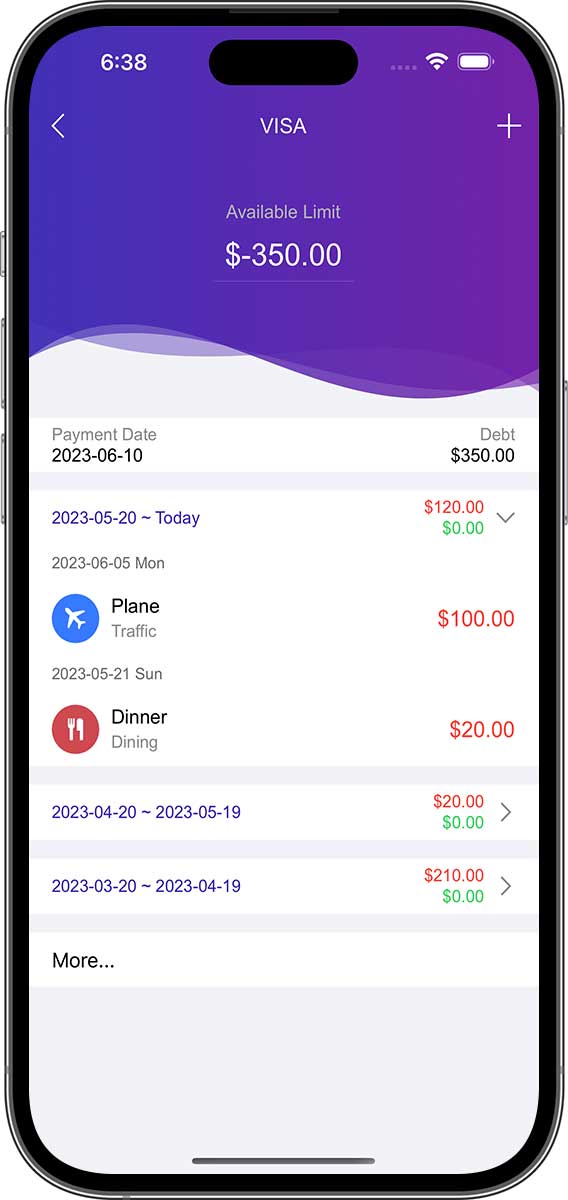
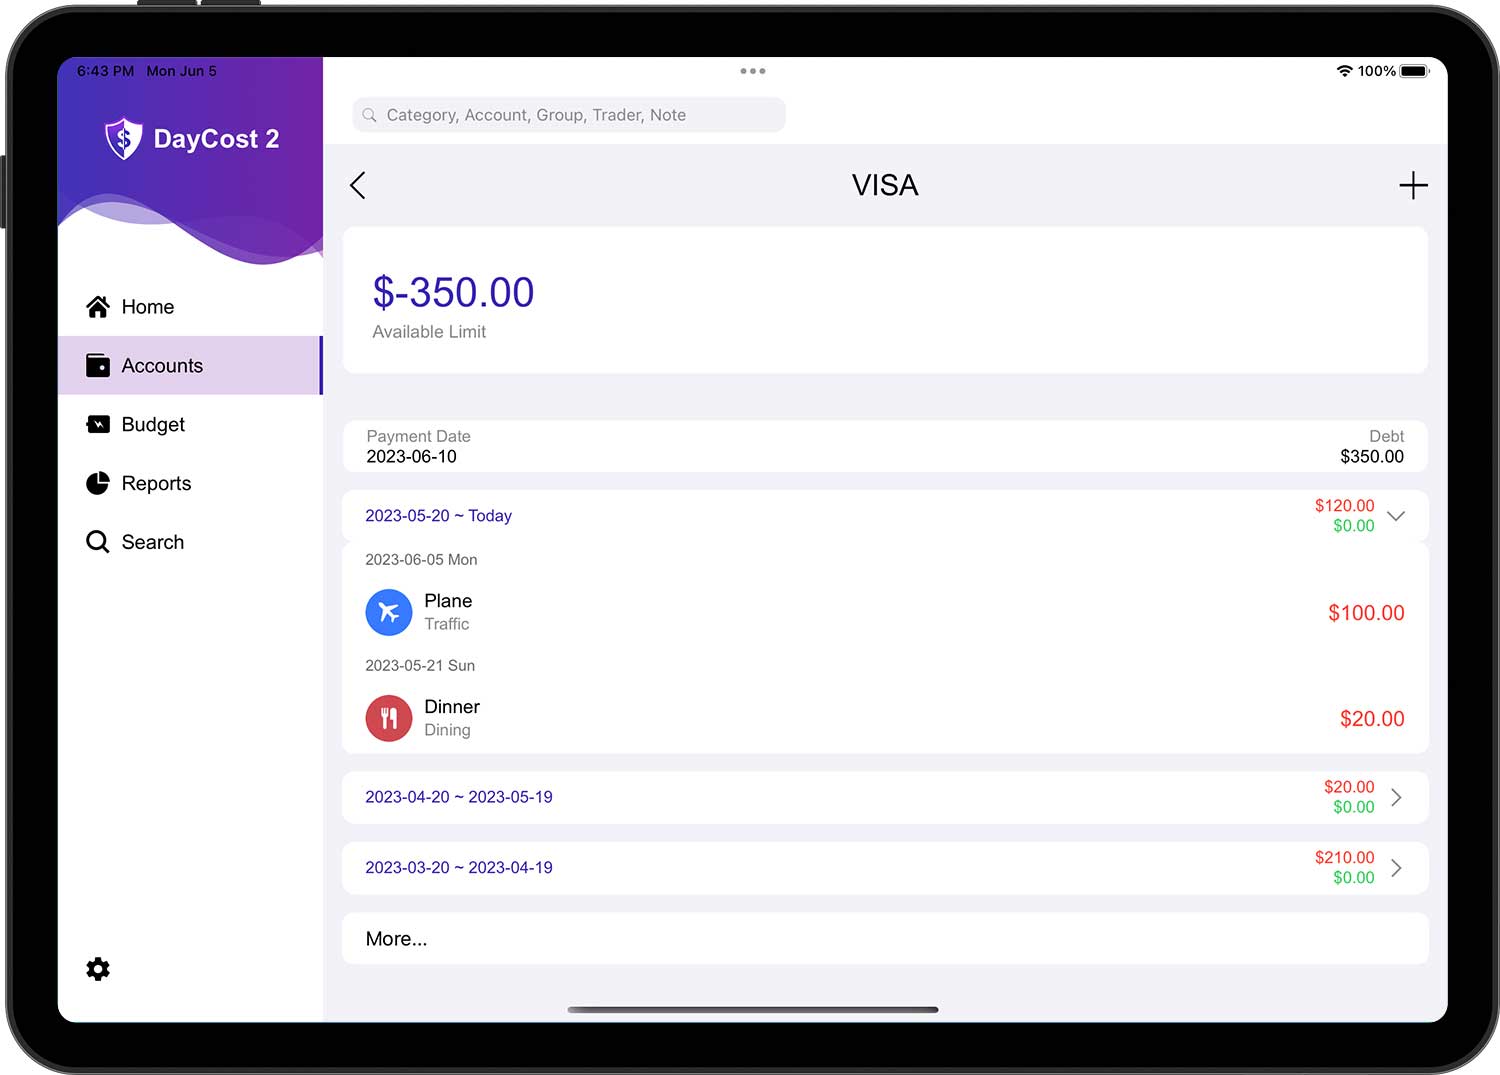
Credit Card Account
If it is a credit card account, the "Balance" information becomes "Debt" and "Limit", plus add Billing date and Payment date:
- Debt: the money you currently owe to the bank.
- Limit: The total amount available for this credit card.
- Billing Date: The date on which the issuing bank regularly summarizes and settles all transactions and charges that have occurred on the cardholder is credit card account for the current period, accrues interest, and calculates the amount due from the cardholder for the current period.
- Payment Date: The last date set by the card issuer to repay the current outstanding amount.
Accordingly, the list of transactions page that opens after tapping on the credit card account (not in edit state) is different. She shows the list of transactions for the last three billing cycles.
Adjust Account Balance
Sometimes you don not enter transactions that have already occurred into DayCost 2 because you forgot or for some other reason, and you don not want to add that information, then you can just adjust the balance of the account.
Tap the Edit button in the upper right corner of the Account List page and then tap the appropriate account. Enter the correct amount and then tap the "✓" button in the upper right corner. In the list of transactions for this account, you will find a new record, namely "Balance Adjustment".
Budget
This section will let you understand how to create/modify/delete a budget, with powerful budgeting features to meet your various budgeting needs. Budget is one of the main tools to help you control your expenses wisely, help you save extra money for big purchases in the future, and help you pay off debts or build wealth.

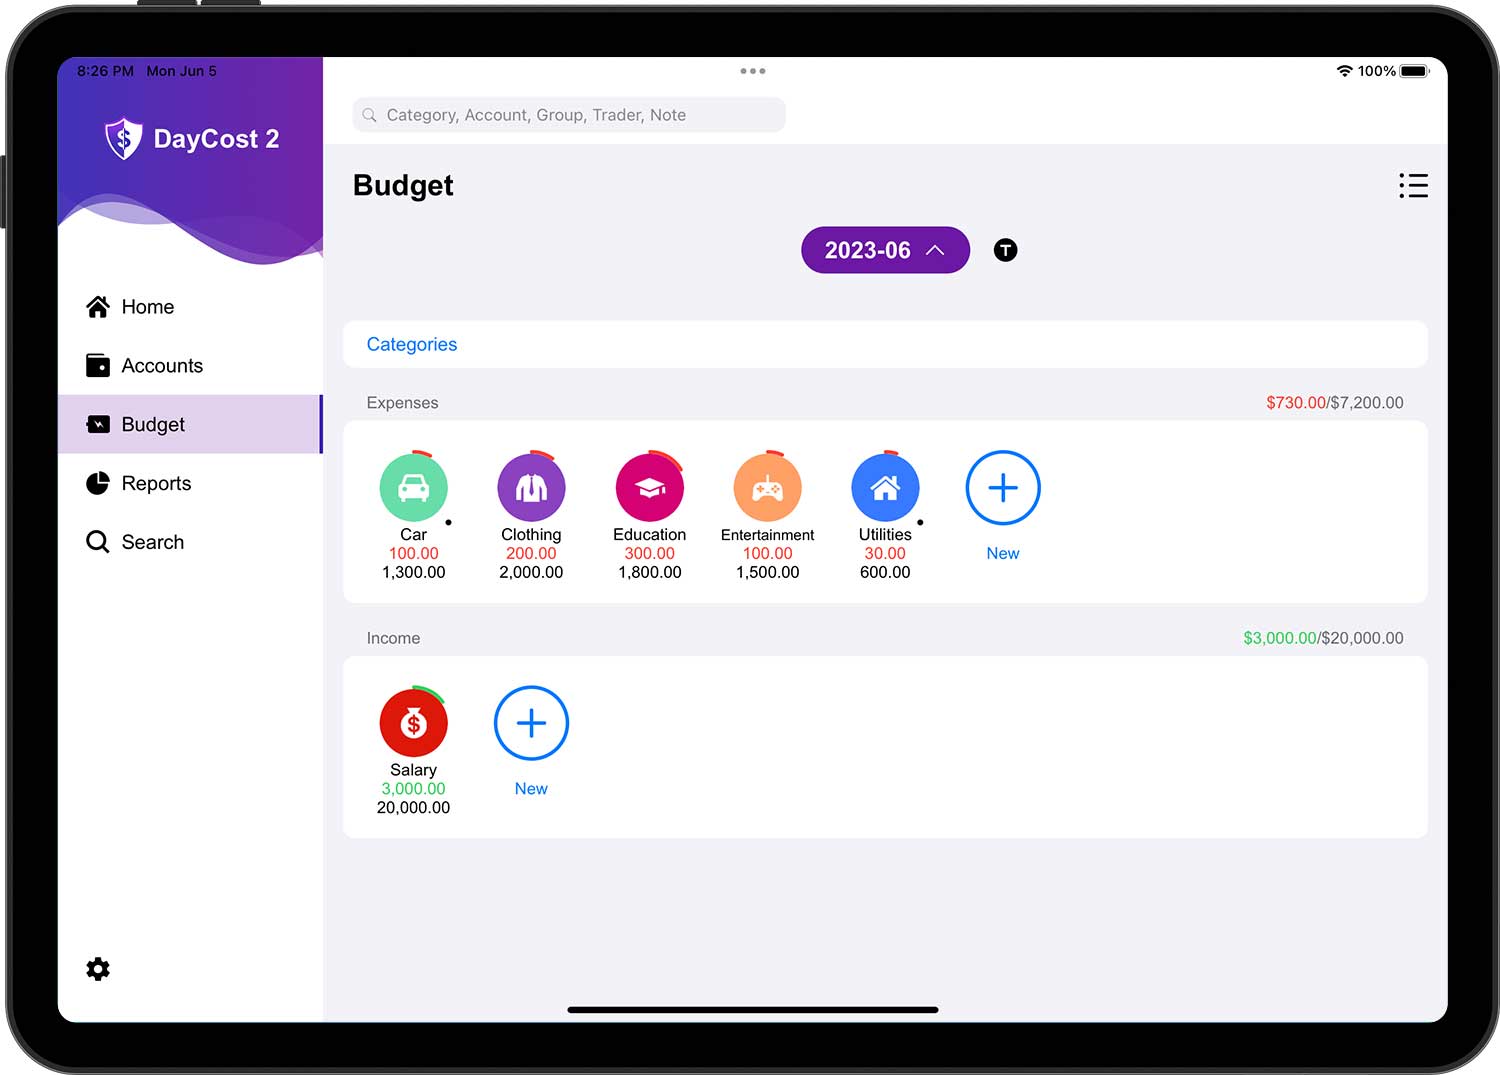
You can make budgets for expenses as well as for income. DayCost 2's budget feature also supports multiple dimensions, you can make budgets for accounts/groups/traders in addition to categories.
Setting up a Budget
First, you can select the dimension (default is category) in the pop-up menu by tapping on the Dimension button.
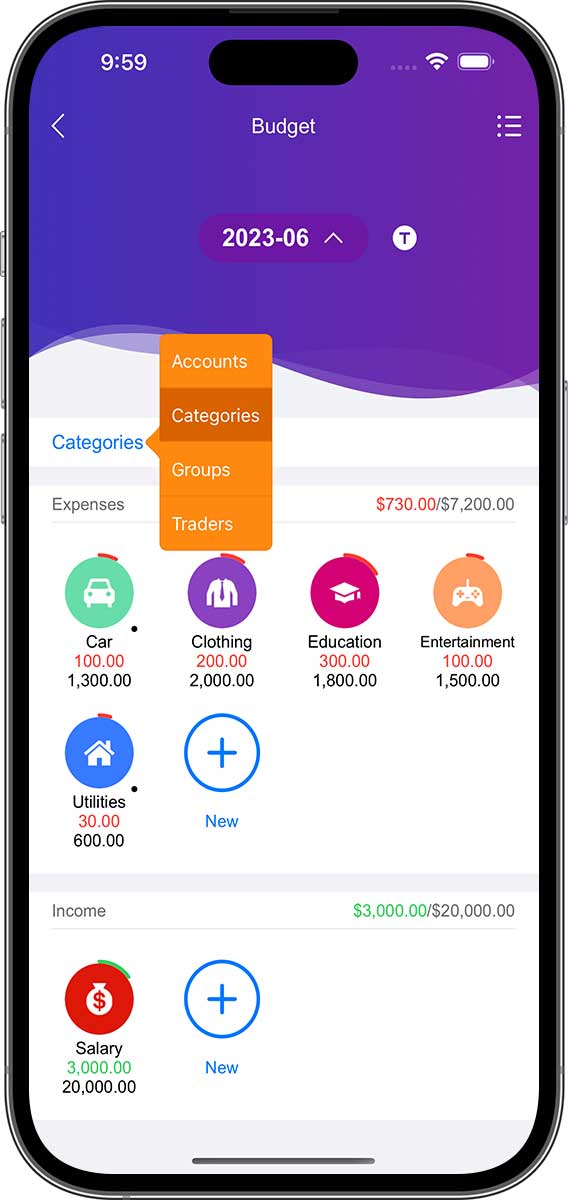

- For most users, it is enough to create budgets for categories only, so you can skip this step.
- This article also operates with budgets for categories, and budgets for accounts/groups/traders operate similarly.
Next, tap on the "+" button in the list of expense/income budgets to create an expense/income budget. You can also tap on the icon of a category in the list to open its budget list page, then go to edit and tap on the "+" button in the upper right corner to create a new budget.
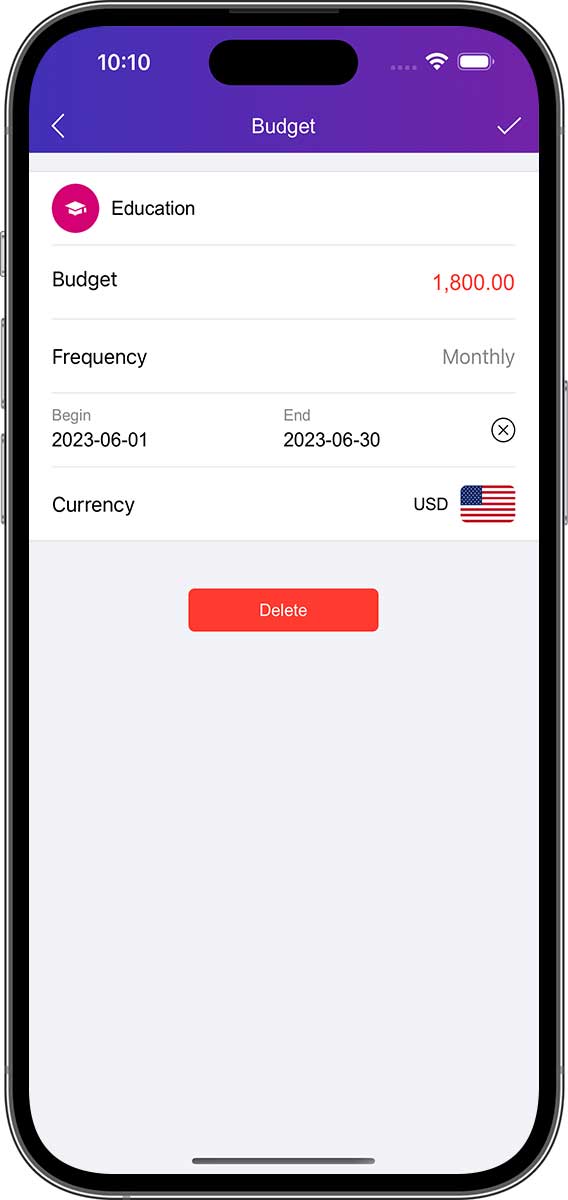

Enter information about the new budget:
- Category: select the category for which the budget needs to be created.
- Amount: the most amount you are willing to spend on this category (this budget).
- Frequency: Used to set the periodicity of this budget. You can set your budget period to "Daily" / "Weekly" / "Biweekly" / "Monthly" / "Yearly", or you can customize the periodicity (default is monthly).
- Begin Date and End Date: If the end date is "Never", or if the end date contains several cycles, then this budget will automatically recur according to the selected cycle.
- Currency: You can select different currency units for the new budget.
When you are done, tap the "✓" button in the upper right corner to complete the operation. Then repeat the above operation and continue to create a new budget.
Track Budget
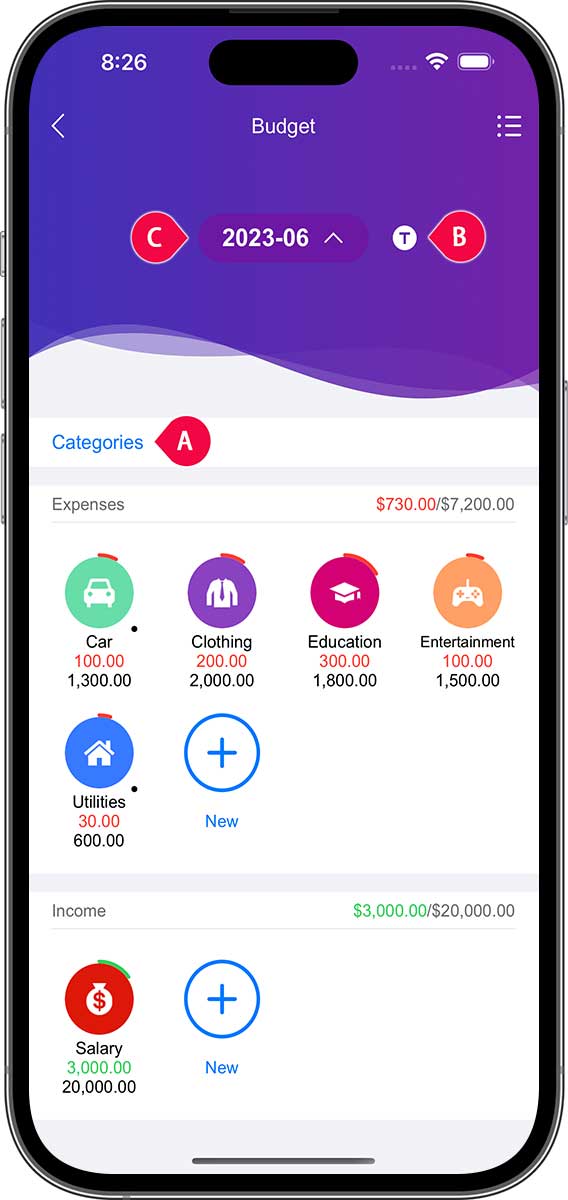

Show the status of the category's expense/income budget for the current month by default. The category will only be displayed here if a budget limit has been set for that category.
- The outer circle of the icon (Expense: red; Income: green) indicates the percentage of the budget that has been used for the current month.
- The value in the first row below the name indicates the amount of the budget that has been used for the current month.
- The value in the second row below the name indicates the total budget amount for the current month.
If you want to track more budget information, you can refer to the following steps:
- Tap the Budget Dimension button (i.e. "A" in the diagram) to toggle the dimension. You can skip this step if you only develop budgets for categories.
- Tap the cycle type button (i.e. "B" in the figure) to toggle between different periodic categories. Cycle type include: Day/Week/2 Weeks/Month/Year.
- Tap the cycle button (i.e. "C" in the figure) to toggle between different periods.
The expense/income budget list will be updated in real time according to your selection.
- Tapping on a category will open the corresponding list of all budgets. If it has subcategories (small dots in the bottom right corner) it will show the budget status of the subcategory and tapping on the subcategory will open its budget list.
- Tap on any budget line in the budget list and the corresponding list of transactions will be displayed.
Delete Budget
If you want to delete a budget, after tapping the list button on the top right corner of the budget home page, it will open the budget list page, she contains all the budget data you made. Then tap the Edit button in the upper right corner to enter the edit state, at which point you can delete the budget.
You can also tap on a category in the budget home page to open the budget list page, which contains only the budget data corresponding to the category you selected.
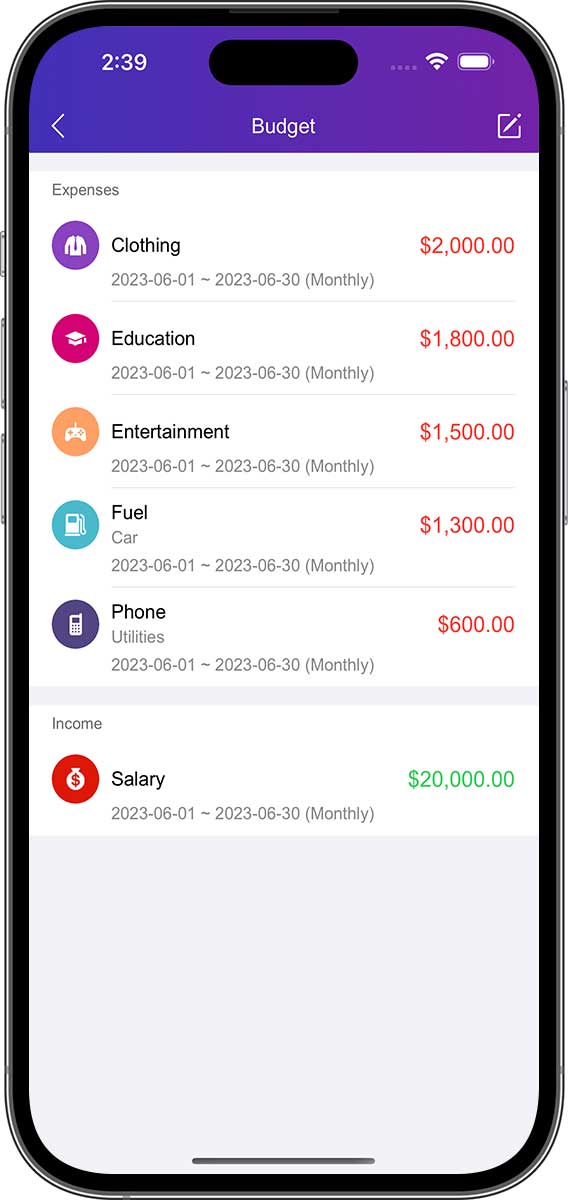

- Deleting a budget does not affect the category data, nor does it affect the transaction data.
- The budget deletion operation for accounts/groups/traders is the same as for categories.
Reports
This section will give you an overview of the various reports in DayCost 2. The powerful reporting features give you a quick overview of your financials, and by expanding them level by level, you can eventually open the corresponding list of transactions.

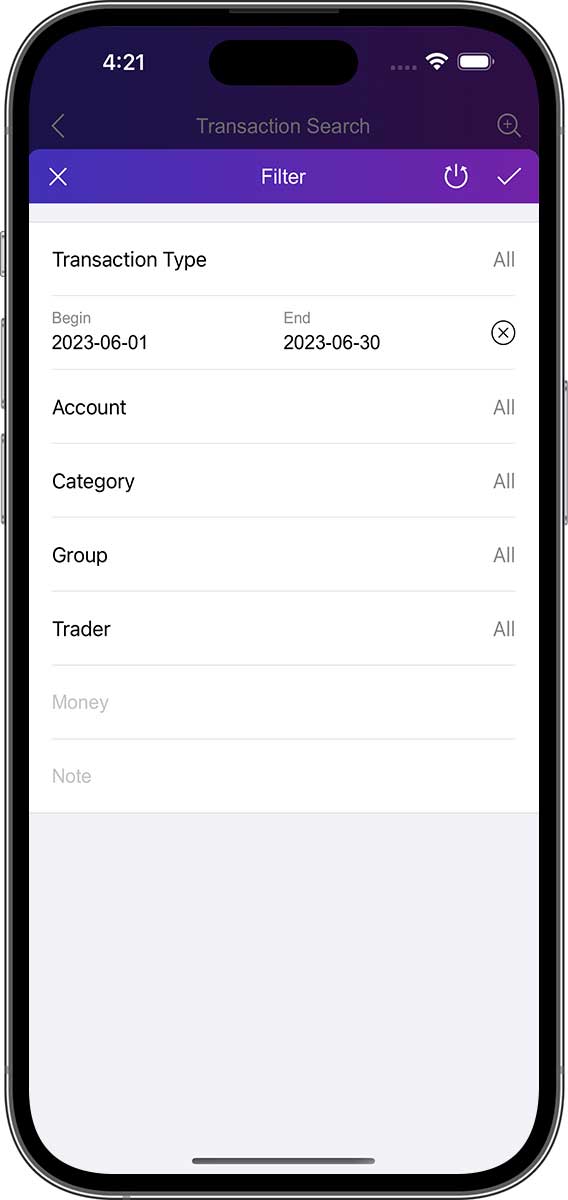
Filters
You can filter your reports by the advanced filtering mode. Tap on the filter icon in the upper right corner of the report page and select the desired parameters. For example, you can select an account and multiple expense categories. By setting different filtering parameters, you will be able to get a different perspective on your personal financial situation.
You can filter transactions by time period according to the above instructions.
You can filter transactions by transaction type:
- Income
- Expense
- Money Transfer
- Asset Purchase
- Asset Sale
- Liability Acquisition
- Discharge of Liability
- Lend Money
- Recover Money
- All the types
You can filter transactions by account:
- One account
- Several accounts
- All the accounts
You can filter transactions by category and subcategory:
- One category/subcategory
- Several categories/subcategories
- All the categories/subcategories
You can filter transactions by group:
- One Group
- Several groups
- All the groups
This filter may be handy if you only want to see expenses for a particular party or trip individually.
You can filter transactions by trader:
- One Trader
- Several Traders
- All the Traders
This filter is especially useful if you want to figure out where you spend most of your money.
In addition, you can choose the right group according to the following indicators:
- Account
- Category
- Group
- Trader
Grouping will determine the information displayed in the report's detail list (default: Category).
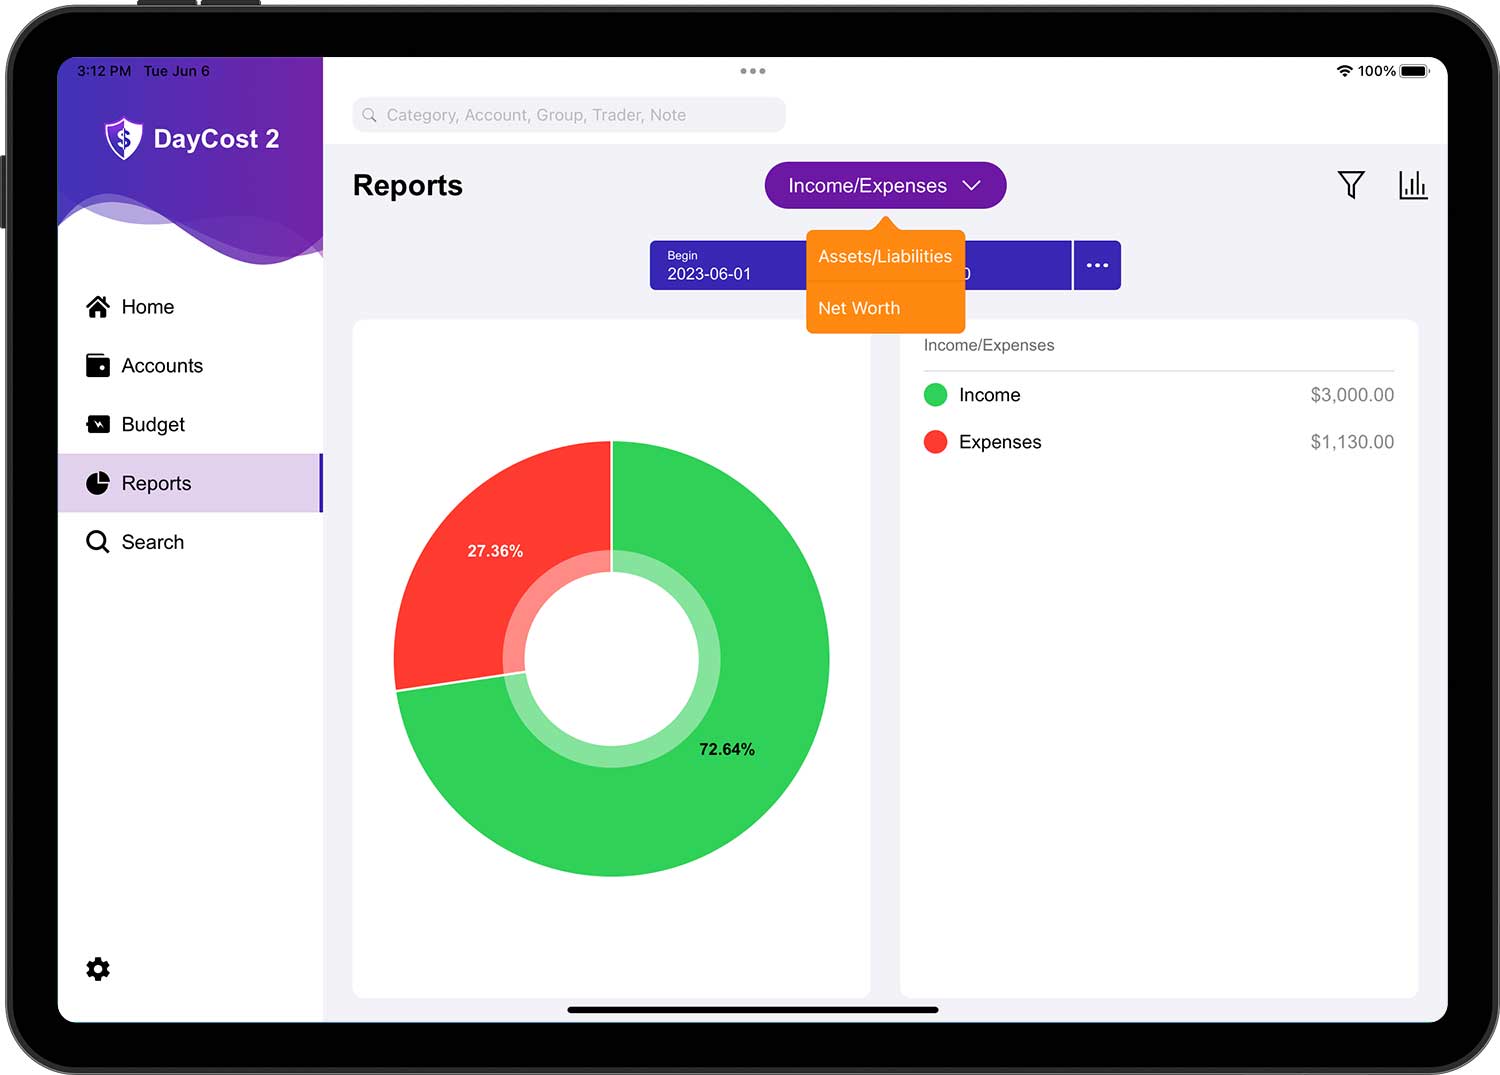
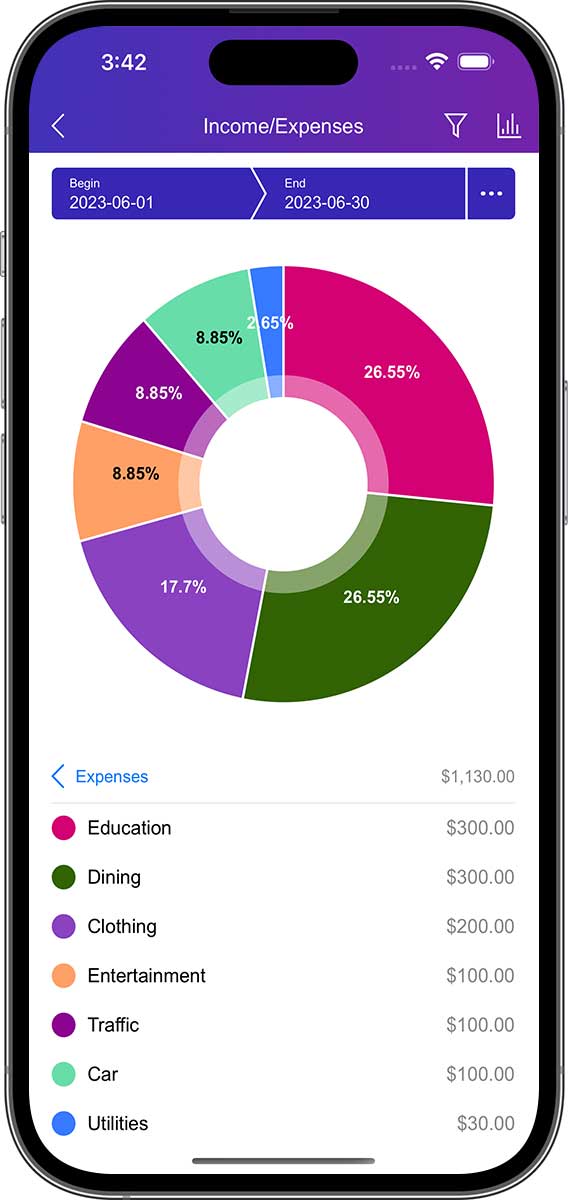
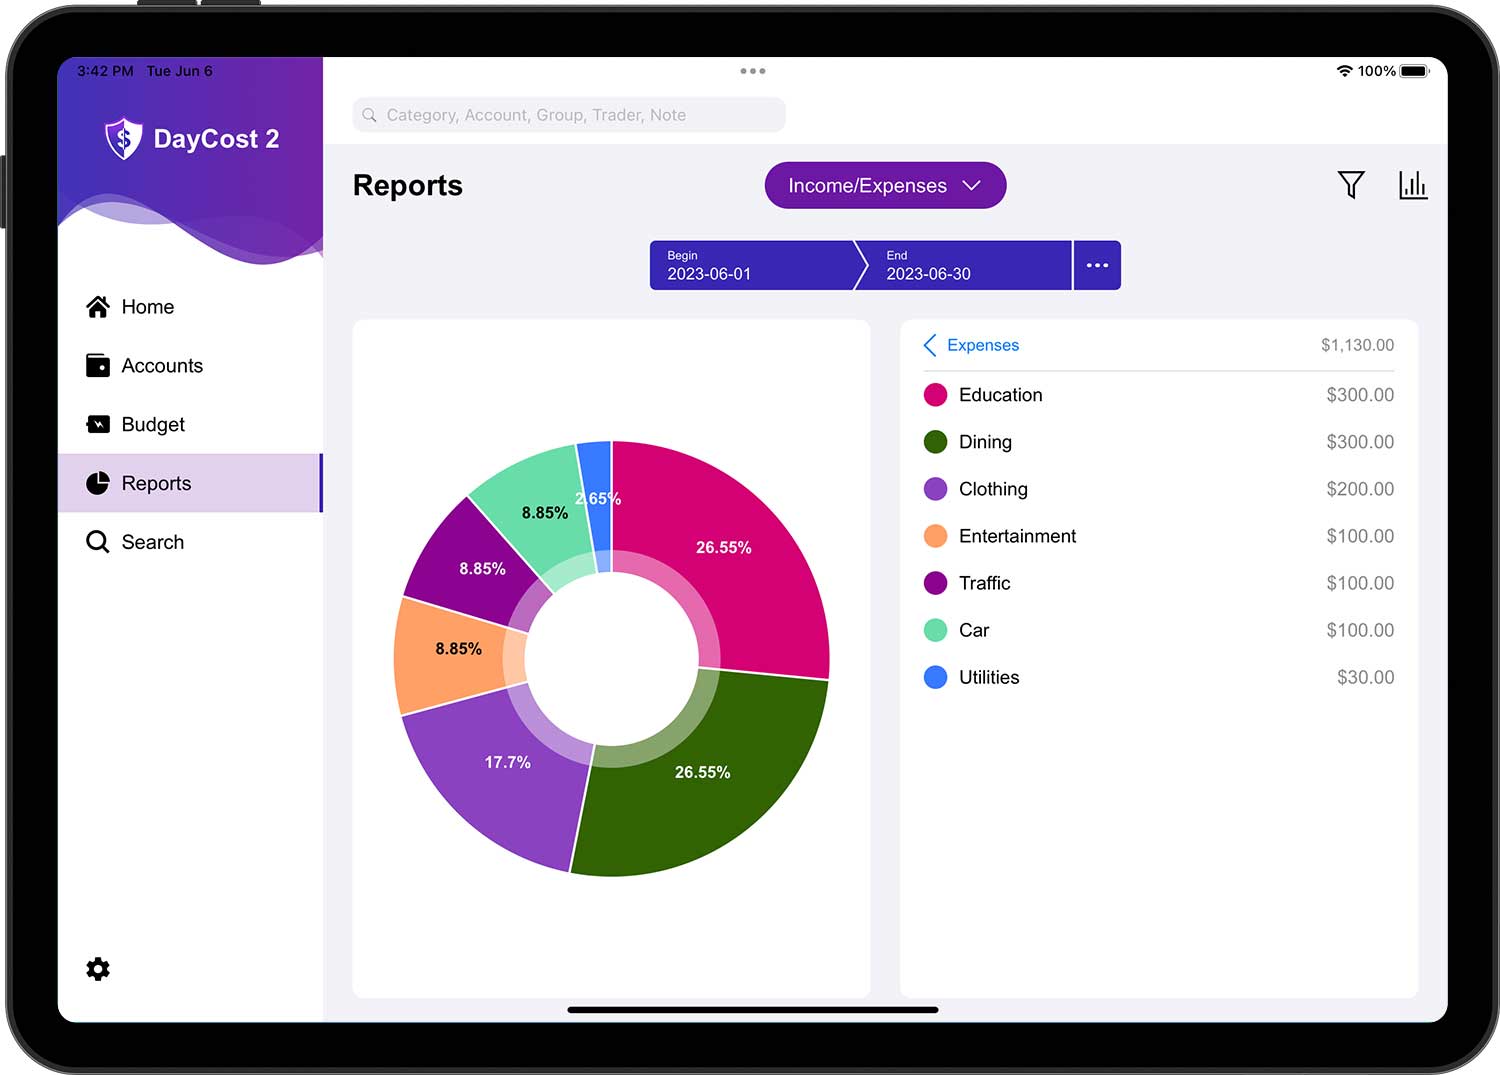
Income/Expenses Report
Here you can see the details of your income/expense structure. You can choose from pie charts, bar charts or line charts to display the data.
Tap on an area of the detail row or chart to expand the next level to get more information. You can select one of the categories to see a report that contains all the subcategories of that category.
In the first level, you will see your total revenue and total expenses. In the second level, you can see the composition of your income or expenses by selecting either income or expenses. The third level presents the composition of subcategories under a certain category (if any). At the last level, you will see a list of transaction data in the selected category/subcategory.
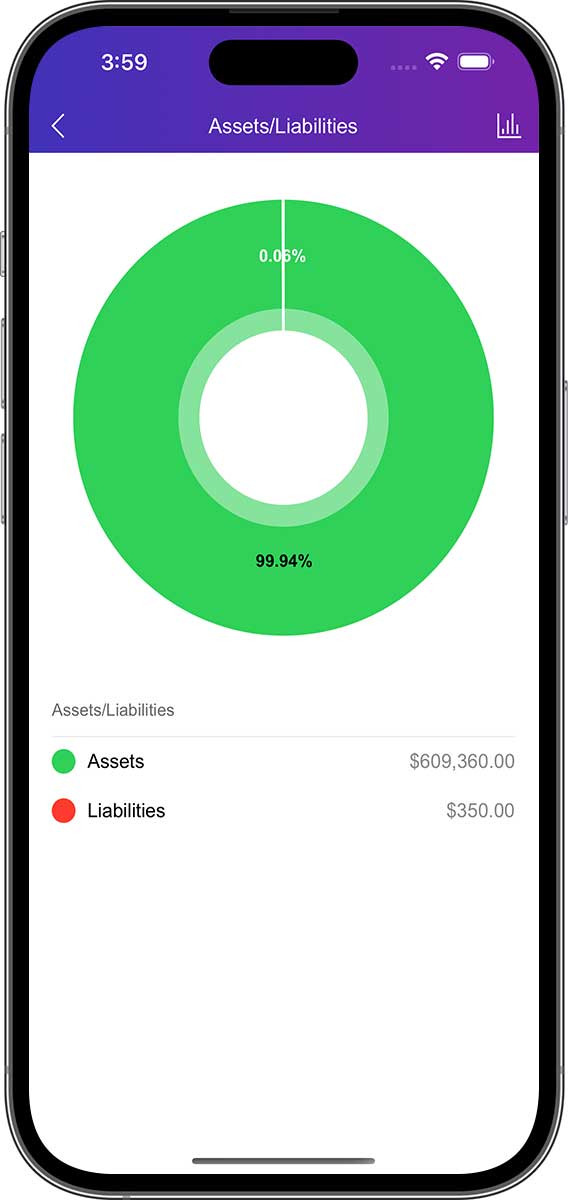
Assets/Liabilities Report
This statement shows the relationship between your assets and liabilities. You can also view the structure of your assets and liabilities here.

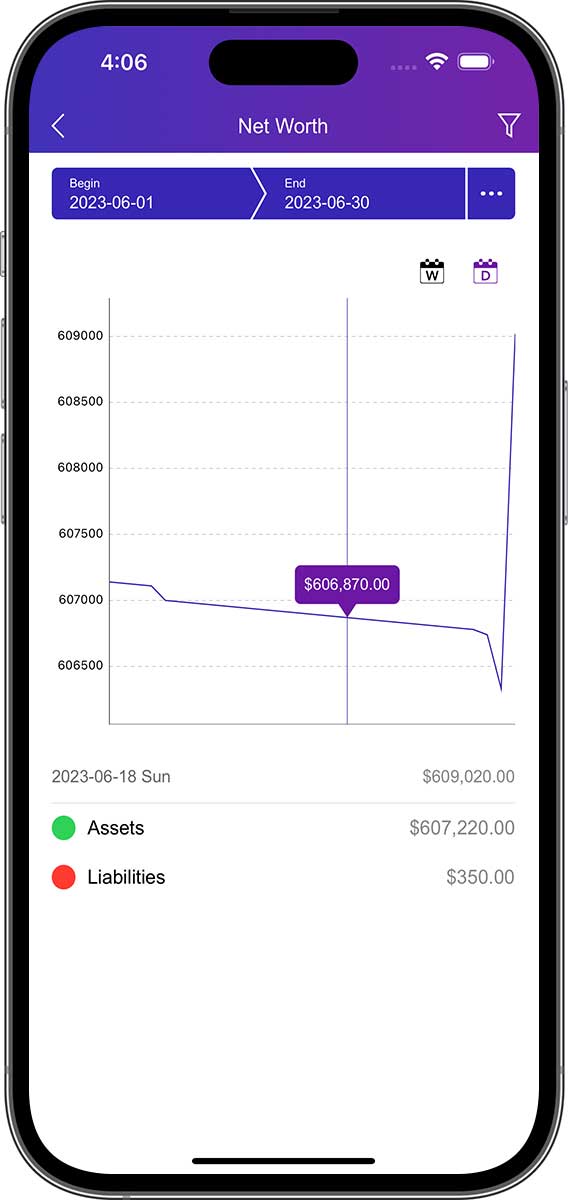
Net Worth Report
The Net Worth statement shows the difference between your assets and liabilities on a daily/weekly/monthly/yearly basis.

Search
This section will give you an overview of DayCost 2's search functionality, including a quick search and an advanced search, allowing you to easily search for the appropriate transaction data.
Quick Search
You can enter category name, account name, group name, trader name, notes to quickly search for trading data and support fuzzy search.

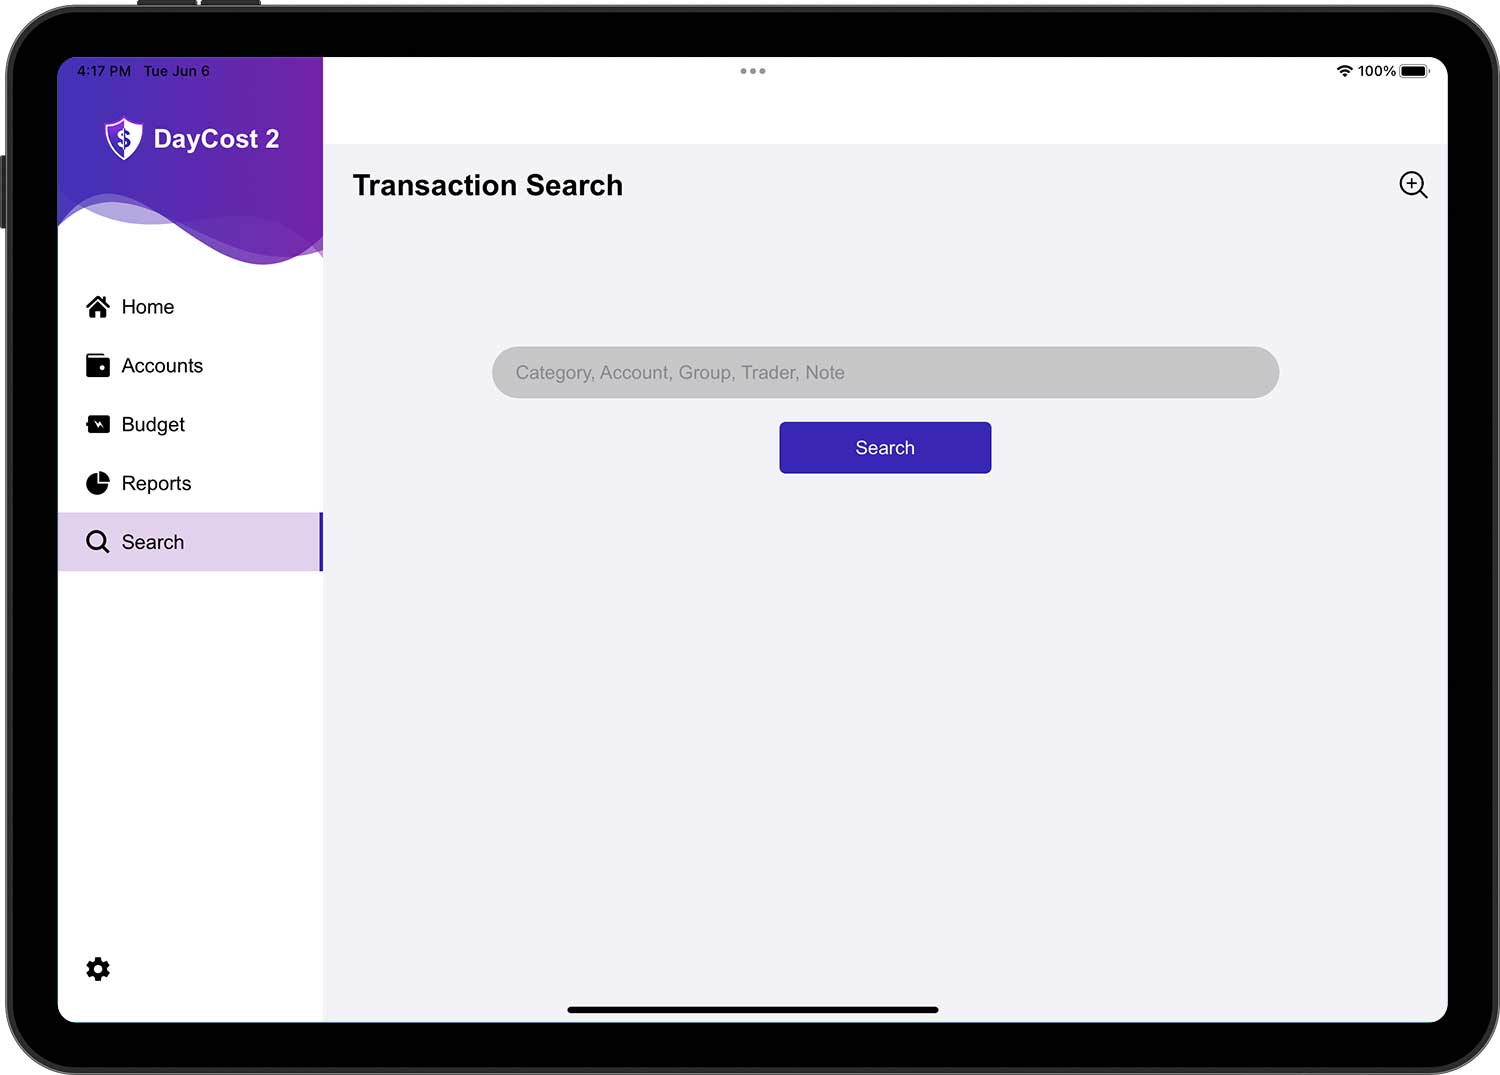
Advanced Search
If a quick search does not meet your requirements, then you can use the advanced search function. You can enter more targeted information to search for transaction data more precisely.

Settings (Family Bookkeeping, Sync)
This section will give you an overview of some of the important features of DayCost 2. In the "Settings" page you can set some common options and also set important options.
Family Bookkeeping
You can keep track of your own financial data, but you can also do it with your family. Each person operates in their own iPhone/iPad to record their respective financial data in DayCost 2 for the purpose of sharing financial data.
Of course, you can also collaborate with your friends or business partners to bookkeeping.
We recommend that you create multiple ledgers. Your own private financial data is recorded in a separate ledger, and you create separate ledgers for your financial data with your family, friends or business partners.
DayCost 2 has a default ledger, and she also allows you to create multiple ledgers. You can create a separate ledger for a business event, or a trip with friends, etc. The data is independent between the ledgers, and queries and statistics are faster.
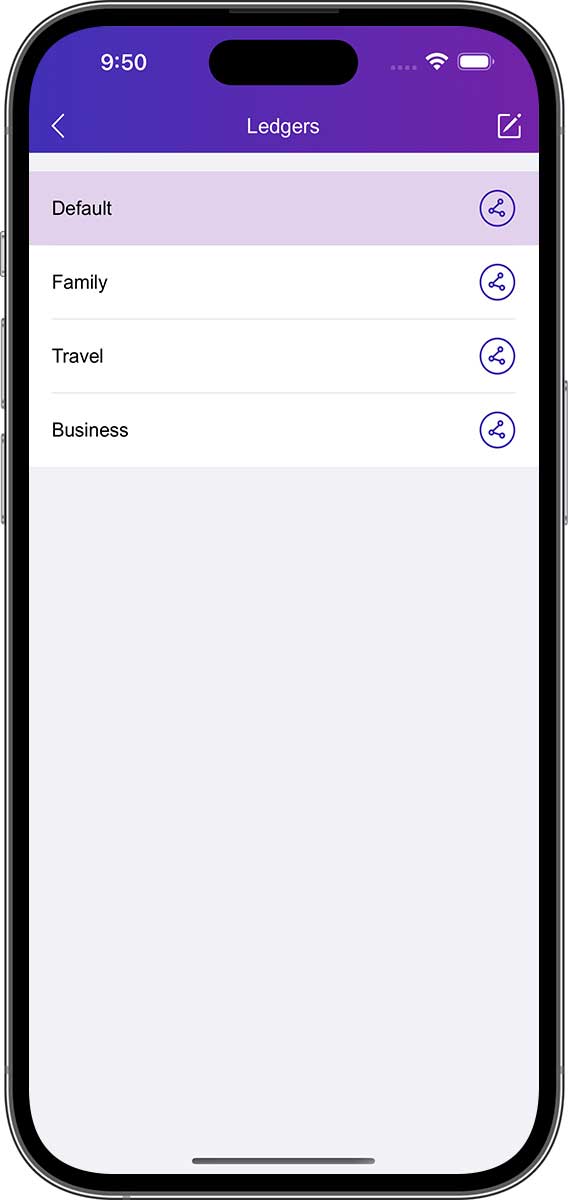
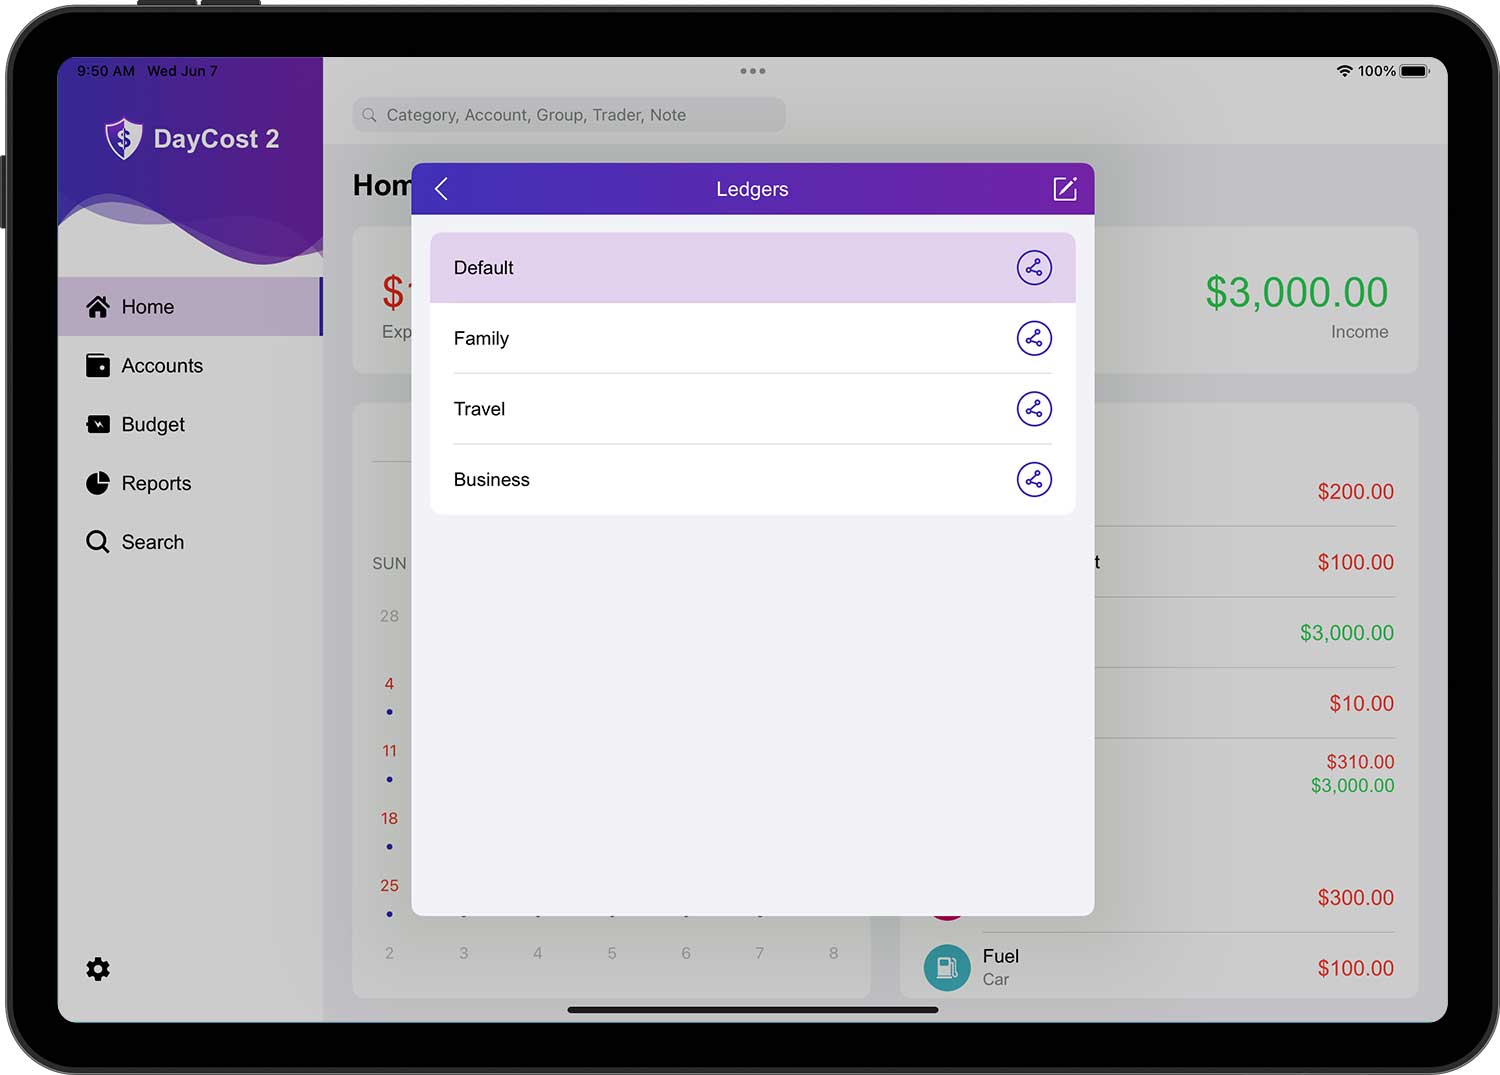
After you create the ledger, you can invite your family, friends or business partners (you can invite more than one person at the same time), and they can bookkeeping together after they accept the invitation. The invitation is very simple, after you tap the share button on the right side of the ledger in the ledger list page, it will open the sharing page, and you can do it in three simple steps.
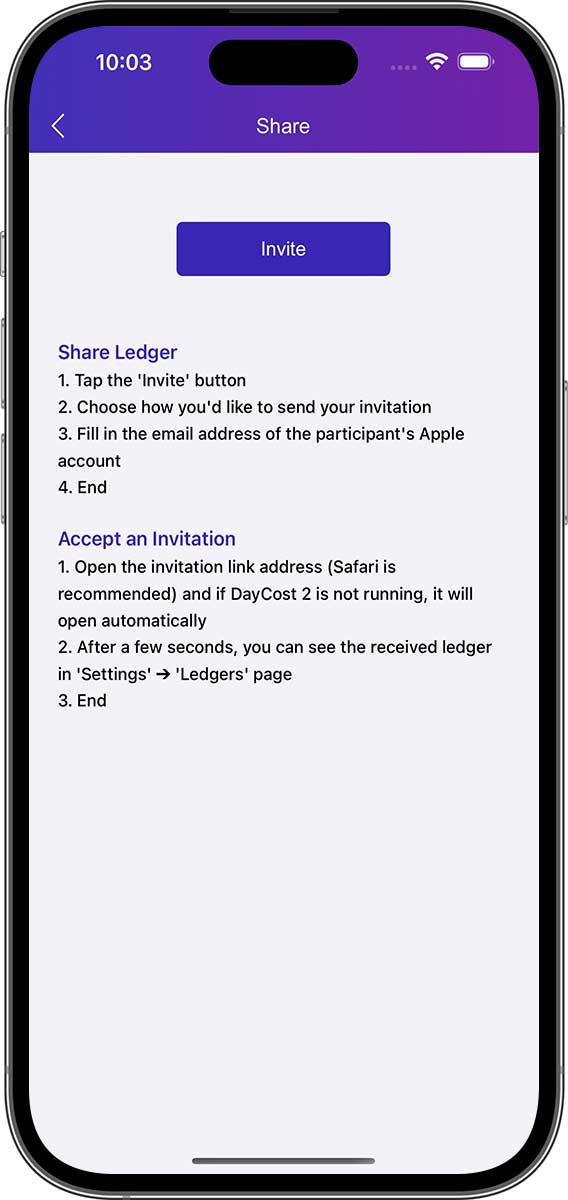

After your invitee accepts the invitation, the ledger you shared will be displayed on their ledgers list page.
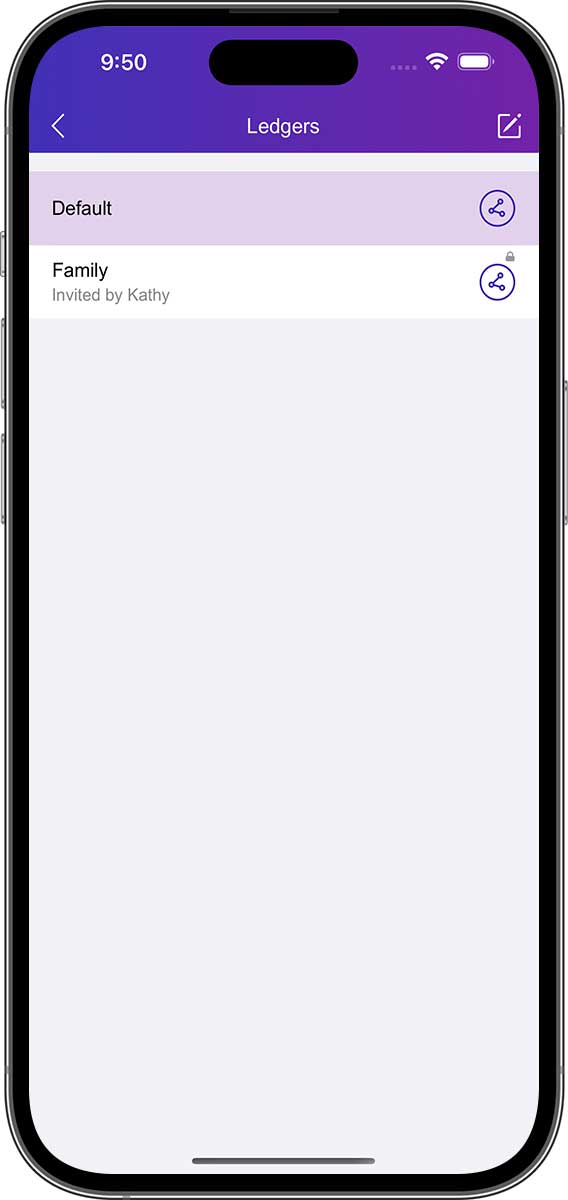
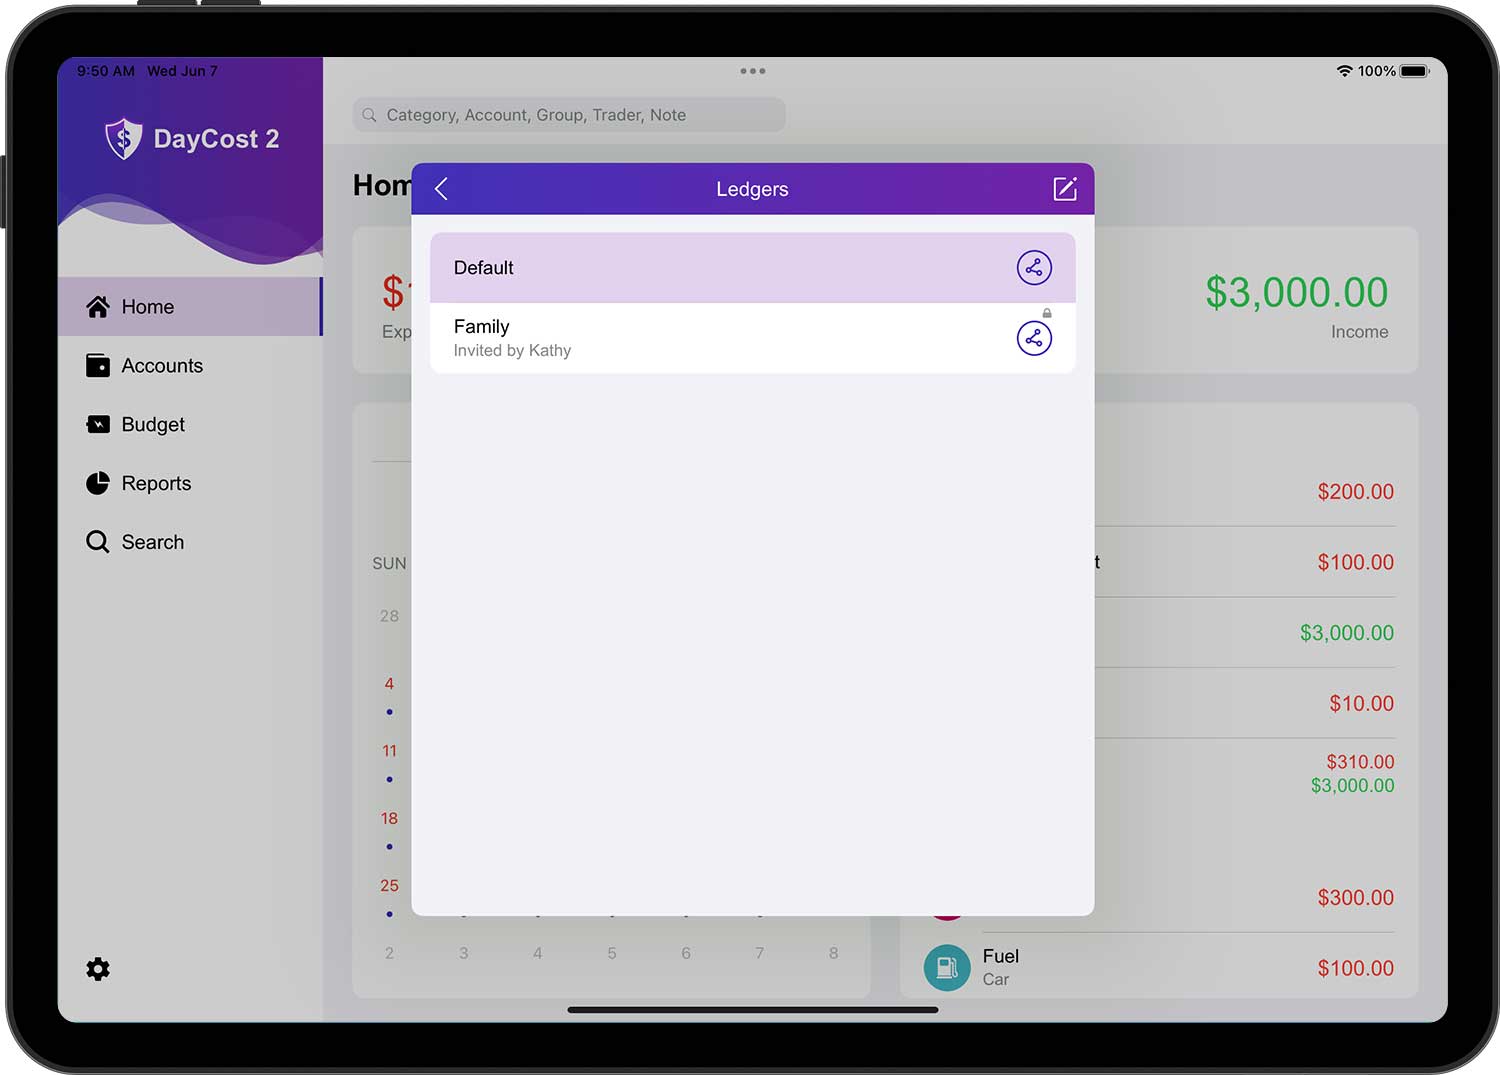
For any transaction data, only the creator can edit/delete it, others can only view it. And a small lock will be displayed in the top right corner of the transaction data.
iCloud Sync
You can use iCloud to transfer data automatically. When DayCost 2 is started, data will be automatically synchronized via iCloud. Data can only be synced between the same ledgers, which means that data can only be synced from one device to the other if both devices have the same ledgers.
If iCloud is enabled, data is automatically uploaded to all your devices. If you delete a ledger on one of your devices, this ledger on all your other devices will also be automatically deleted.
To enable iCloud, open the Settings page and turn on "iCloud Sync".
If you want to set up iCloud correctly on all your devices, please use the recommended settings. Once you have set up iCloud, please wait for the information to update.
Import/Export
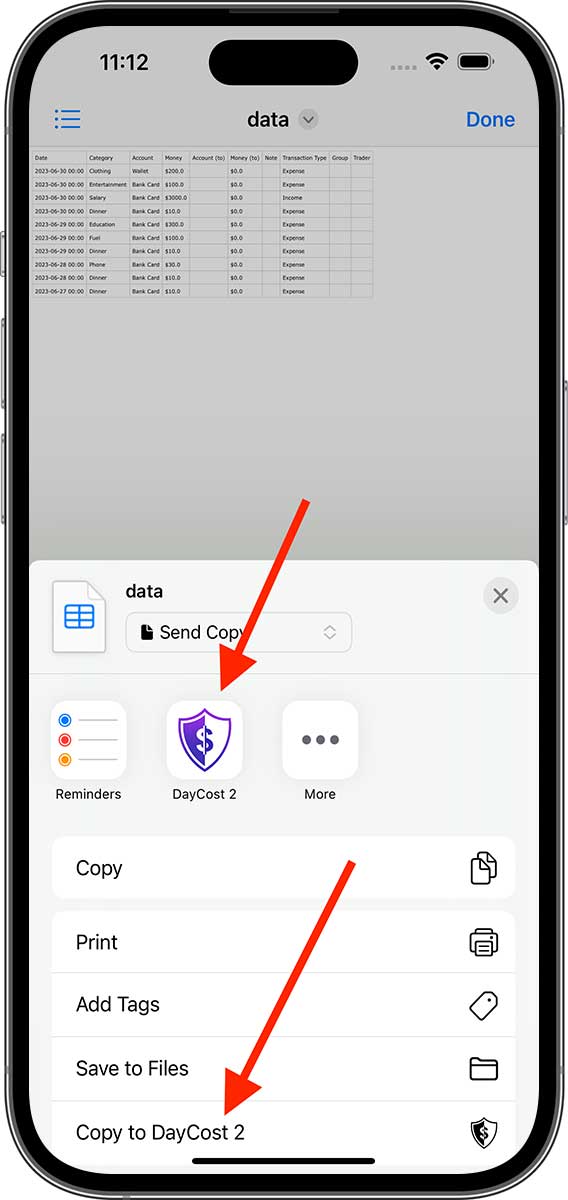
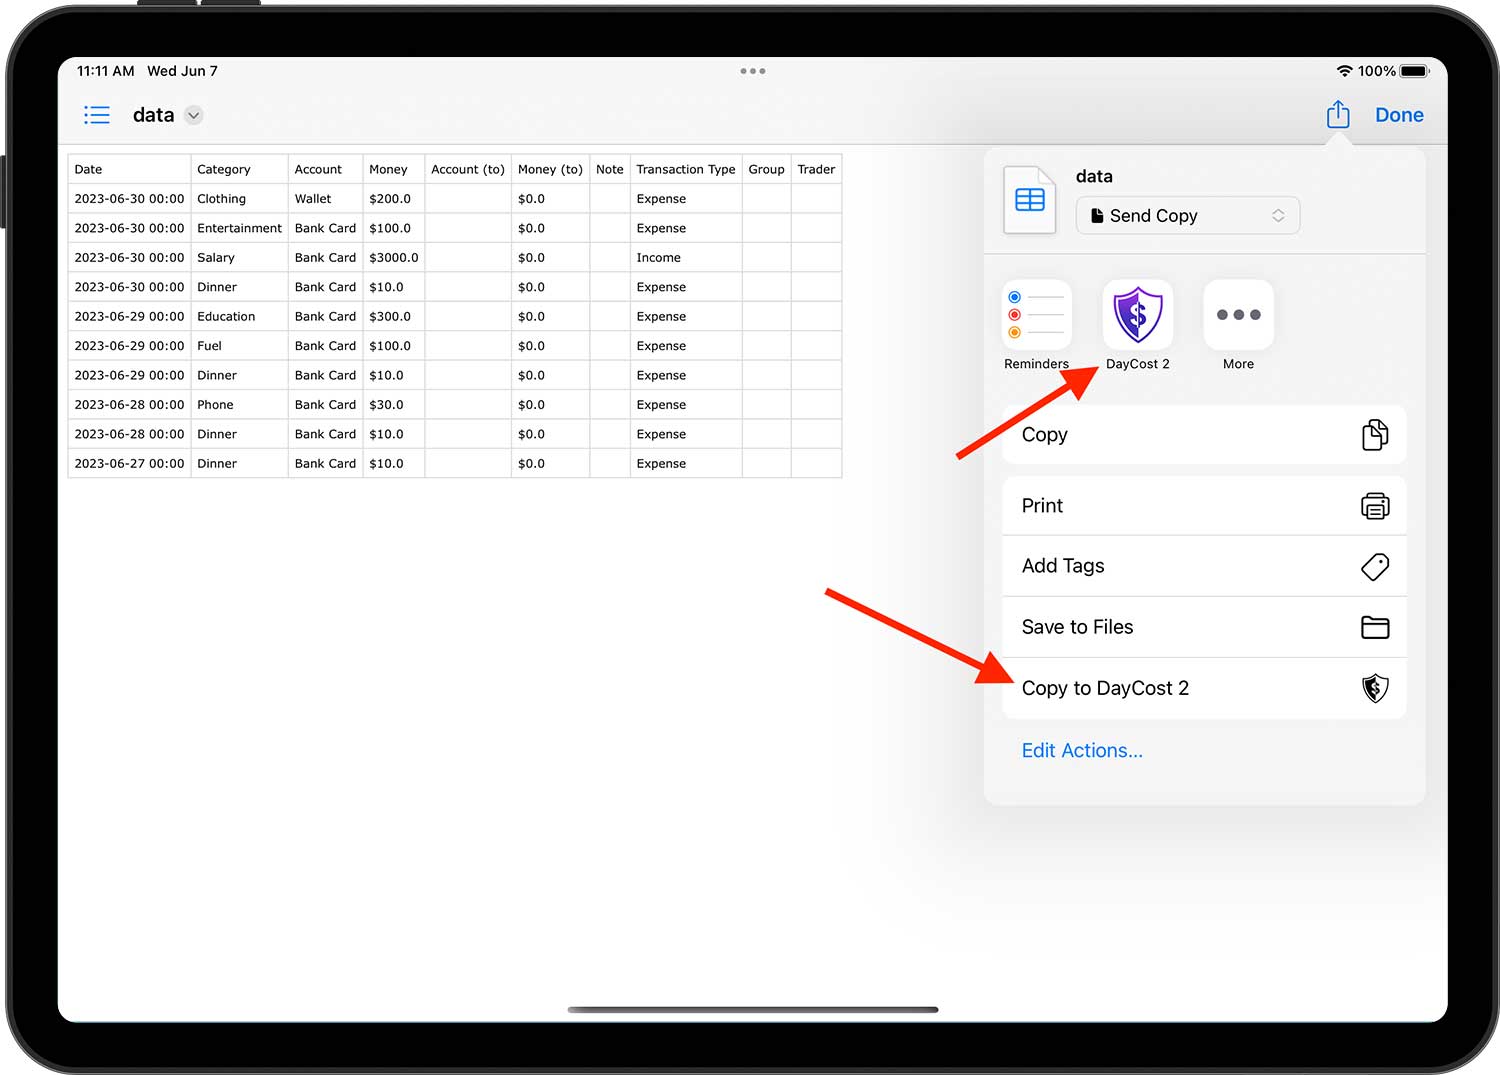
You can download your own bank statements (CSV format only) from DayCost Pro, other apps or from your bank's website, and then upload the CSV file to your iPhone/iPad via DayCost 2's built-in WIFI function or other app's sharing function. The whole process is very simple, fast and smart.
Built-in WIFI Function:
Open DayCost 2 "Settings" ➔ "Import/Export" ➔ "Import CSV" ➔ "Select File" page, tap the Edit button in the upper right corner, then tap the "+" button, it will open the WIFI page, and upload the CSV file as required.
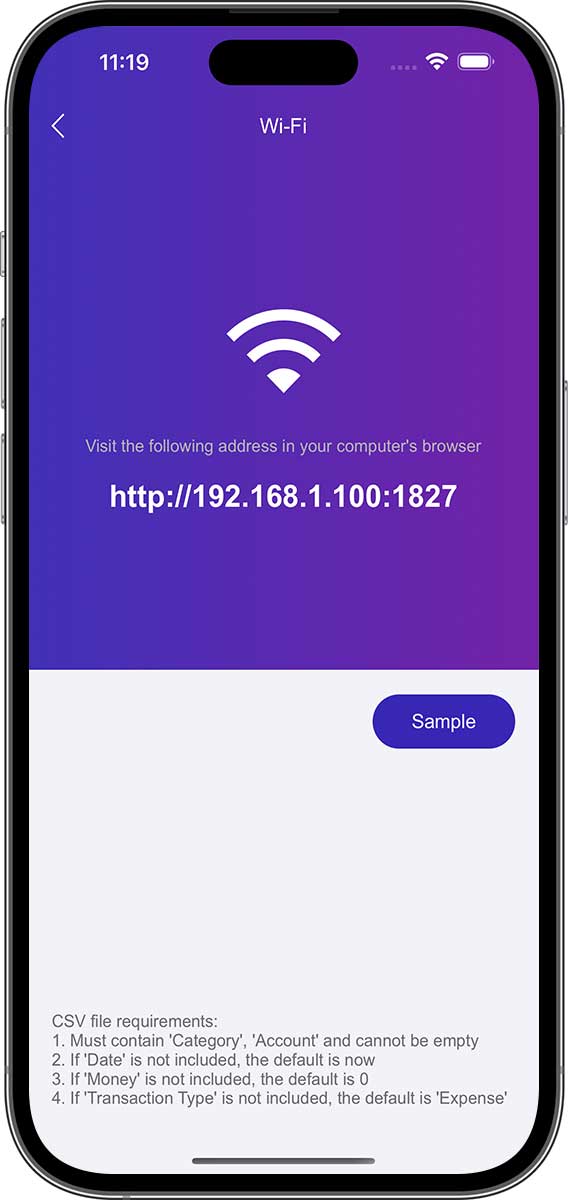
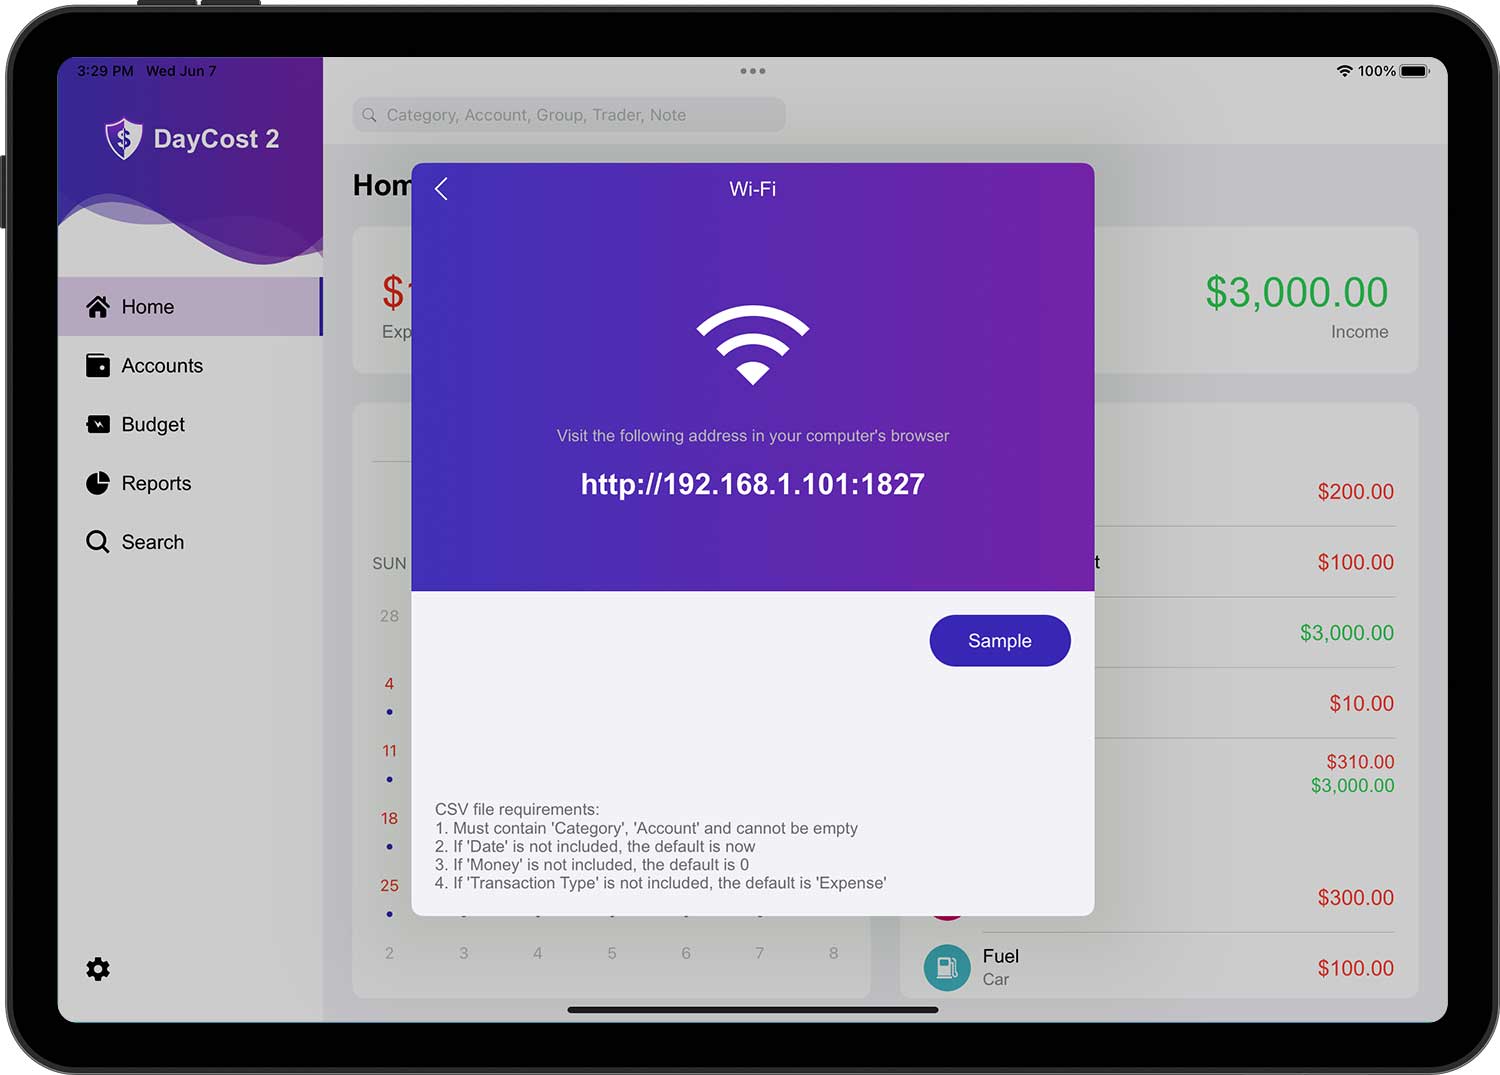
Share Function:
Take the "File" App that comes with iOS as an example. Open the CSV file you want to import, then tap the "Share" button and choose one of the two methods indicated by the arrow to import it.
After uploading the CSV file, you will see all the CSV files you uploaded before when you open the "Select File" page again. After selecting a file, a new page will pop up that will tie the transaction name to the table header in the file.
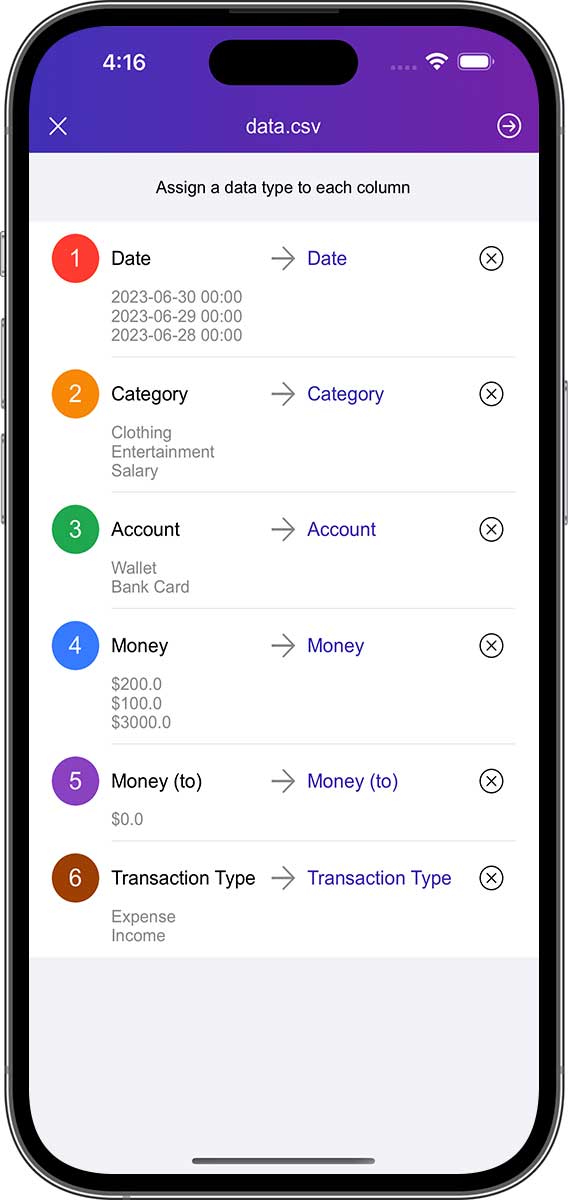
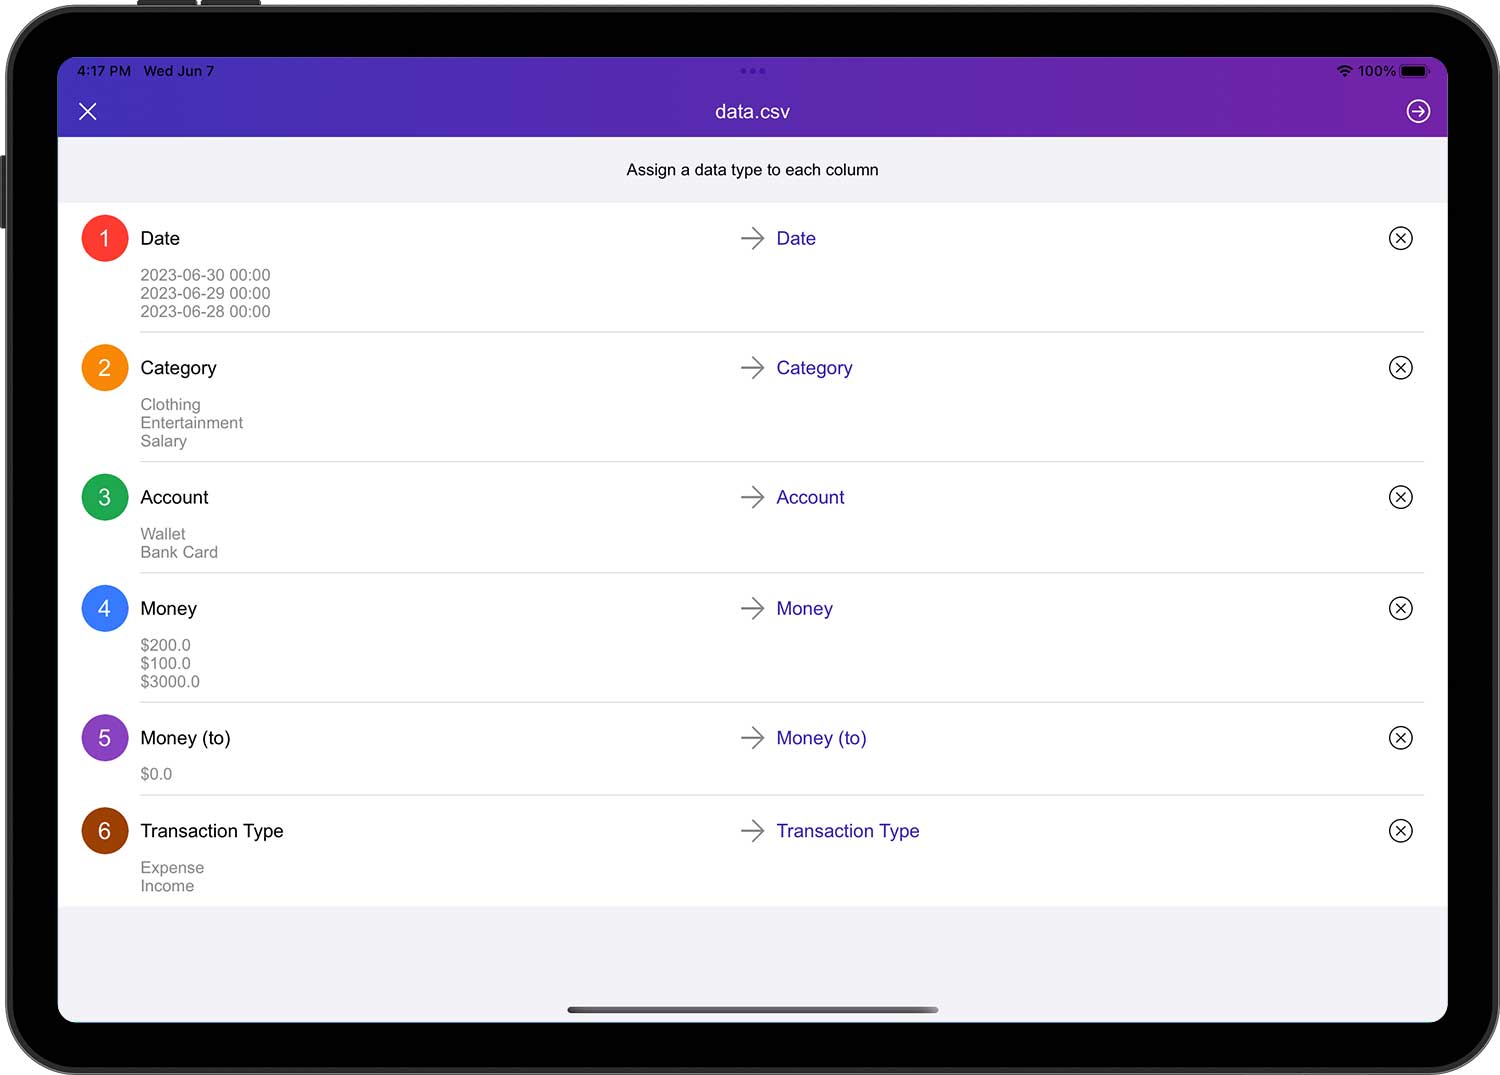
Tap the Next button in the upper right corner and DayCost 2 will automatically sort all the table rows for unique values and then bind the unique values of the table rows to the transaction type, category, account, etc. in DayCost 2 in turn.
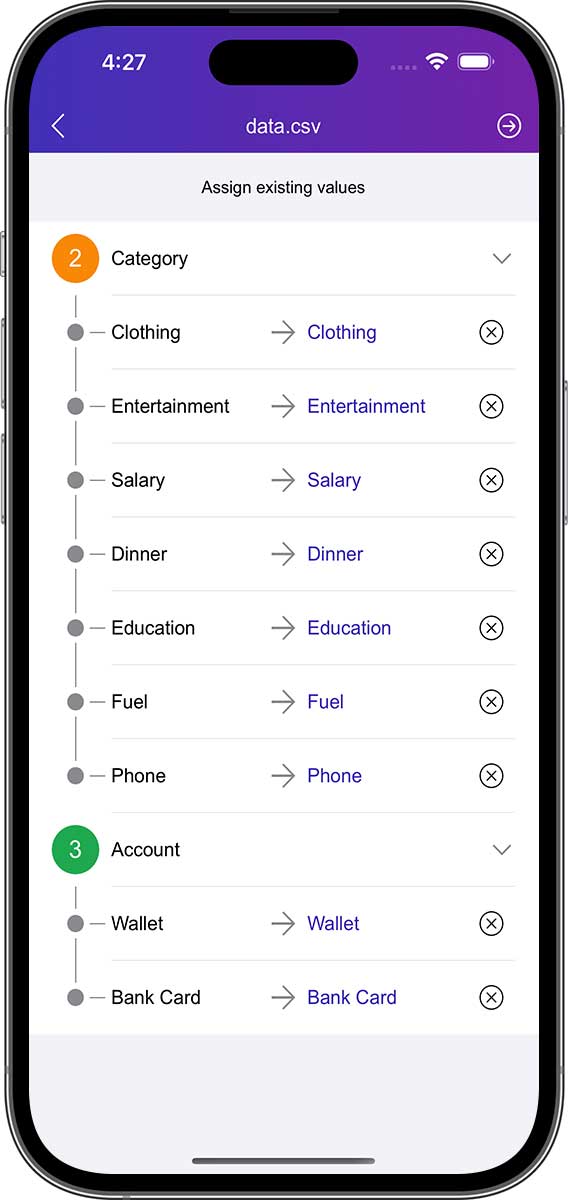
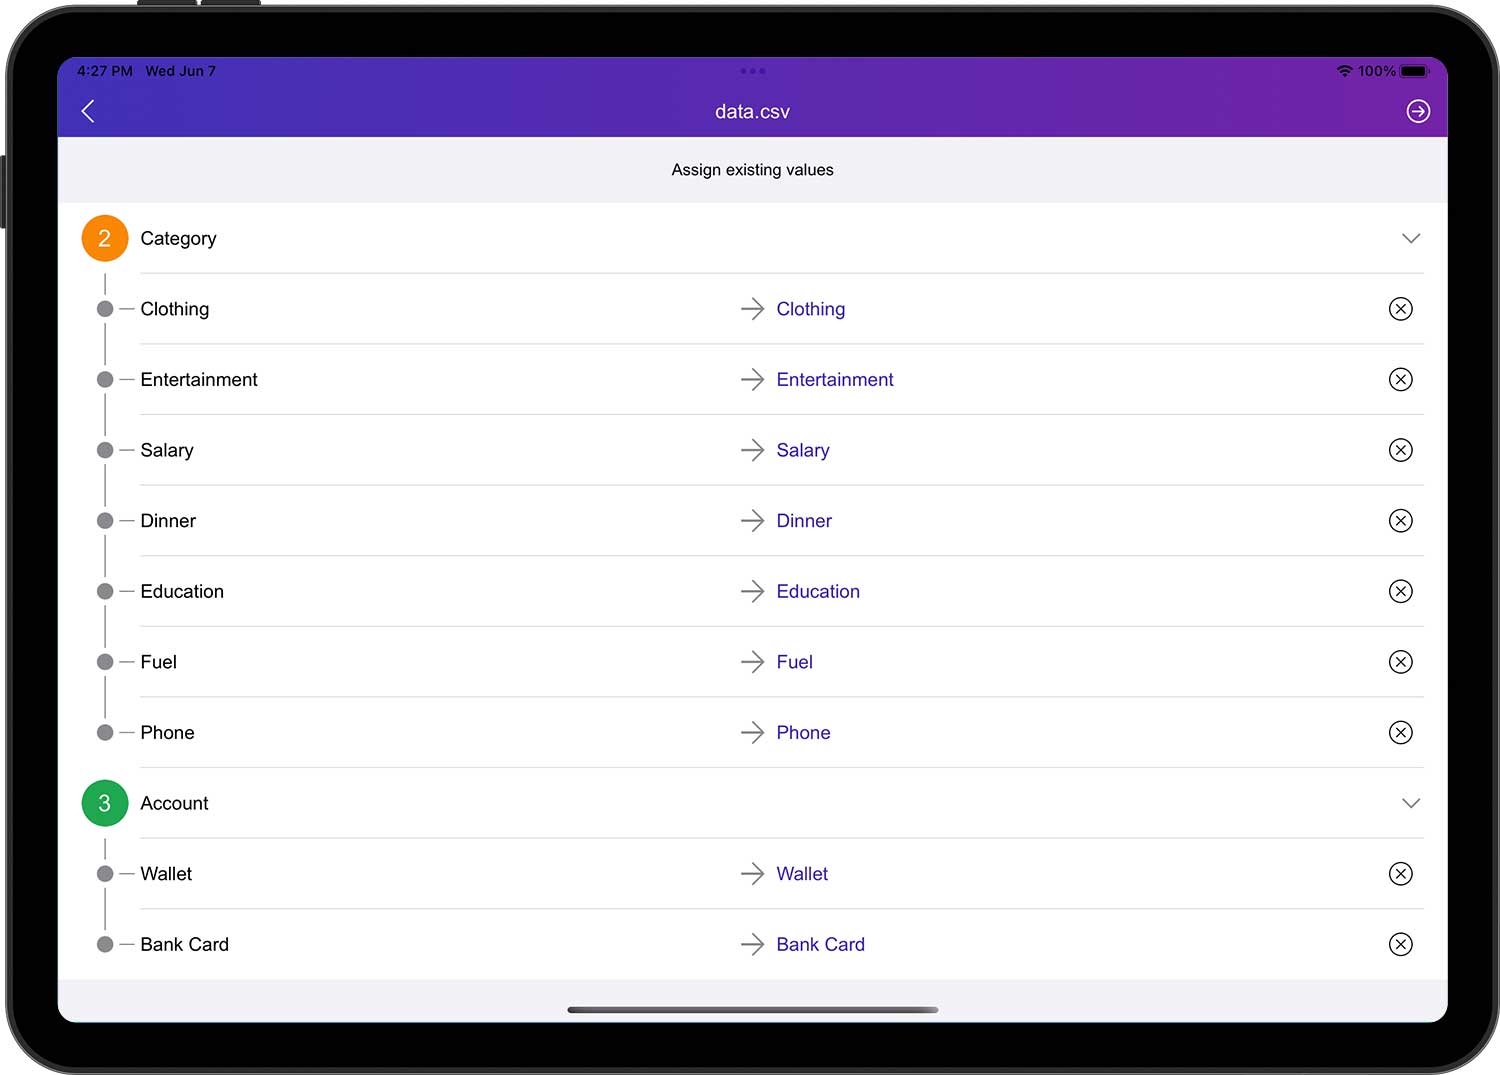
- If the unique value of a table row does not have a corresponding message in DayCost 2, DayCost 2 automatically creates the corresponding message based on the unique value (except for accounts).
- Since accounts contain several categories (payment accounts, credit cards, etc.), DayCost 2 doesn't know what categories you need, so it requires you to manually add new accounts. You can add them before importing or during the import process.
Tap the Next button to automatically generate a list of transactions, confirm that they are correct and tap the "✓" button in the upper right corner to complete the import operation.
Export:
You can export your financial data to CSV files or PDF files.
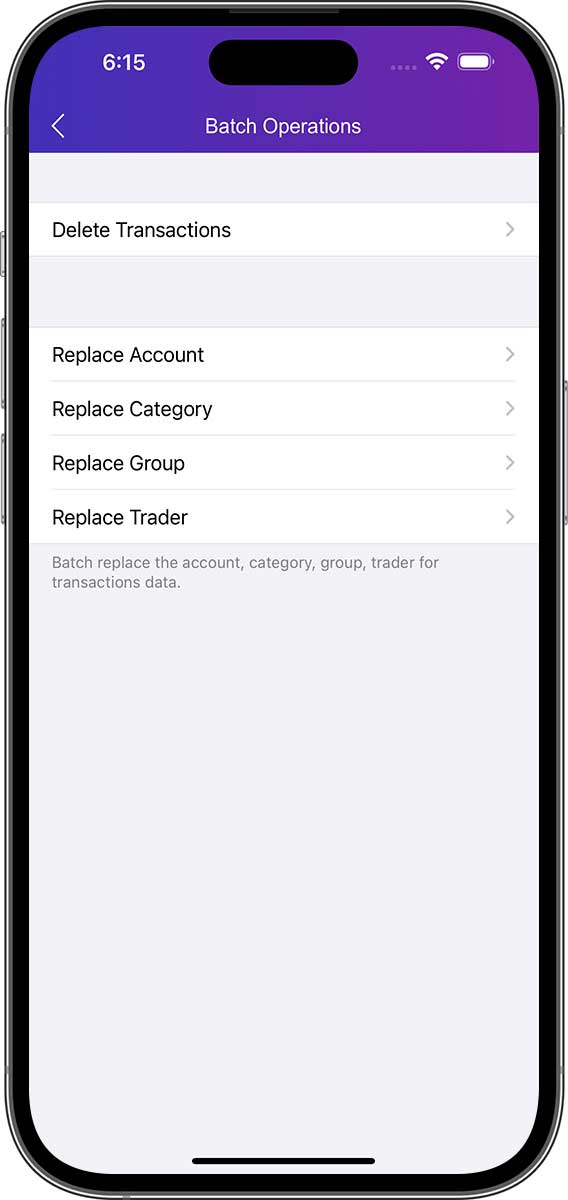
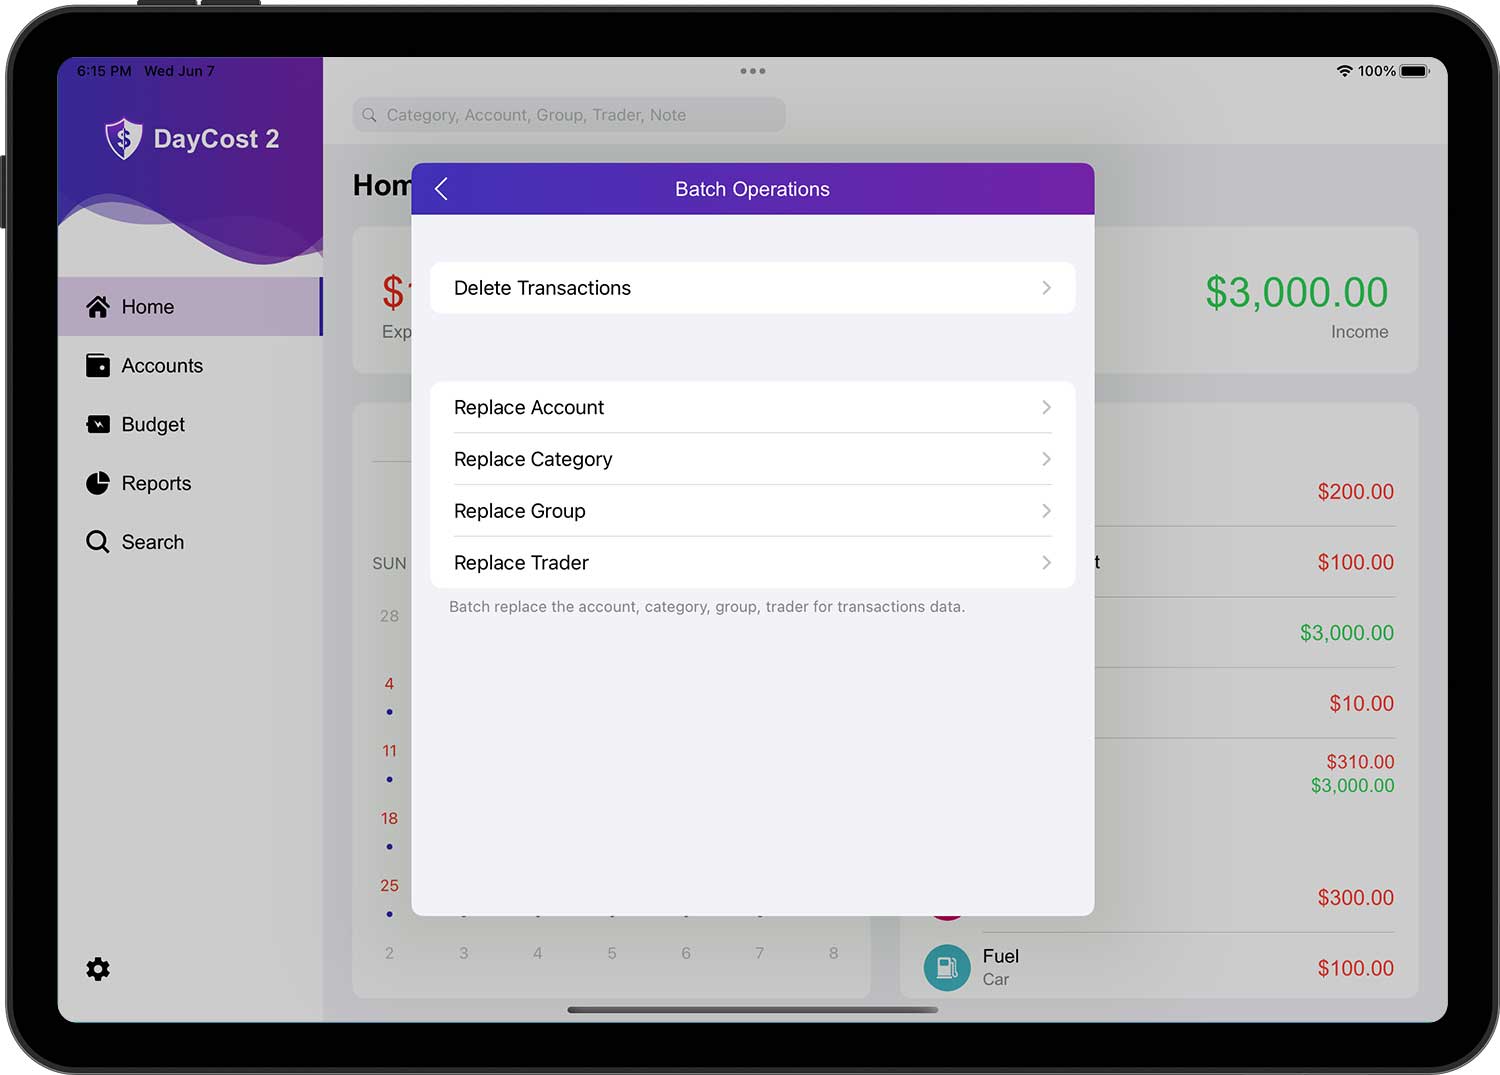
Batch Operations
If you need to delete or modify a lot of transaction data and they have the same characteristics, "Batch Operations" is your first choice, it will make the job easy and save you a lot of time.
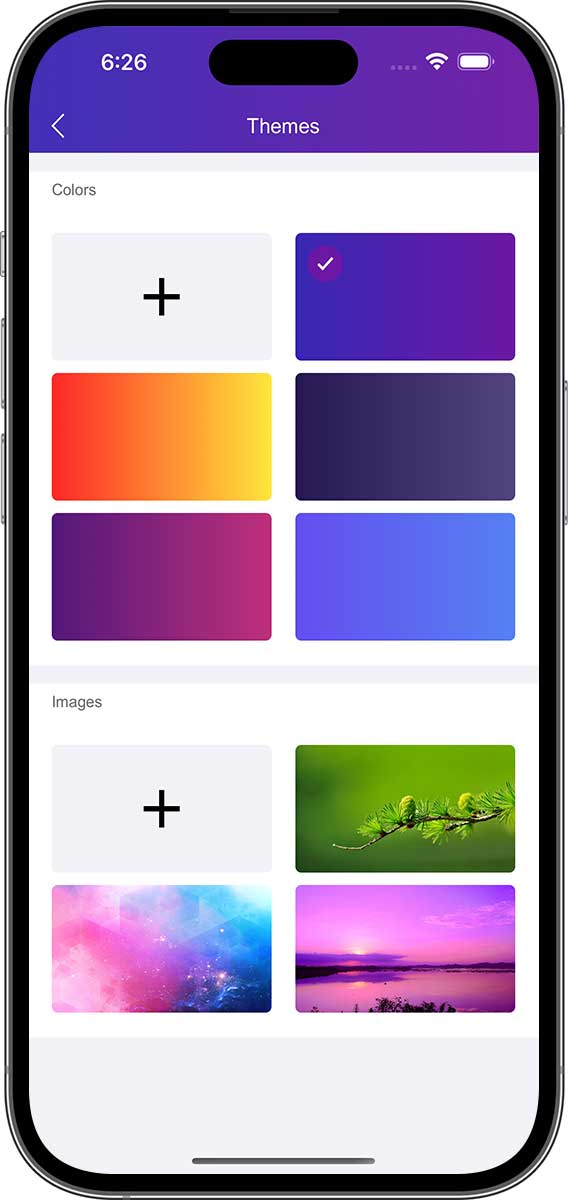
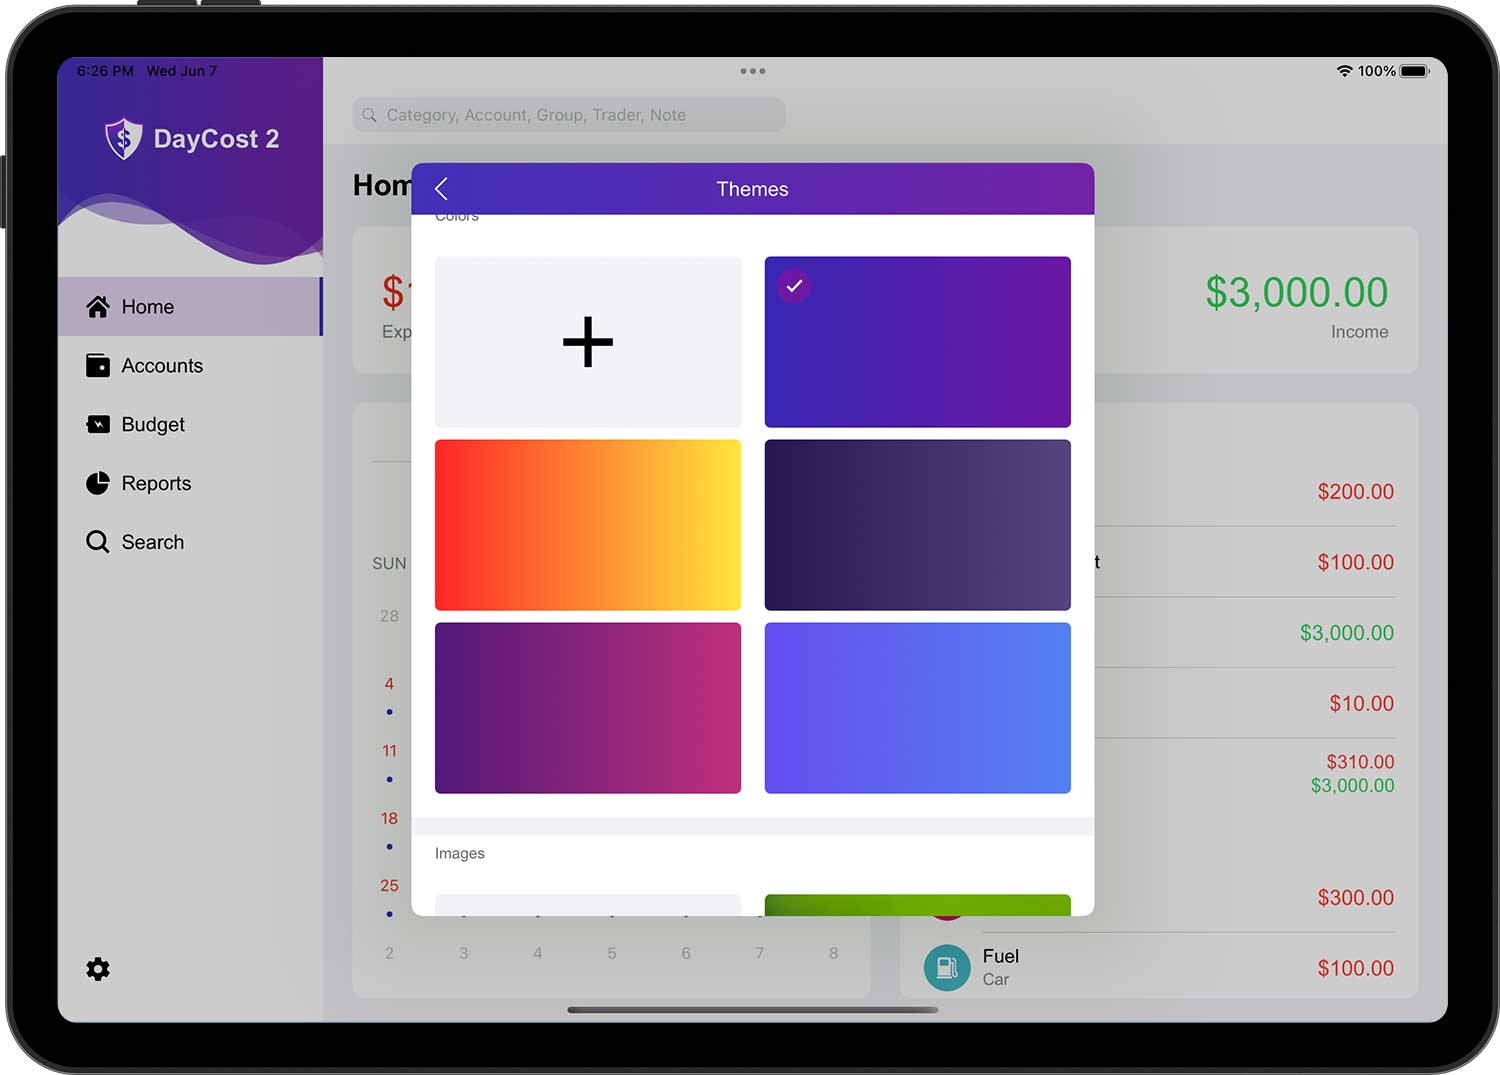
Themes
You can choose the built-in color and background image directly, or tap the "+" button in the color group to customize the color, or tap the "+" button in the image group to get a custom image from the camera/photo library. to get a custom background image from the camera/photo library.
Password Protection
If you don not want anyone to view your DayCost 2 data, you can set a password to protect your data. If you want to set a password, open the "Settings" ➔ "Passcode" page and tap "Turn on password" at the top.
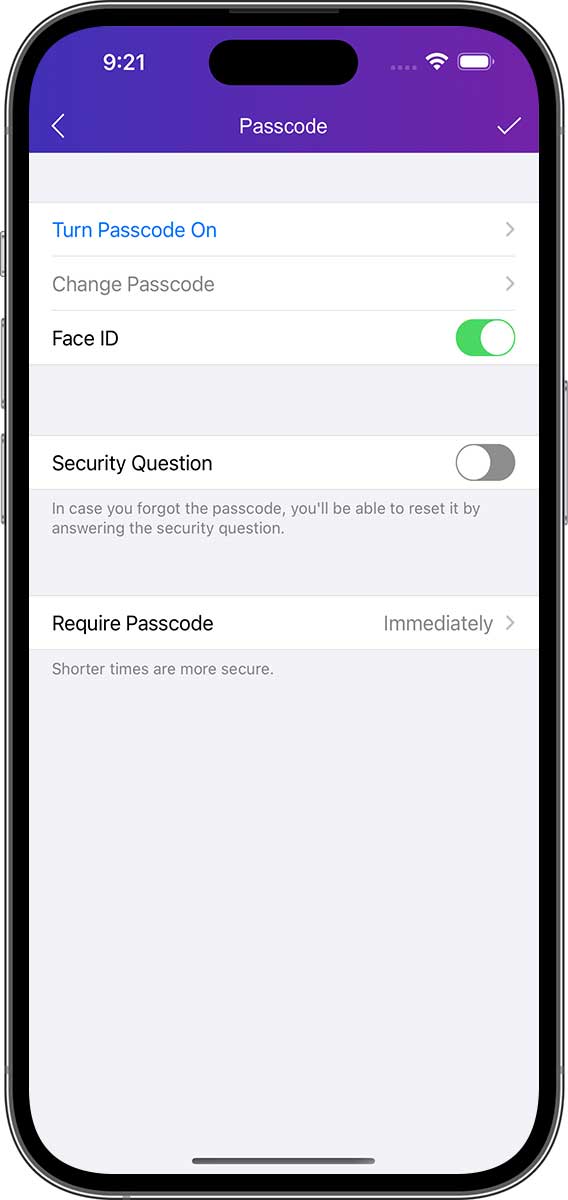
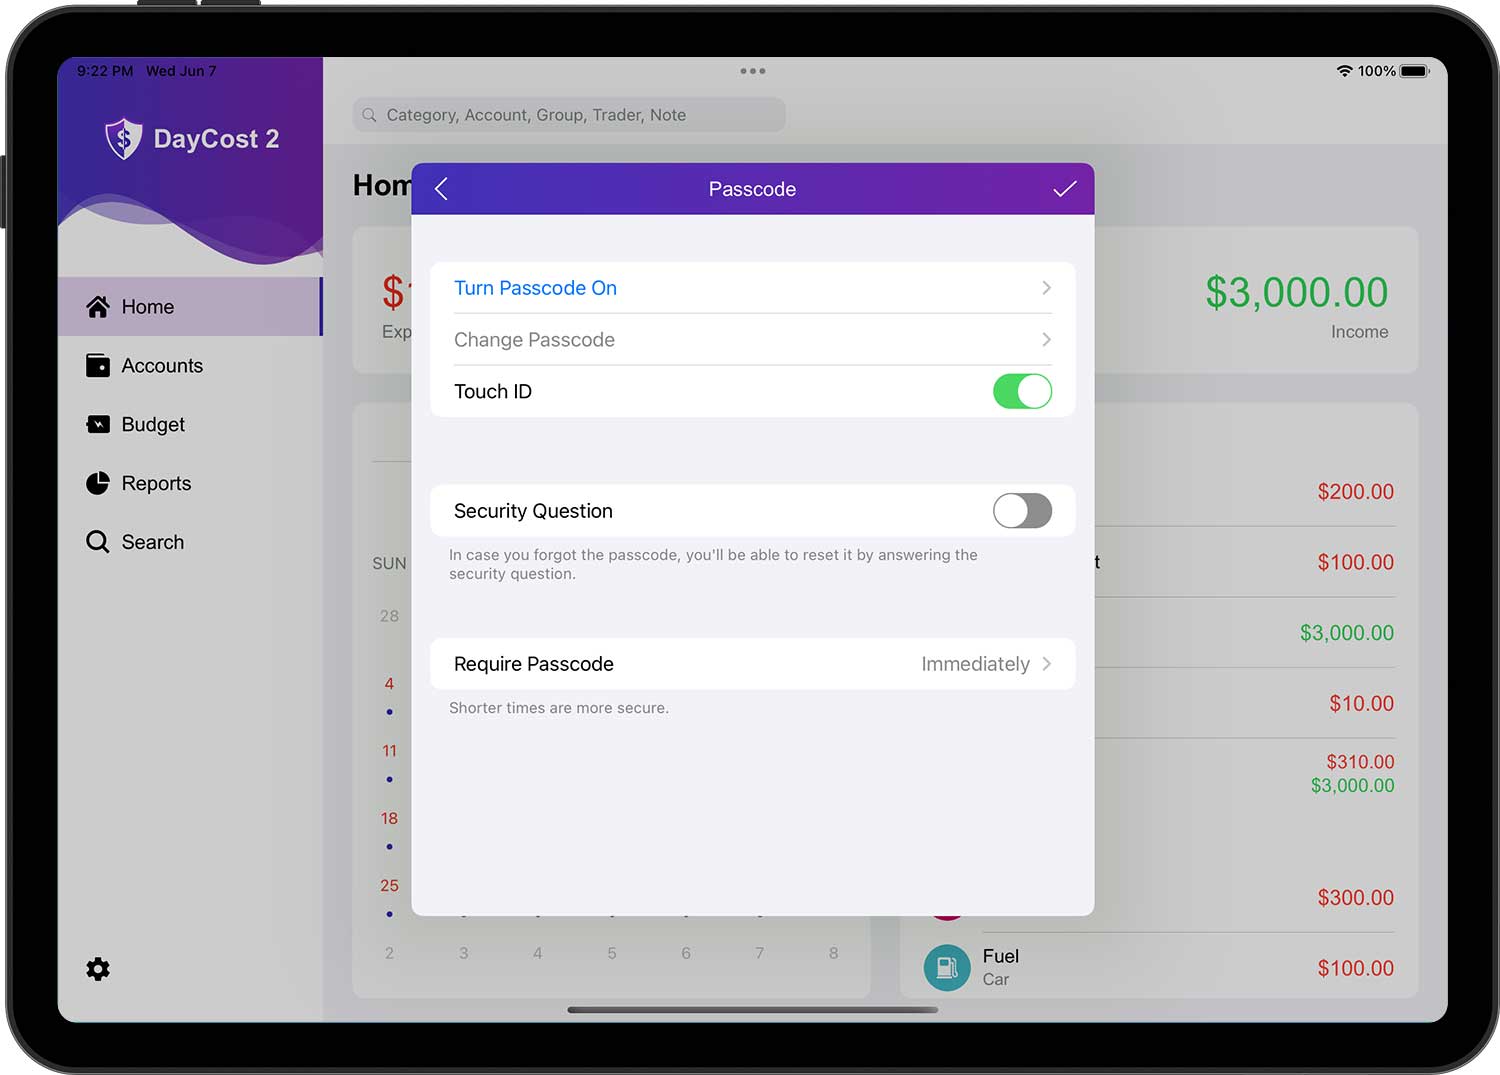
When you have entered all the information, tap the "✓" button in the top right corner to finish the operation.
We strongly recommend you to set "Security Question".This way, if you forget your password, you can still reset it by answering the security question. Because if you forget your password and don not set "Security Question", you won not be able to open DayCost 2, even if you delete DayCost 2 and reinstall it.
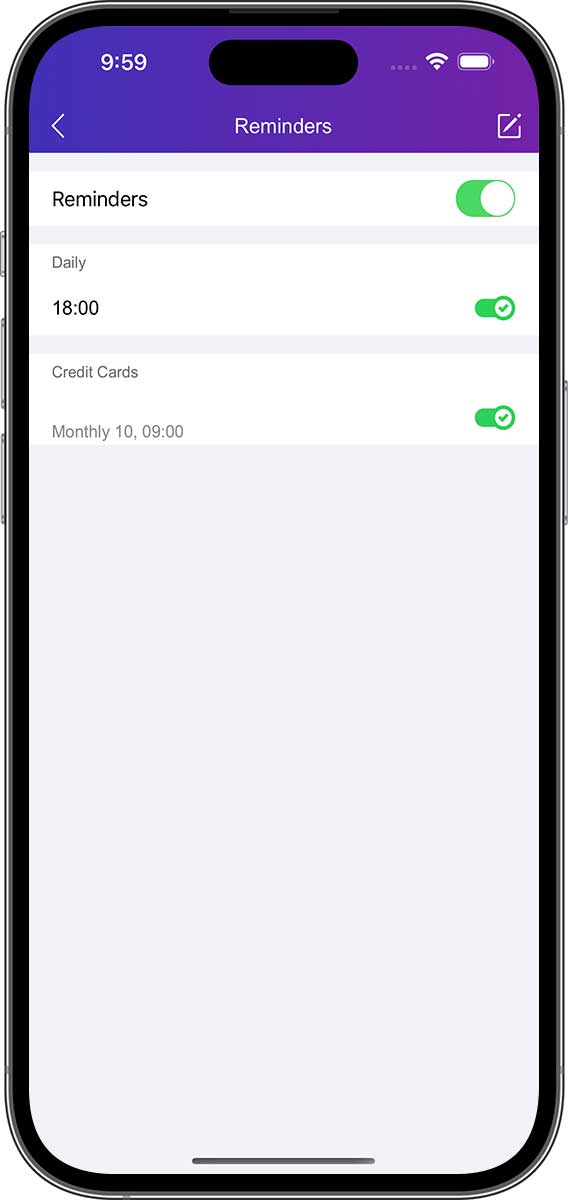
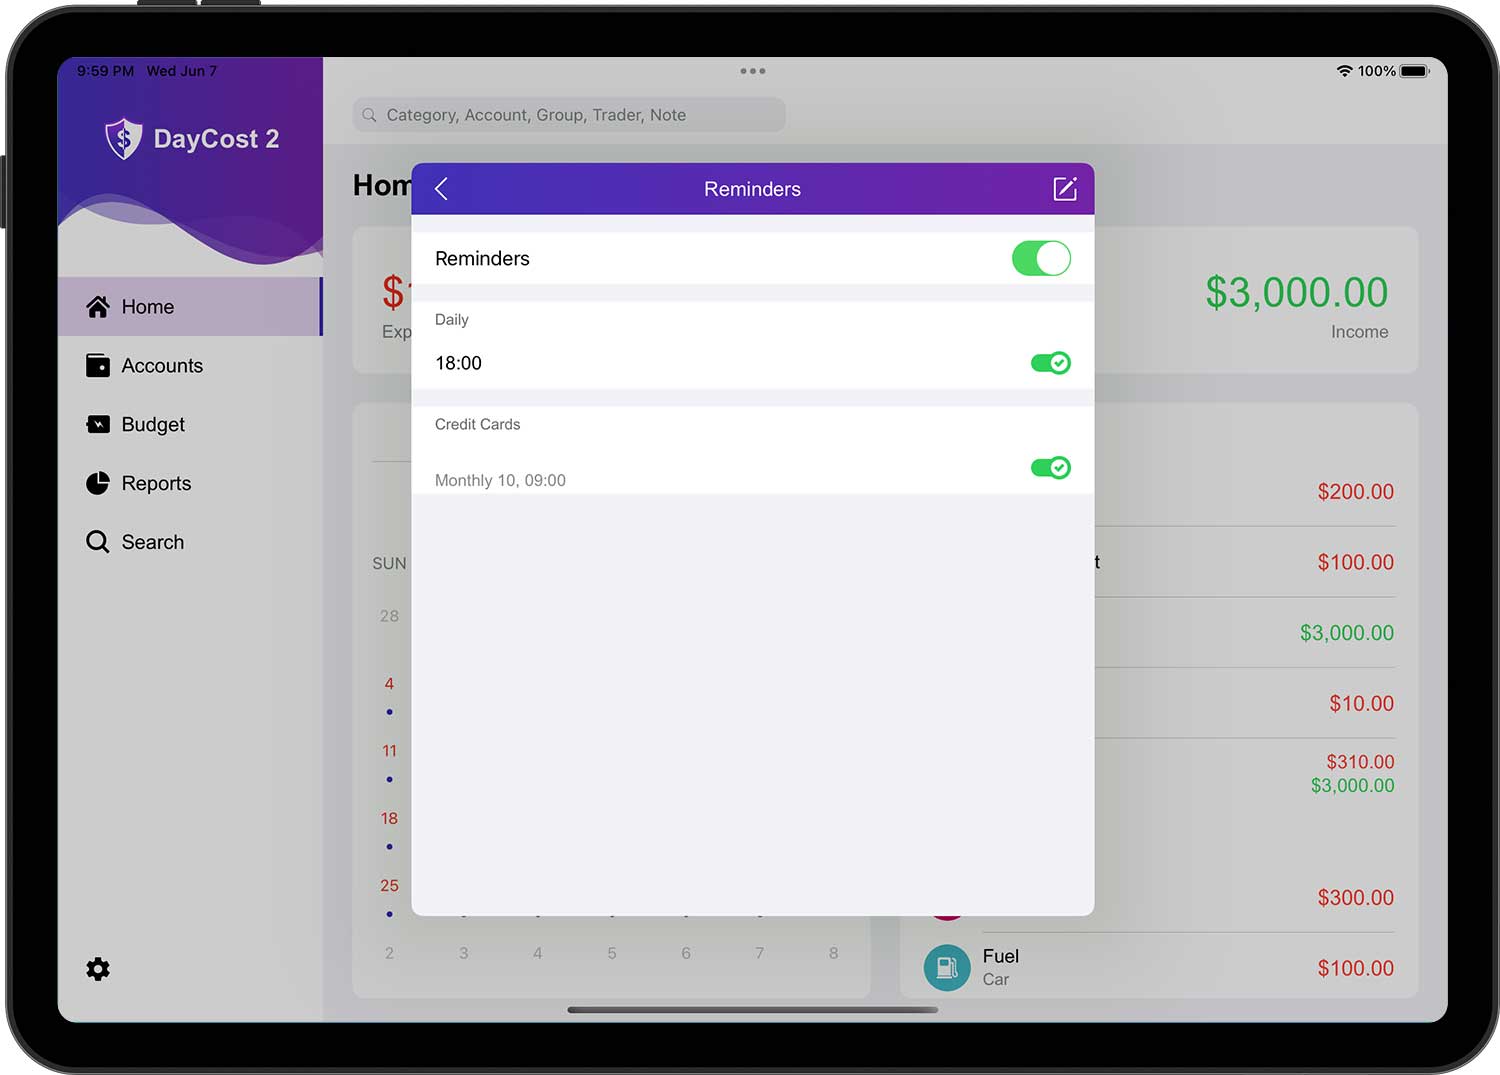
Reminders
You can open the "Settings" ➔ "Reminders" page to view and set reminders. Reminders include: daily reminders, payment reminders for credit cards, payment reminders for liability acquisition, and payment reminders for lend money.
- Daily: Send a notification message every day at the time you set. You can set multiple times and accordingly, you will receive multiple notification messages every day. The default is 18:00.
- Credit Cards: When you save your credit card account information, DayCost 2 will automatically add a reminder record. If the record already exists, it is updated.
- Liability Acquisition: After you save the transaction data of "Liability Acquisition" and set the "Repayment time", DayCost 2 will automatically add a reminder record. If the record already exists, it will be updated.
- Lend Money: After you save the transaction data of "Lend Money" and set the "Repayment time", DayCost 2 will automatically add a reminder record. If the record already exists, it will be updated.
Apple Watch
DayCost 2 is also available on Apple Watch.
You can open the "Settings" ➔ "Apple Watch" page (iPhone only) and set up the information that needs to be synced to Apple Watch. This includes: Categories, Accounts, Groups (optional), Traders (optional).
When you create trade data in Apple Watch and save it, the trade data will be automatically synced to the iPhone.
Support
If you still have other questions after reading this manual, please open the "Settings" ➔ "About" page and send us a message via "Feedback " to send us a message. Do you have any good ideas on how to improve DayCost 2? Again, please let us know via "Feedback"! We will carefully evaluate each of your suggestions to decide whether to improve the relevant features.
Please follow DayCost 2 on Facebook to get the latest information. Thank you again!